For added touch screen functionality we have created a toolbar that will show at the bottom of the device screen. This toolbar serves as additional area for designating pre-defined functions.
The file that controls the functions and labels of the toolbar is named extkeys.ini. The contents of this file (a simple ASCII format) simply list the button number, the text to be displayed on the button and the mnemonic to be issued when the button is used.
Disabling the extended keys toolbar can be done through the client or client settings.
In this example, replace statements within the < > with the appropriate information.

This would cause the first button to be labeled “Tab” and perform the [Tab] function (which moves the cursor position to the next field) each time it is activated.
The following is a sample layout of the extkeys.ini file. This file must be in a true txt file format. Any formatting information in the file will prevent it from being used by the client software. Any errors found on a line of the file will cause the line to be ignored.
[display]
font_size=8
[defaults]
button1=Tab,[tab]
button2=F Exit,[fldext]
button3=Enter,[enter]
button4=F1,[key=990100]
button5=F2,[key=990200]
button6=F3,[key=990300]
button7=F4,[key=990400]
button8=F5,[key=990500]
button9=F6,[key=990600]
button10=EXIT,[device-exit]
button11=HOME,[home]
button12=PgUP,[device-pageup]
button13=PgDN,[device-pagedown]
button14=KbMnu,[keyboard menu]
Please note that all mnemonics (the text in square brackets) should be lower case characters only.
The font_size option in this file will control the size of the characters used to describe each button. On small devices it is recommended that no more than 3 characters are used and on vehicle mounts or full screen devices no more than 5 characters. If more characters are used the software will center the text on the button and could cut off the edges on large fonts or long descriptions.
Android and iOS clients support two settings instead of just the font size, these can also control the button width. The min_width behavior is only obvious when you have tiny captions, like digits. The buttons will be much more narrow with a smaller min_width value. Larger font_size values should make taller buttons.
Note that any key code not listed in the keyboard map will perform the ASCII value represented by the center two characters. For example, the code [key=993199] would perform an ASCII 31, which is a number 1. An entry of [key=FF32FF] would perform an ASCII 32, which is a number 2.
Mappable Mnemonic options:
Each button on the toolbar may be configured to perform one of the following actions:
| Cursor Positioning | Paging Support | Function Keys | Custom Options |
| [backspace] | [device-up] | [pf1] | [call1] |
| [tab] | [device-down] | [pf2] | [call2] |
| [clear] | [device-left] | [pf3] | [call3] |
| [down] | [device-right] | [pf4] | [device-exit] |
| [left] | [device-pageup] | [pf5] | [keyboard menu] |
| [right] | [device-pagedown] | [pf6] | [staylinked menu] |
| [up] | [device-pageleft] | [pf7] | [toggle_sip] |
| [delete] | [device-pageright] | [pf8] | [switch_session] |
| [enter] | [device-fullup] | [pf9] | [disconnect_device] |
| [eof] | [device-fulldown] | [pf10] | [minimize_client] |
| [fldext] | [device-fullleft] | [pf11] | [execute_program] |
| [home] | [device-fullright] | [pf12] | [increase_font] |
| [insert] | [device-followcursor] | [pf13] | [decrease_font] |
| [pageup] | [pf14] | [renegotiate] | |
| [pagedn] | [pf15] | [soft_trigger] | |
| [printhost] | [pf16] | [key=xxxxxx] | |
| [reset] | [pf17] | [keyboard_qwerty] | |
| [char ndbackspace] | [pf18] | [keyboard_numsym] | |
| [pf19] | [keyboard_numpad] | ||
| [pf20] | [keyboard_fkeys] | ||
| [pf21] | [keyboard_ctrl] | ||
| [pf22] | [keyboard_cycle] | ||
| [pf23] | [tile_show] | ||
| [pf24] | [tile_show #,#] | ||
| [tile_hide] | |||
| [tile_toggle] | |||
| [tile_prev] | |||
| [tile_next] | |||
| [tile_cycle] | |||
| [tile_refresh] | |||
| [disabled] | |||
| [menu_hide] | |||
| [menu_show] | |||
| [hide] | |||
| [device-exit-all] |
The number of keys will vary depending on the size of the device display. Typical configurations will have 8 available buttons, with vehicle mounts having a maximum of 14 keys. The default toolbar appears with F11-F24 if the extkeys.ini file is not found. Each button will appear as the default function key if any errors in formatting are found in that line of the extkeys.ini file.
While many of the settings are self-explanatory, the following may be helpful in some environments:
[soft_trigger] – Activates the device’s scanning laser as though the trigger had been depressed.
[renegotiate] – Toggles the display between the maximum and configured font sizes.
[minimize_client] – Moves the StayLinked client to the background and displays the device desktop.
[device-exit] – Ends the StayLinked session and the telnet session. Always requests confirmation.
[toggle_sip] – Hides or shows the Soft Input Panel, also known as the on-screen keyboard.
[disconnect_device] – Disconnects the client from the server but leaves the telnet session active. The device will return to the last state once it is re-connected to the StayLinked server.
[execute_program] – This option must be accompanied by a program call configured in the staylink.ini file.
[key=xxxxxx] – Acts as a keyboard key by generating a code that can be configured in the Administrator keyboard definition for the specific device type.
[device-exit-all] – This mnemonic is available for multi-session configurations, allowing the user to end all sessions with a single input (requires client v15.3 or newer).
[menu_hide] – Hides the menu bar. Requires client version 15.3 (Android build 230 or newer).
[menu_show] – Displays the menu bar. Requires client version 15.3 (Android build 230 or newer).
[char ndbackspace] – Non-destructive character backspace (requires server v15.5 or newer).
SmartKeyboard Commands:
[keyboard_XXXXX] These various commands will show the keyboard type defined in the mnemonic, or hide that keyboard if it the current keyboard.
SmartTile Commands:
[tile_show #,#] – This will take the user directly to a tile collection ID and page, as entered in the number options. For example, [tile_show 4,3] would display page three of tile collection four. [tile_show ,3] – would display page three of the current collection. [tile_show] would show the current page in the current collection.
[tile_hide] – This removes the current tile from the screen, allowing the user to see the emulation space. Once hidden, the user would need to select an extended keys or keyboard map entry to show a new collection and page.
[tile_toggle] – This is a combination of the hide and show mnemonics which will hide the tile if it is currently displayed, or show it if it was currently hidden.
[tile_prev] – Displays the previous page in the current SmartTile collection. Using this mnemonic on the first page will wrap back to the last page of the current collection.
[tile_next] – Displays the next page in the current SmartTile collection. Using this mnemonic on the last page will wrap back to the first page of the current collection.
[tile_cycle] – This mnemonic works much like the next option, except that it includes a blank or hide option after the last page of the collection.
[tile_refresh] – Used primarily during initial testing and design, this mnemonic will request the latest copy of the collection page from the StayLinked server. This allows you to immediately see any changes on the collection page on your device without having to change pages or reconnect.
Alternating Pages in Screen Designs
Note that the mnemonics for [device-pageright] and [device-right] can be used to alternated between screen designer pages of the same size. Likewise [device-pageleft] and [device-left] both work to return backwards through these designer pages when more than two pages are created of the same screen size.
Distributing toolbar configurations
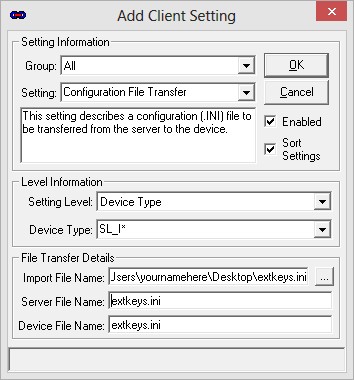
Toolbar configurations can be standardized by creating a client setting that distributes the extkeys.ini file. This is done in the StayLinked Administrator and will be pushed to qualified devices when a new session is started. The sample dialogue on right can be found by creating a new setting in the Administrator’s Client Settings section. Details on this and other features of the Administrator can be found in the Administrator User’s Guide in the Documentation section of our downloads site.
To copy the configuration of the toolbar from one device to another, simply copy the desired extkeys.ini file into the StayLinked directory of the destination computer. This is easily completed if you start a StayLinked session and use the reliable file transfer to copy the file to the desired devices. Please note that the client software will store your settings file in persistent space if you transfer the file from the StayLinked Administrator.
If changes are made to this file they will not take effect until the StayLinked device software is restarted, which can also easily be done from the StayLinked Administrator.
Share the post "Client Guide – Extended Keys"