This section describes the various methods provided to centrally manage your client sessions. Topics include selecting and viewing a list of connected sessions.
Selecting a Connection List Group Option
When you select Connections from the server tree or the Manage menu, a list of connection group options will appear in the main display panel. Also, if you expand the Connections branch of the server tree (by clicking on the ‘+‘ sign), the list of connection group options will appear in the server tree, indented below the Connections branch.
These group options allow you to subset your list of connections by device IP address subnet, by device type, or by device group. You can also view all connections without grouping. If you select a group option, a list of groups will appear in the main display panel. The list will contain all the groups that currently have a session connection. For example, you may have 10 device groups defined, but only two of them currently have a device with a connected session, so only those two groups appear in the list.
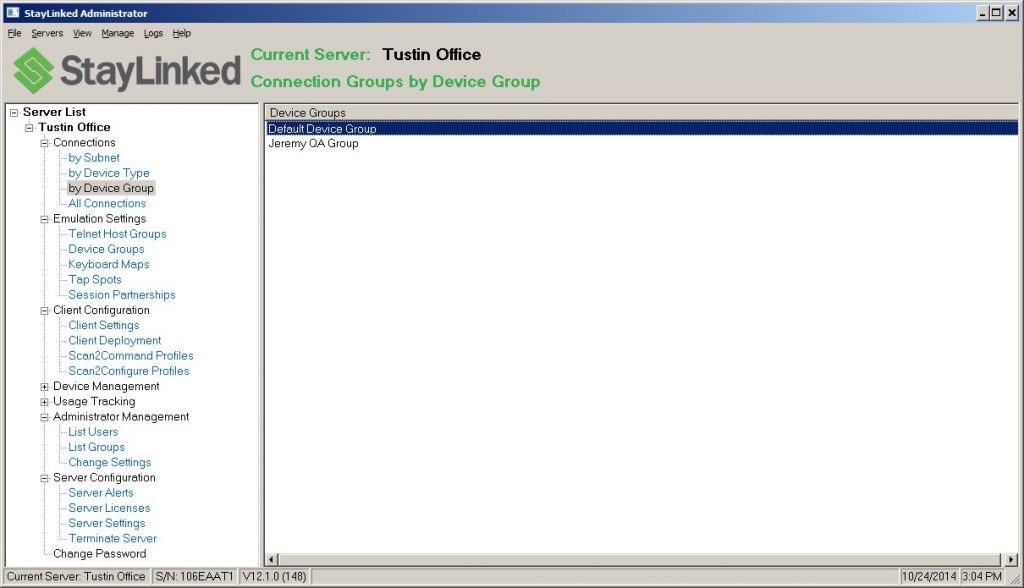
Select a group by double clicking on the group name in the list. A list of connections that belong to the selected group will appear in the main display panel.
Connections by Subnet – Subnet Description
When you select the option to display connections ‘by Subnet’, a list of subnets is displayed that reflect the currently connected devices. You can assign a description to each of these ‘subnets’ by right-clicking on the subnet row and selecting the ‘Edit Description’ menu option. The description that you enter will be stored with, displayed on and affect only your Administrator installation.
The Connections List
After selecting your connections group, a list of the currently running sessions is displayed. The list contains many columns of useful information about the session and the device. You can also double click on a specific session in the list to view the details in a separate window.
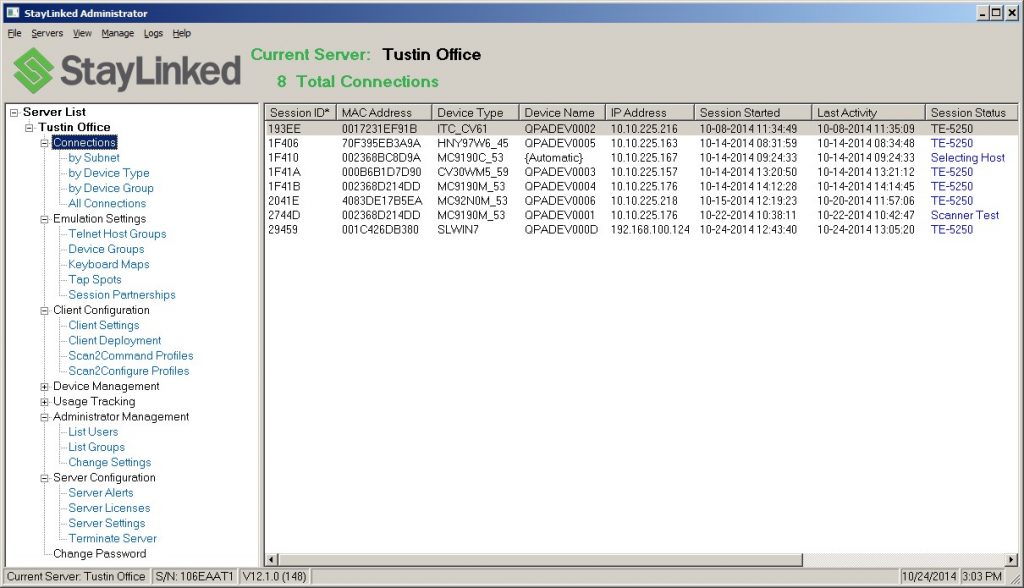
The Connections List information can be sorted into ascending or descending order by clicking on any of the column headers. The currently sorted column will be indicated by an asterisk (*). You can also drag the columns into any arrangement that you desire. The information displayed in the columns of the list and in the Connection Details list includes the following:
- Session ID – A unique identifier for the session.
- Device Type – The code that identifies the specific type of the device.
- Device Name – The Device Name that has been assigned to the device in the Device Group. Often used for the 5250 Device Description (*DEVD) name associated with the device. This value will be displayed as ‘{Automatic}’ if the device is not assigned a device name.
- MAC Address – The hardware address of the network interface contained in the device.
Note that some device operating systems do not provide visibility of the hardware network address. This value may reflect a different unique identifier provided by the device OS. - IP Address – The IP address assigned to the TCP/IP stack in the device. If the device is running behind a NAT server, then this value will reflect the PublicIP – PrivateIP.
- Session Started – This is the date and time when the session was established.
- Last Activity – This is the date and time of the last activity on the device, keystrokes, etc.
- Session Status – The status of the StayLinked session. The status text is color-coded to display in ‘black’ if the device is likely powered-on and available. The status text will be displayed in ‘blue’ if the device is likely powered-off and unavailable.
- Client Version – Identifies the version and build of the StayLinked Client software that is running on the device.
- User ID – Identifies the user of the device. The contents of this column depend upon the ‘Device Identification’ setting for the StayLinked Server. If ‘Device Identification’ is enabled, then this column will display the value that the user provided when the connection was established. You can also populate this column by using functions of the ‘Screen Recognition’ feature set. Otherwise, this column will always display ‘[unidentified]’.
- Device Mgmt ** – Identifies the status of ‘Device Management’ software that might be running on the device. This column will be displayed only when Device Management licensing is installed on the server.
** Note that Device Management features have been discontinued as of September, 2015 and removed from the product effective v15.1 build 208.
The Connections List Menu
When you click on the Connections branch of the server tree, or the blank area of the connections list, a small menu will appear with certain options that affect the connections list.
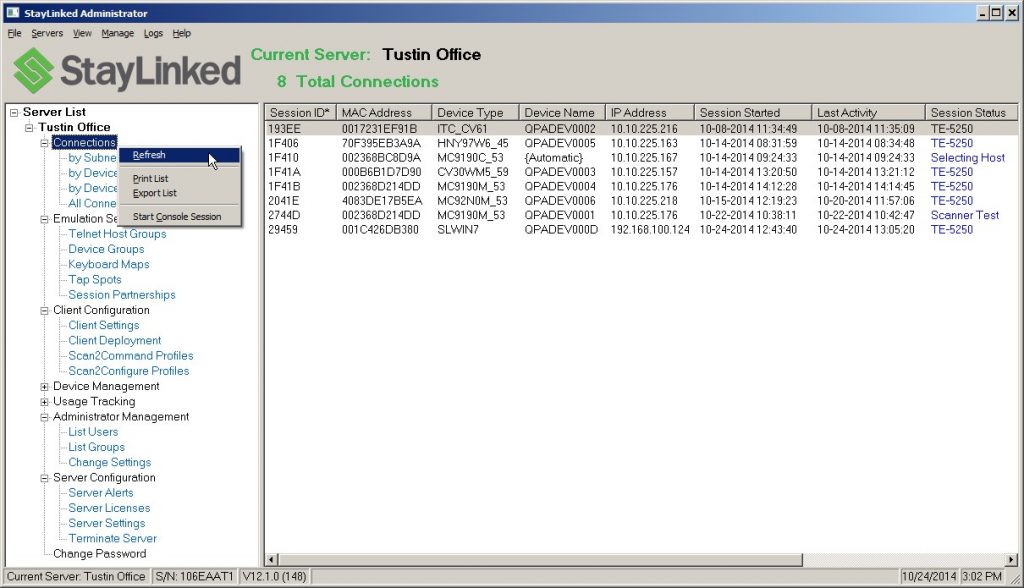
Refresh – This menu option will cause the currently displayed connections list to be refreshed from the server. There is no automatic or periodic refresh of this data, so you will need to take this option or press F5 whenever you want to get the latest connection list.
Print List – This menu option will send the list of connected devices to a report on your current Windows default printer. The report will include columns for Device Type, Device Name, MAC Address, IP Address, Client Version and User/Device ID.
Export List – This menu option will export the list of connected devices to a ‘Comma Separated Variable’ (.csv) file of your choice. The export will include all the connections and columns that are displayed in the Connections List. This format is appropriate for import into common spreadsheets and databases.
Start Console Session – This menu option will establish a connection to the current StayLinked Server using the built-in StayLinked DOS or Java Console Client. This feature provides an easy way for the administrator to confirm the operation of the StayLinked Server. The StayLinked Console Client runs on the Administrator PC and is a fully functional StayLinked Client for Windows.
Note: Start Console Session does not work with TESS emulations.
When you are finished running a Console Session, press the ‘Esc’ key to “Quit Session” and then press the ‘Y’ key to end the session. Finally, press the ‘0’ key to exit the Console Client (DOS) or select the File->Exit menu option (Java).
Connections Menu
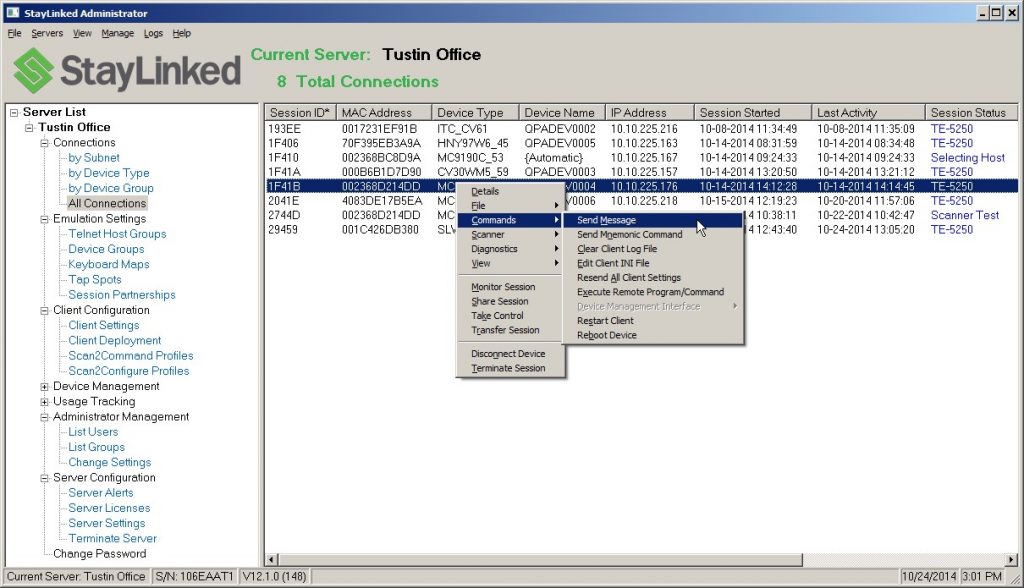
When you view the connections list in the main display panel of the Administrator, the Connections menu is available by clicking the right mouse button over the specified connection in the connections list. Some menu options will function over multiple selections, which means you can highlight multiple connections in the list and then right mouse click. The Commands, Diagnostics, Device Disconnect and Session Terminate menu options will then process all of the selected connections.
When selecting and terminating multiple sessions, the Administrator will display a progress bar. Sessions will be terminated at a rate of one-per-second until all selected sessions have ended, as displayed by the progress bar.
Connections Menu – Details
The first item in the connections menu is the Details window. Select this option to open a window showing details about a particular connection. As noted above, this is the default menu option, which means you can open the Details window by double-clicking a connection list entry. You may open multiple Detail windows at one time as desired.
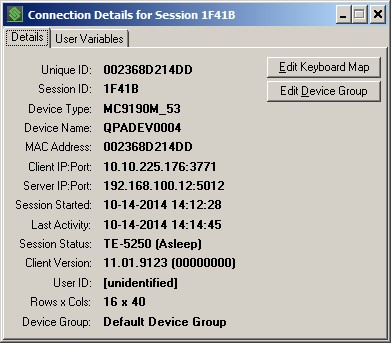
Details Tab: This tab displays information about the device, connection and session.
- You can right-click on Session ID, Device Type, Device Name, MAC Address and Client IP to copy any of these values to the clipboard.
- You can double-click on the Client IP Address to attempt a ‘Reverse DNS’ to resolve a ‘host name’ for the client device.
Edit Keyboard Map: Click this button to launch the Keyboard Map editor for this connection.
Edit Device Group: Click this button to launch the Device Group editor for this connection.
User Variables Tab: This tab will display any defined ‘User Variables’ that have been assigned for this connection. User Variables are implemented using Host APIs and Screen Recognition features.
Connections Menu – File
Select this option to send a file to the client or receive a file from the client.
File: Send to Device – This panel allows the administrator to send files to the device using the StayLinked Reliable protocol. The files will be stored on the writable media on the device.
NOTE: This option is also available using ‘drag-and-drop’ from Windows Explorer.
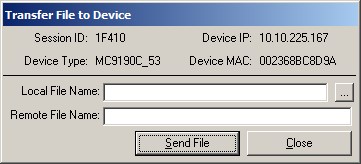
- Local File to Send: This is the full path to the file that will be sent to the device. You may use the Browse button to locate this file.
- Remote File Name: This is the name of the file that will be stored on the device. You can include the file path. The path must exist on the device and be writable on the device.
- Send File Button: Click this button to send the file to the device.
- Close Button: Use this button to close the ‘Transfer File to Device’ dialog.
File: Receive from Device – This panel allows the administrator to receive files from the device using the StayLinked Reliable protocol. The files will be retrieved from the writable media on the device.
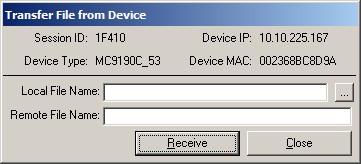
- Local File Name: This is the full path to the file that will be received from the device. You may use the Browse button to specify this file name.
- Remote File Name: This is the name of the file that will be retrieved from the device. You may include the file path.
- Receive Button: Click this button to receive the file from the device.
- Close Button: Use this button to close the ‘Receive File from Device’ dialog.
Connections Menu – Commands
Select this option to perform any of the following commands with one or more selected devices in the connection list:
- Send Message
- Send Mnemonic Command
- Clear Client Log File
- Edit Client INI file
- Resend All Client Settings
- Execute Remote Program/Command
- Device Management Interface -> Start/Stop
- Restart Client
- Reboot Device
Commands: Send Message – This panel allows the administrator to send administrative messages to the selected devices. The message will appear on the device screen and you will be required to press a specific key combination to answer the message and proceed. A typical use for this feature is to notify a device user that a software update is about to be installed.
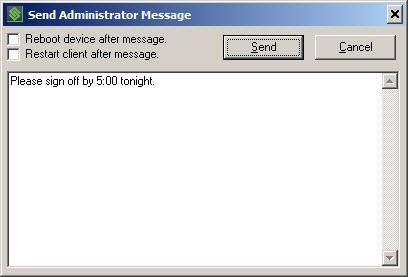
- Reboot device after message: This option allows the administrator to have the device automatically reboot after the device user answers the message. After rebooting, the device will automatically reconnect to the same session and display the same screen and cursor to the device user. You can seamlessly continue the previous task after the reboot and reconnect is completed.
- Restart client after message: This option allows the administrator to have the client software automatically restart after the device user answers the message. After restarting, the device will automatically reconnect to the same session and display the same screen and cursor to the device user. You can seamlessly continue the previous task after the restart and reconnect is completed.
- Message Text Box: Type your message into this text box.
- Send Button: Click this button to send the message to the device.
- Cancel Button: Use this button to close the ‘Send Administrator Message’ dialog.
Commands: Send Mnemonic Command – This panel allows the administrator to send mnemonic commands to the telnet sessions running for the selected device. The mnemonic command will be transmitted to the telnet host after substitution script processing. A typical use for this feature is to test VT escape sequences for specific functions against the telnet server and application.
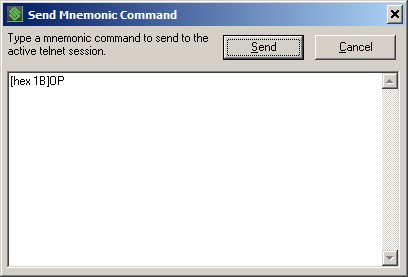
- Send Button: Click this button to send the mnemonic command to the telnet session.
- Cancel Button: Use this button to close the ‘Send Mnemonic Command’ dialog.
Commands: Clear Client Log File – This command causes the log file on the client to be cleared. The client log file is named staylink.log and is stored on the device’s writable media. StayLinked Support generally uses the client log file for debugging and problem analysis.
Commands: Edit Client INI File – This panel allows for quickly editing the Client Configuration File. The Client Configuration file is named staylink.ini and is stored on the device’s writable media.
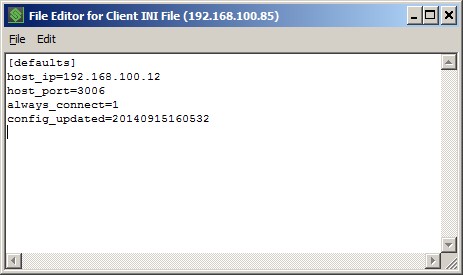
- File -> Save Changes to the Device: Select this menu option to cause the edited Client INI file to be saved and the file to be transferred back to the device. The device must be awake and on the network in order to transfer the file back to the device.
- File -> Exit: Select this menu option to close the dialog without sending any changes.
- Edit -> Find and Edit -> Find Again: Select this menu option to preset a ‘Find’ dialog that will search the configuration file for your desired text.
Commands: Resend All Client Settings – This command causes the server to send all active client settings to the client device, replacing any previous values found there. This is an override to the existing “smart” client settings update that occurs during the device connection request. This command will not trigger a transmission of any ‘Configuration File Transfer’ client settings.
Commands: Execute Remote Program/Command – This command allows you to specify a command to run locally on the device. The command can call a program that is installed on the device or invoke a local OS command on the device. Please note that commands that are valid on one OS (DOS) may not be valid on another OS (PPC, iOS, Android).
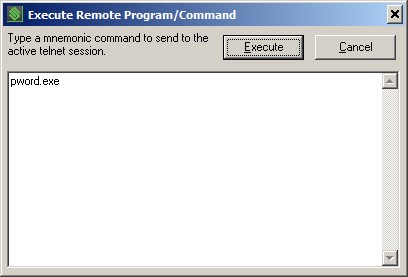
- Show ‘Press Any Key’: This option will cause a ‘Press any key’ message to be displayed on the client device after the command has been executed.
- Clear Device Screen: This option will cause the screen to be cleared on the client device prior to executing the command.
- Command Text Box: Type the command/program to call into this text box.
- Execute Button: Click this button to send the command to the device.
- Cancel Button: Use this button to close the window.
Commands: Device Management Interface -> Start/Stop – These commands are only available if the client is running the tightly integrated StayLinked Device Management components. Using these commands, the Device Management Interface (service) on the device can be stopped and started. (removed v15.1 build 208)
Commands: Restart Client – This command causes the client software to exit the active session and return to the Main Menu. The active session will not be terminated. When the device user selects the ‘Connect to Host’ option on the Main Menu, the device will automatically reconnect to the same session and display the same screen and cursor to the device user. The user can seamlessly continue the previous task after the reboot and reconnect is completed.
Commands: Reboot Device – This option allows the administrator to have the device automatically and immediately reboot. After rebooting, the device will automatically reconnect to the same session and display the same screen and cursor to the device user. The user can seamlessly continue the previous task after the reboot and reconnect is completed.
Connections Menu – Scanner
Select this option to initiate any of the following scanner laser functions on one or more selected devices in the connection list (only applies to devices that support soft-scan laser functions):
- Trigger a Soft Scan
- Disable Scanner Laser
- Enable Scanner Laser
Connections Menu – Diagnostics
Select this option to initiate any of the following diagnostic utilities on one or more selected devices in the connection list:
- Radio Stats
- Echo Test
These tools are described in detail in the Client User Guide that matches the client version on the target devices.
Connections Menu – View
View: Radio Config – This option allows the administrator to view the contents of the Radio Configuration file. The Radio Configuration file is named pkt.ini and is stored on the device’s writable media. Some devices do not utilize a pkt.ini file and in this case, you will get a ‘File Not Found’ message when you try to view the file. Or, the client may be designed to synthesize a pkt.ini file and will provide that file containing important radio configuration information.
View: Network Config – This option allows the administrator to view the contents of the Network Configuration file. The Network Configuration file is named net.cfg and is stored on the device’s writable media. Some devices do not utilize a net.cfg file and in this case, you will get a ‘File Not Found’ message when you try to view the file. Or, the client may be designed to synthesize a net.cfg file and will provide that file containing important network configuration information.
View: Client INI File – This option allows the administrator to view the contents of the Client Configuration file. The Client Configuration file is named staylink.ini and is stored on the device’s writable media.View: Remote File – This option allows the administrator to view the contents of a specified file on the client device.
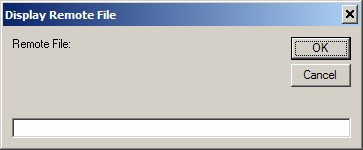
- Remote File: Type the file name that you wish to view into this text box.
- OK Button: Click this button to send the request to the device.
- Cancel Button: Use this button to close the window.
View: Client, Session, Handler, and Socket Logs – These options allow the administrator to view the contents of the specified log file from the client device or from the server.
View: ZIP All Session Logs – This option allows the administrator to collect and package available logs for the selected session into a single compressed ZIP file.
View: Usage Tracking – This option allows the administrator to view the ‘Usage Tracking’ information for the currently selected device. The user interface will be transformed into the Usage Tracking List for the specific Unique ID for the selected device.
View: Session Screen Dump – This option allows the administrator to view a special ‘Screen Dump’ text file that is generated by the StayLinked Server and reflects the current status of the session screen for the selected device. This screen dump file is useful for screen localization efforts, especially for foreign language font glyph support.
View: Device Screen Capture – This option is only available if the client is running the tightly integrated StayLinked Device Management components. This option allows the administrator to capture an image of the device screen in the JPEG file format. The screen will be displayed in the application that is currently associated with the JPG file extension.
Device Management has been end-of-life since September, 2015.
View: Export Screen Map –This feature will generate a screen map of the current session telnet screen. The screen map is used for Screen Recognition and Screen Reformatting ‘Designer’ feature. After the screen map is prepared and transferred to the Administrator, you will be prompted for a unique name for the screen map. You can read more about this option in the ‘StayLinked Screen Recognition and Reformatting User Guide’.
Note that screen maps can also be captured using a keyboard map entry To optimize the collection of screen maps for your application, you can use a new [screen_map] mnemonic that can be added to your device’s keyboard map. While navigating your screens in a StayLinked Session, you can press the key combination that you have mapped to the [screen_map] mnemonic and the StayLinked Server will immediately capture a map of the current telnet screen and save it into the Screen Maps master file. The screen map will be automatically named using this pattern: ‘PushButtonScreenMap_SSSSS_yyyymmddhhmmss’ where ‘SSSSS’ indicates the Session ID and ‘yyyymmddhhmmss’ is a date/time stamp representing the moment that the screen map was captured. After you have completed capturing all of your desired screen maps, you can use the ‘Telnet Host Groups -> Manage Screen Maps’ dialog to review and rename your screen maps for use in screen recognition and reformatting. This option should not be available to users, as it directly writes to a server configuration file and multiple simultaneous entries can cause file write issues. These features are not currently available for use with TESS emulation.
Connections Menu – Monitor Session
This feature provides the administrator with the ability to view and monitor the selected device session in a window on the PC. This option behaves as a toggle, turning the monitor feature on and off, depending upon the current monitor state. Devices that are currently being monitored will have a checkmark on the Monitor menu option. When you start the monitor, you will be prompted to confirm and then the monitor window is displayed and the current screen from the device will be shown:
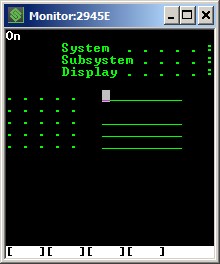
This monitor window will be updated in real time as the device is utilized. You may monitor more than one device at a time, depending upon the available space on your desktop. In order to terminate a monitor session, find the device in the connection list and select the ‘Monitor’ menu option again to toggle this feature off. The monitor window on your PC will close automatically. Or, just click on the [X] in the Monitor Window to close the monitor session. NOTE: Monitor Session is not available for sessions running Blowfish encryption.
Resizing this window, skewed or shifted monitors can be corrected using configuration options in the console window. Review the knowledgebase article regarding skewed monitor issues for more details. Do not drag or pull edges to resize this window.
Connections Menu – Share Session
This feature provides the administrator with the ability to collaborate with the selected device session. The shared session will be displayed in a window on the PC.
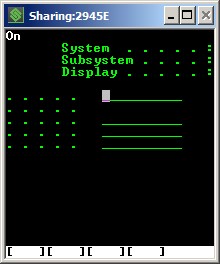
As the administrator, you are able to type into this window and drive the session. The original user will see your changes on the device. Inputs from the device, will also affect the session, appearing in your share window. You may share more than one session at a time, depending upon the available space on your desktop. In order to exit a shared session, press the ‘Esc’ key and you will be prompted to ‘EXIT SESSION? (Y)es or (N)o’ . Press ‘Y’ to quit the session. The original user will be able to continue. Shared sessions appear in the Administrator’s connections list with a status noting the share and original session id.
Connections Menu – Take Control
This feature provides the administrator with the ability to take over the selected session in a window on the PC. This removes the session from the remote device and brings it to the Administrator PC. When you select to Take Control, you will be prompted to confirm and then the session window is displayed and the current screen from the session will be shown:
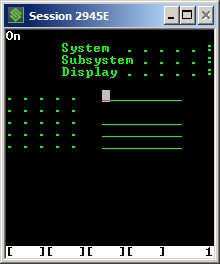
You can now type and operate the session as if you had started the session yourself. The Take Control function is not reversible. Once you take control of a session, the device will not be able to regain control of that session. The device might be able to start a new session. This feature is especially useful to complete sessions after a device has been damaged or otherwise disabled and can no longer be used. Administrator sessions can be transferred to a device as mentioned below.
Connections Menu – Transfer Session
This feature provides the administrator with the ability to transfer a session from one device to another. This feature is especially useful when a device has become disabled while it was in the middle of an important operation. In this case, the session that was associated with the damaged device can be transferred to an operational device, at which point the important operation can be completed using the target device. When you select this option, you will be presented with a dialog that will ask for the target device to which the session will be transferred. This device must already be connected to the StayLinked server:
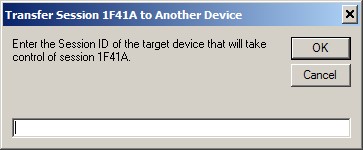
Enter a valid session ID and, if verified, the session will be transferred to the target device.
Connections Menu – Disconnect Device
After a confirmation, this option will send a directive to the device(s) to disconnect from the session and return to the main screen. The session stays alive on the server waiting for the device to reconnect. This option will cause a device that is running in the ‘Always Auto-Connect’ mode to exit back to the main screen.
Connections Menu – Terminate Session
After a confirmation, this option will send a directive to the server to immediately terminate the selected device connection(s). When multiple sessions are selected, the Administrator will display a progress dialogue and terminate sessions individually at one-second intervals until all selected sessions have been ended.
Connections Menu – Launch MobiControl
This version of the StayLinked Administrator supports basic integration with the MobiControl Deployment Server. You can configure the MobiControl settings for the current StayLinked Server in the ‘Edit StayLinked Server’ dialog as described in the ‘Connecting to the StayLinked Server‘ section of this guide. If the ‘Always Available?’ option is selected for the MobiControl integration, then this ‘Launch MobiControl’ menu option will be available. This option will launch a Web Browser session and connect to the MobiControl Deployment Server and display the Remote Control dialog. If the device is awake, the MobiControl Agent is running on the device, and if the MobiControl Deployment Server is aware of this device, then this menu option will provide quick access to the MobiControl system.
Connections Menu – Manage Device
If the tightly-integrated StayLinked Device Management software is installed and detected on the device, then this option will be available to access all of the interactive device management options provided by the StayLinked Device Management feature set. Please review the ‘StayLinked Device Management User Guide’ for full details of these interactive features.
Integrated ‘Device Management’ features have been end-of-life since September, 2015 and replaced with SOTI MobiControl integration. These features are removed in v15.1 build 208 and newer.
Share the post "Administrator User Guide – Connections List and Session Management"