The StayLinked Administrator is the user interface for the StayLinked Server process. It is not licensed and can be installed on any computer that has a need to manage the server configuration or sessions. When installing the Administrator, it is important to make sure that the installer has Administrative rights to the Windows PC. Even after installation, the Administrator directory must have read/write/execute permissions for the current Windows user. More details are available in the various server installation guides which cover server installation, upgrades and Administrator installation.
Windows 7/8/10
On newer Windows operating systems, it can be important that the StayLinked Administrator is run ‘as Administrator’ by right clicking the shortcut or changing the option in the compatibility tab of the application properties.
Without administrator compatibility mode, Microsoft has added user-specific directories for programs operating from the Program Files directory. StayLinked log files and cached configuration files will not be found in the Program Files\StayLinked Administrator subdirectories. Instead, these files will be found under the user profile subdirectory (where the blank is the current user account):
C:\Users\...........\AppData\Local\VirtualStore\Program-Files\Stay-Linked Administrator
Identify the StayLinked serial number for this installation.
Once the Administrator is installed and configured to manage a running Server process, you can find server serial number(s) displayed in the Server List.
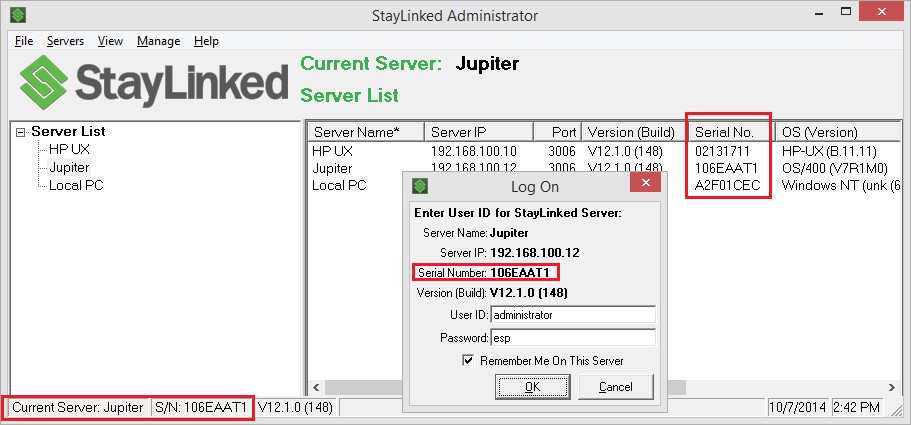
From there, you can log into the server using the default account of administrator with a password of esp.
Instructional Video – Locate Your Serial Number
Create a New Administrator User Account.
We recommend starting the new installation by creating a new user account. These accounts are stored on the StayLinked Server and will be accessible from any StayLinked Administrator that connects to the server that owns the profile. Right click in the window to create a new user profile.

Once you’ve created the profile, double click it and set all of the values to *Yes, select file > Save Changes > Right click the profile again and select Enable. The user account will have a default password that matches the username.
Instructional Video – Create a New Administrator User Account
Tip – The default administrator profile can be re-enabled and reset to the default password by placing an empty file in the StayLinked Server’s Config subdirectory named resetadmin.xml. You can confirm this took place during the next server startup by confirming that this custom file is automatically deleted. Restarting your server process may cause an interruption to your users if you are forced to bounce the server process during normal business hours. Creating a second account and adjusting the desired user account settings will help prevent the administrator account from being locked out. It may also be easier to login using a username that is shorter or more familiar than administrator.
Configure your Telnet Host Entry
The next step will be to tell the StayLinked Server where to find your telnet server. In most cases, the StayLinked Server will be installed on the same system as the telnet server, meaning you can leave the default entry as the local loopback address of 127.0.0.1.
Note that there may be tuning considerations or emulation settings to improve the performance for SSH and cloud-hosted WMS and ERP system.
From the StayLinked Administrator, select Emulation Settings > Telnet Host Groups > double click the Default Host Group > then double click the Telnet Host Entry, usually called ‘My Telnet Host’ or ‘My iSeries’.
The emulation type sets the communication parameters for your connection.
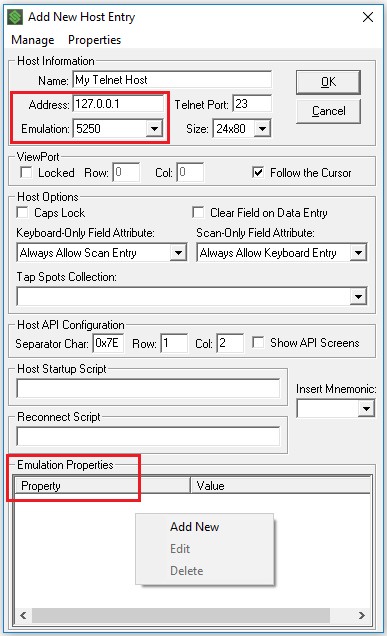
3270 emulation is specific to IBM Mainframe systems.
5250 emulation is used for IBM AS/400, iSeries and IBMi systems.
VT-SMARTTE emulation (v15.2) offers many features that have not been available in traditional VT emulation types. This option can perform standard VT and includes SSH connections with additional security algorithms.
VT-SMARTTE-SSH emulation from the pulldown menu is offered in v16.2 and later. This option is identical to selecting VT-SMARTTE and adding a few emulation properties, but is added as a shortcut for SSH communications. See below for the default emulation properties, which are not displayed in the list box unless specifically added.
TESS emulation is specific to TEKTERM for Android (SmartTEK) for use with select Zebra mobile devices and used in conjunction with proprietary Psion emulation systems. For detailed instructions on this emulation configuration, please review the TEKTERM for Android (SmartTEK) User Guide.
VT-XXX emulation options are no longer recommended in most installations. These emulation options are typical among Windows, Linux and various Unix platforms. VT-SmartTE is the default emulation types for any Windows, Linux, and Unix server installations. This emulation type offers the best range of features and security.
VT-SMARTTE-SSH utilizes the following emulation property default values:
- SSH Session is always set to ‘true’.
- useScreenUpdateDelay set to ‘true'.
- SSHKeepaliveInterval set to 60000ms (which is 60 seconds)
VT emulation options typically require a defined ‘terminal capabilities’ which is set as a Terminal ID. These various options can be added as emulation properties, the most common of which will be a Terminal ID of vt100 or vt220. More details on these options can be found in the Administrator User’s Guide and the Technical Reference document on Keyboard Mapping.
Note that the telnet port will change to the default value if you change emulation types. Some telnet applications will use a non-standard port, and some companies change the port for security reasons. For a connection to be established, the address, port and emulation type must all be correctly configured for your application. “eSP0002 Host Not Responding” Any errors in these settings will result in an error on the device that the emulation host is not responding.
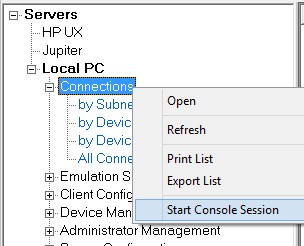
Testing an Emulation Session.
Testing your settings so far can be done by starting a console session. From the Administrator, right click on the connections list and select Start Console Session. This will test the StayLinked Server’s ability to connect to your telnet server. Please note that this is a very basic client intended to display shared sessions. Some characters may not appear as they would on devices. If your devices are not displaying special or international characters, you may need to add a host code page to the emulation properties above. See the Double-Byte and Unicode Localization Support (DBCS) guide, located in the StayLinked solutions download page; for more details on international character support.
You can end a console session by pressing the escape key and answering yes to the “Exit Session: Y or N” prompt.
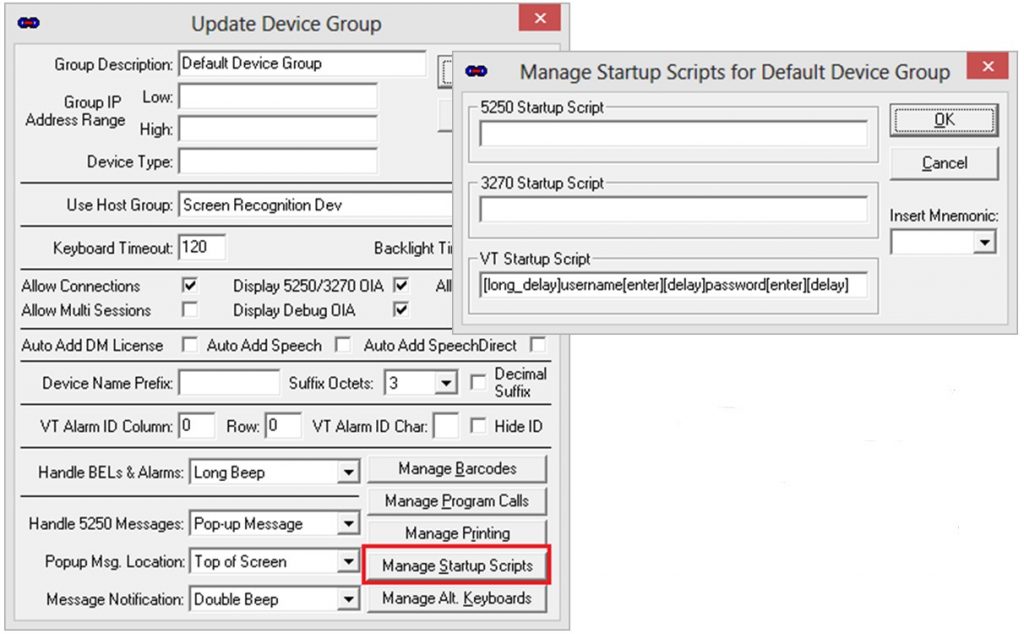
Adding a Startup Script
Once you have established a connection to the emulation host, StayLinked can provide a startup script to enter the first few transactions. This is often used to launch an application screen, bypass menus or even provide login credentials. Startup scripts can be added in one of two places, the telnet host entry or in the device group. More details on these dialogues and the available options can be found in the StayLinked Administrator User Guide.
Instructional Video – Adding a Startup Script
Storage Modes
Starting in v15.2, the StayLinked Administrator supports three different storage modes. These modes utilize different file system locations on the Windows machine for storage of configuration files. The three modes are:
• Legacy
• Common
• User (default)
When launched, the StayLinked Administrator first reads from the staylinkedadmin.ini in the current active directory (\Program Files\Stay-Linked Administrator\ if run ‘as administrator‘ or in C:\Users\username\AppData\Local\VirtualStore\Program Files\StayLinked\Stay-Linked Administrator) to determine which storage mode to use. If there is no entry, the User mode is the default.
If no line appears, then the storage mode is User. If one of these lines appear, that mode will be used, noting that this is case sensitive and all lower-case:
storage_mode=legacy
storage_mode=common
storage_mode=user
The current storage mode is displayed under the information dialogue for the Help > About Administrator menu.
The legacy mode will run from the Windows Virtual Store unless the program is run in Windows ‘as administrator’. This should not be confused with logging into the Administrator with the administrator user account. Note that user accounts on the Windows machine with administrative rights do not affect the storage location of files other than the name of the user directory for that Windows account.
The file locations are as follows:
When run using User mode file storage:
C:\Users\username \AppData\Local\StayLinked\Stay-Linked Administrator
When run using legacy mode, but not ‘as administrator’ in Windows:
C:\Users\username\AppData\Local\VirtualStore\Program Files\StayLinked\Stay-Linked Administrator
When run using legacy mode ‘as administrator’ in Windows:
C:\Program Files\Stay-Linked Administrator
The AppData directory for the current user can be accessed in Windows Explorer by typing %appdata% but will navigate to the roaming subdirectory.
Center Windows and Dialogues
Starting in v15.2, a new setting has been added to the [SYSTEM] section of the 'staylinkedadmini.ini' file that may be helpful to users who add or remove multiple PC screens.
If this setting is found during the Administrator startup, all windows/panels will be opened in the center of the current display.
CenterAllPanels=Y
This entry must be added to the active version of the 'staylinkedadmin.ini' file in the [SYSTEM] section as described in above section for Storage Modes.
Note that the Administrator will save the active window positions for use when the Administrator is opened again in further uses.
Share the post "Administrator Installation"