This section describes the various methods provided to centrally manage the StayLinked Client software on your devices. Topics include managing the client control settings, deploying client configuration files and managing automated client software deployment.
Managing Client Settings
Client Settings are stored on the device in the ‘staylink.ini’ file and they control the behavior of the StayLinked Client on the device. A powerful component of the StayLinked feature set is the ability to set and control many of the client settings right from the administrator. You can even specify to which device or group of devices the setting is targeted. This feature will save you all the time and headaches of trying to make setting changes on individual devices. Configured client settings are transferred to the clients when they start their next new StayLinked session or can be pushed immediately to specific, connected devices.
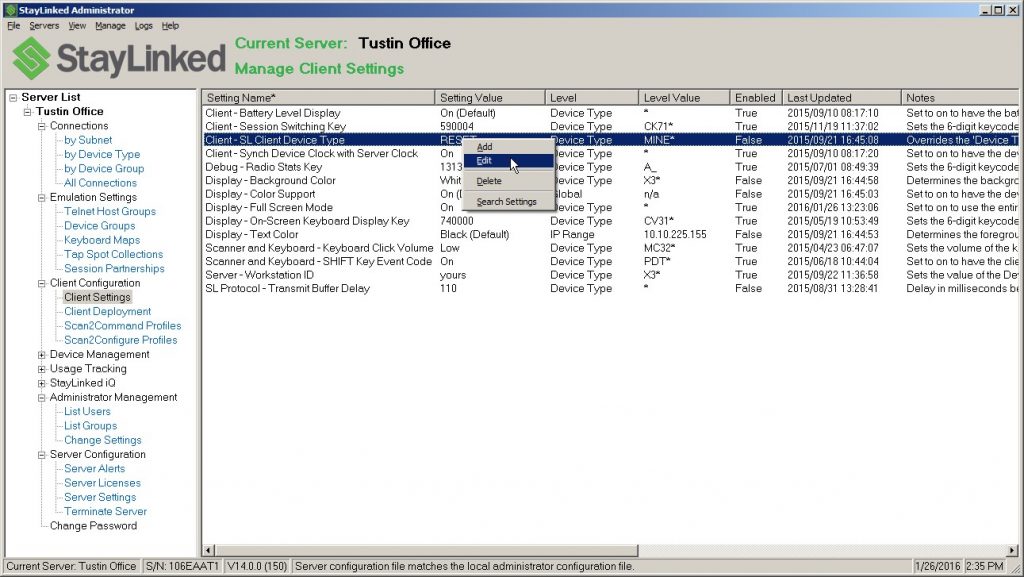
When you select Client Settings from the server tree or the Manage menu, a list will appear in the main display panel, showing all of the client settings that are currently defined for the selected server. You can sort the client settings listing by clicking on the appropriate column headers.
Clicking the right mouse button in a blank area of the list or on a client setting will cause a small menu to appear with options to Add, Edit, Delete or Search Settings.
Client Settings – Delete – Select this menu option in order to delete a client setting from the list.
Client Settings – Search Settings – Select this menu option to access a search dialog that can help you find the Client Setting that you wish to add to the list. The search dialog will provide a text box where you can enter a search term. Press ENTER to have the results list populated with any Client Settings that contain your search term found in the ‘Setting Name’ or the ‘Setting Description’. When you find the desired Client Setting in the list, double-click on it to open the ‘Add’ dialog.
Client Settings – Add – Select this menu option in order to add a new client setting to the list.
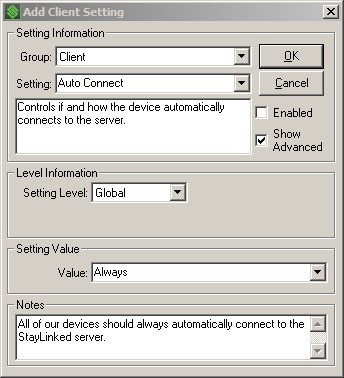
Group: Use this drop-down list to select a group of client settings to work with.
Setting: Use this drop-down list to select from the client settings included in the selected group. After a selection is made, a brief description of the setting is provided below. You can hover your mouse-pointer over the ‘setting’ to display a ‘tool-tip’ that will show the syntax for the current client setting and the selected value.
Enabled: Check this option to enable the setting. Only enabled settings will be kept current on the targeted devices. If this option is not checked, the server will completely ignore the setting.
Show Advanced: Check this option to have the contents of the ‘Setting’ drop-down list include less-frequently used advanced settings. This option will be remembered the next time you use this dialog.
Setting Level: Use this drop-down list to select from the following distribution groups:
Global – Setting applies to all devices
Device Type – Setting applies only to the specified device type (a text box will appear for you to enter the device type or a drop-down list of devices will be provided if the setting only applies to certain devices). Note: when specifying a device type, enter the value exactly as reported by the device. The only exception to this would be the use of the ‘*’ wildcard character at the end of your entry. This will allow you to cover multiple, similar devices with a single entry. Use this option to define a setting for all devices of a specific type.
IP Range – Setting applies only to the specified range of IP addresses (3 text boxes will appear for you to enter the Low and High IP addresses plus a Device Type filter).
MAC Address – Setting applies only to the specified MAC address (a text box will appear for you to enter the MAC Address). Use this option to define a setting for a single device.
Setting Value: Depending on the Setting, you enter a value into a text box or select from a drop-down list of available options.
Notes: Provided for your convenience. These notes have no effect on setting processing. They can, however, help you to organize and manage your client settings by providing a place to record why you created this client setting for future reference.
Client Settings – Edit – Select this menu option to update an existing client setting in the list.

Setting: Displays the current setting and a description below. You can hover your mouse-pointer over the ‘setting’ to display a ‘tool-tip’ that will show the syntax for the current client setting and the selected value.
Enabled: Check this option to enable the setting. Only enabled settings will be kept current on the targeted devices. If this option is not checked, the server will completely ignore the setting.
Setting Level: Use this drop-down list to select from the following distribution groups:
Global – Setting applies to all devices
Device Type – Setting applies only to the specified device type (a text box will appear for you to enter the device type or a drop-down list of devices will be provided if the setting only applies to certain devices). Note: when specifying a device type, enter the value exactly as reported by the device. The only exception to this would be the use of the ‘*’ wildcard character at the end of your entry. This will allow you to cover multiple, similar devices with a single entry. Use this option to define a setting for all devices of a specific type.
IP Range – Setting applies only to the specified range of IP addresses (3 text boxes will appear for you to enter the Low and High IP addresses plus a Device Type filter).
MAC Address – Setting applies only to the specified MAC address (a text box will appear for you to enter the MAC Address). Use this option to define a setting for a single device.
Setting Value: Depending on the Setting, you enter a value into a text box or select from a drop-down list of available options.
Notes: Provided for your convenience. These notes have no effect on setting processing. They can, however, help you to organize and manage your client settings by providing a place to record why you created this client setting for future reference.
Managing Client Configuration File Deployment
The StayLinked Client Software determines most of its behavior by using settings from the ‘staylink.ini’ file. The previous section of this article describes how to centrally manage the settings that are stored in this file. There are, however, additional configuration files that might be used by the StayLinked Client Software to control other aspects of the behavior of the device or the client software. Here is a list of some of these files:
EXTKEYS.INI – Configures the tap-able button bar that can be displayed on PPC/CE devices.
SCANNER.INI – Configures the OEM scanner engine on devices that have no native user interface.
LOCALE.INI – Provides localization support for alternate language fonts on PPC/CE devices.
SERVERS.INI – Provides access to multiple and/or backup StayLinked Servers from a client.
CONNECTIONS.INI – Provides access to multiple, individually configured connections to one or more StayLinked Servers from a client.
COLORS.INI – Configures alternate host foreground/background color mapping on the devices.
These configuration files can also be managed centrally from the StayLinked Administrator in a manner that is very similar to the management of the individual device settings. You can use the ‘Device Settings’ management feature to deploy various versions of these files to specific devices. Clicking the right mouse button in a blank area of the ‘Device Settings’ list or on a device setting will cause a small menu to appear. Select the ‘Add’ option and then in the ‘Setting’ drop-down list, find and select the ‘All – Configuration File Transfer’ device setting. The following dialog will be displayed:
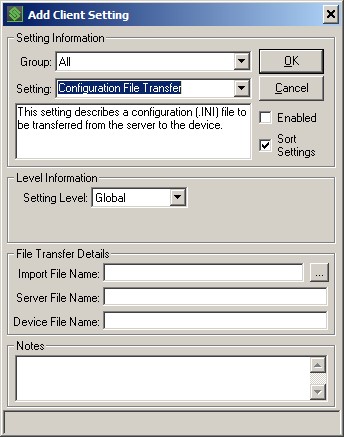
Enabled: Check this option to enable the setting. Only enabled settings will be kept current on the targeted devices. If this option is not checked, the server will completely ignore the setting.
Setting Level: Use this drop-down list to select from the following distribution groups:
Global – Setting applies to all devices
Device Type – Setting applies only to the specified device type (a text box will appear for you to enter the device type or a drop-down list of devices will be provided if the setting only applies to certain devices). Note: when specifying a device type, enter the value exactly as reported by the device. The only exception to this would be the use of the ‘*’ wildcard character at the end of your entry. This will allow you to cover multiple, similar devices with a single entry. Use this option to define a setting for all devices of a specific type.
IP Range – Setting applies only to the specified range of IP addresses (3 text boxes will appear for you to enter the Low and High IP addresses plus a Device Type filter).
MAC Address – Setting applies only to the specified MAC address (a text box will appear for you to enter the MAC Address). Use this option to define a setting for a single device.
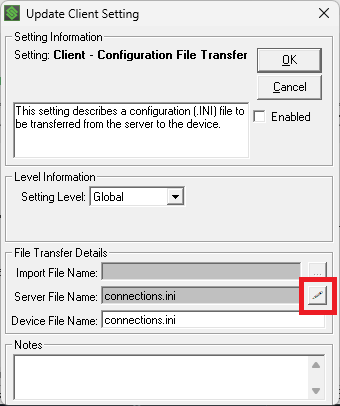
Import File Name: Use the ‘browse’ button to the right of this textbox to locate and select the configuration (.INI) file that you wish to transfer for this entry. This file will be transferred to the server and stored there to be deployed to devices that are selected for this setting.
Server File Name: Enter a unique file name to be used for this file when it is stored on the server. All of the files selected for ‘Configuration File Transfer’ settings will be stored in a single folder on the StayLinked Server machine at ‘..\stay-linked\deploy\files’. Each of these files must have a unique file name in this folder on the server.
Device File Name: Enter the name of this file as it should be stored on the device. You should provide a path as part of the name only if the file is not one that is recognized by and managed by the StayLinked Client on the device. The files listed at the top of this section are automatically handled by the StayLinked Client and so only that name needs to be specified for this value.
Notes: Provided for your convenience. These notes have no effect on setting processing. They can, however, help you to organize and manage your client settings by providing a place to record why you created this client setting for future reference.
Client Configuration File Deployment Example:
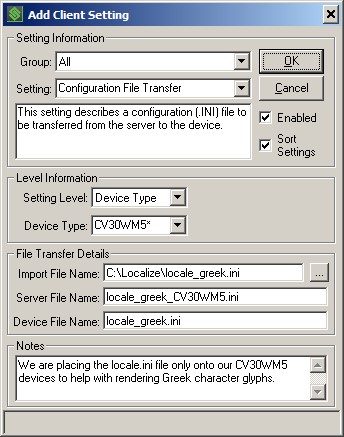
This example shows the dialog for sending a ‘locale.ini’ file to devices that are of a specific device type, in this case Symbol PDT9000 devices.
Import File Name: The original ‘locale.ini’ file was located on the Administrator PC in the ‘c:\localize’ folder with the name ‘locale_greek.ini’. This file will be transferred to the server.
Server File Name: The unique file name to be used for this file when it is stored on the server has been entered as ‘locale_greek_pdt9000.ini’. Since all of the files selected for ‘Configuration File Transfer’ settings will be stored in a single folder on the StayLinked Server machine, each of these files must have a unique file name in this folder on the server. The files are stored on the StayLinked Server at ‘..\stay-linked\deploy\files’.
Device File Name: The name of this file as it will be stored on the device is ‘locale.ini’. The ‘locale.ini’ is a special configuration file that is recognized and managed by the StayLinked Client. In this case, it is not necessary to provide a path for the file on the device.
After configuring the dialog for ‘Add Device Setting’, press the OK button to validate the dialog. Once validated, the file will be transferred from the Administrator to the StayLinked Server where it will be stored for deployment to qualifying devices. When a StayLinked device creates a new connection to the StayLinked Server, and both ‘Configuration File Deployment Settings’ and ‘Device Settings’ are to be sent to the device, first the ‘Configuration Files’ will be transferred to the device and then immediately the ‘Device Settings’ will be sent to the device. The StayLinked Client will restart automatically after receiving these files and settings and then, upon connection, those settings will take effect immediately.
Making Changes to Configuration File Transfers
Begging with server version 15.5 build 220, files on the server can be modified without having to remove and re-create the setting. An edit button appears on files that have been uploaded, but not on the initial creation of the client setting. This is available only on a configuration file transfer setting:
Managing Client Deployment
The StayLinked Client Deployment feature provides a method to centrally manage and wirelessly upgrade StayLinked Client software running on your devices. From the StayLinked online portal, you can download StayLinked Client Deployment Packages for your specific wireless devices. These deployment packages can be imported into the StayLinked Administrator which will install the package onto the StayLinked Server. Using the StayLinked Administrator, you can control when these packages will be deployed, to what devices and how to deploy them. When a device starts a new StayLinked session, if it has a different version of client software waiting, then depending upon the configuration of the package on the server, they may be prompted to upgrade the client software or they may have no choice. If the client software is upgraded, the user will be shown a progress indicator on the device screen and after the software package is transferred, the software will be installed and the devices will be rebooted or restarted, depending upon the platform.
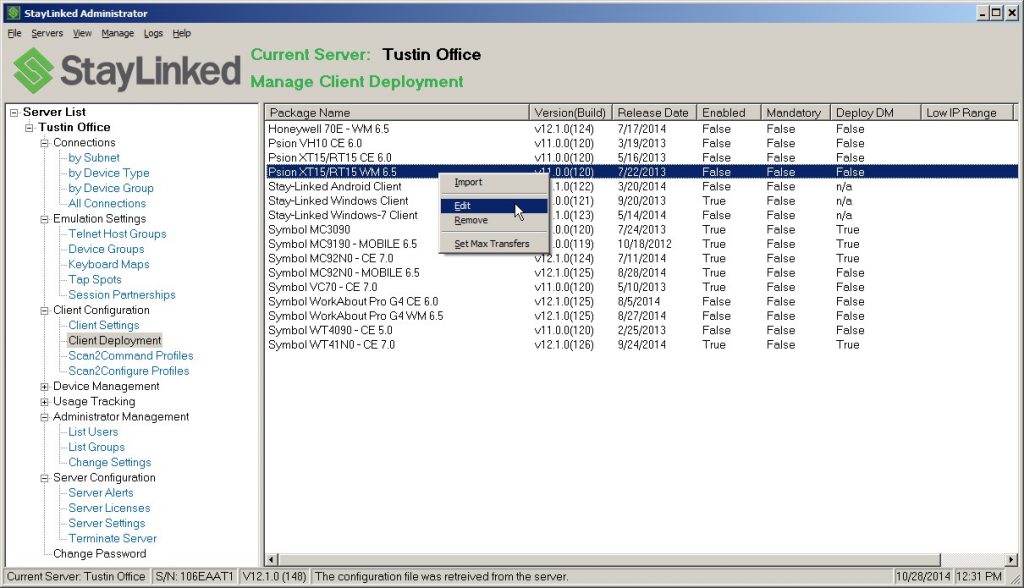
When you select Client Deployment from the server tree or the Manage menu, a list will appear in the main display panel, showing all of the client packages that are currently installed onto the selected server.
Clicking the right mouse button on a client package will cause a small menu to appear with options to Import, Edit, or Remove a client package and control the number of concurrent client updates that are allowed to be processed at one time. You can also ‘double-click’ a package to ‘Edit’ the package.
When you select the Import option from the menu, the following window will appear:
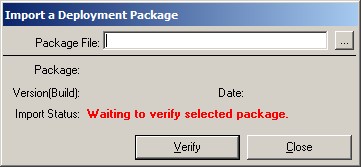
Package File: Type or browse for the client deployment package file name (with the .sdp extension) that you wish to import. Client deployment package files are available on the StayLinked portal site.
Verify: Click on this button to verify the deployment file and contents. If the file is a valid deployment package, the Package information will be displayed in the window and the ‘Verify’ button will transform into an ‘Install’ button.
Install: Click this button to install the package onto the StayLinked server. By default, when a new package is installed, it will be disabled until it has been manually reviewed and enabled. While the package is being imported to the server, the ‘Import Status’ will be updated.
When you select the Edit option from the menu, or double-click on the package, the following window will appear:
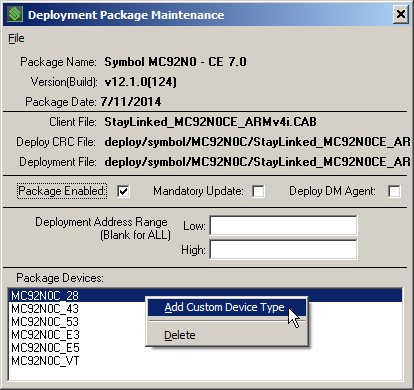
Package Enabled: Use this check box to indicate that this deployment package is enabled and should be transferred to the appropriate client devices. If this option is not checked, the server will completely ignore the package.
Mandatory Update: Use this check box to indicate that this deployment package is mandatory, and that the client will not be allowed to run a StayLinked session until the update has been accomplished. If this check box is not selected, the user will be given a choice to update now or to update later.
Deploy DM Agent: Use this check box to cause the ‘Device Management Agent’, if included in the Deployment Package, to be transferred to and installed onto the device.
Deployment Address Range: Enter the range of device IP addresses that will affected by this client deployment package.
Package Devices: Displays a list of device types to which this client deployment package will be applied. This list is predefined and is not managed by the administrator. The client software in the package is designed for the device types that appear in this list.
Add Custom Device Type: This right-click menu option for the Package Devices listing will allow you to add a custom device type to the list of devices that will be upgraded using this deployment package. You must make sure that any device types added here are compatible with this deployment package.
Delete: This right-click menu option for the Package Devices listing will allow you to delete a device type from the list of devices that will be upgraded using this deployment package.
When you select the Remove option from the menu, you will be prompted to have the client deployment package removed from the list of packages. This option does not physically remove the client package from the server. This option only removes the entry from the list of deployment packages, making it no longer be available for deployment. You may re-import the package again in order to make it available to devices.
When you select the Set Max Transfers option from the menu, you will be prompted for the number of concurrent transfers that you wish to allow from this server to the devices. This feature provides you with control over the bandwidth that will be available for client software updates. If a device starts a new session, is eligible for a client software update, but there are already the maximum allowed number of transfers in process, then the user at the device will be notified and given the choice to try the upgrade again or to start a session using their current client software.
Notes
Please note that the client configuration file and logs are not staylinked.ini, staylinked.log, client.ini, or client.log. The actual files are staylink.ini and staylink.log due to old DOS 8.3 naming conventions.
Share the post "Administrator User Guide – Client Administration"