One key difference between traditional clients and the newer device operating systems is the extent to which the client can control the device interface. Windows clients could operate in full screen mode and completely hide the operating system menu and program bars, displaying “0 for Options” on the splash screen. With full screen mode disabled, these clients display menus for: File, Host, and Tools. Clients for these new operating systems cannot completely hide the OS navigation menus.
The sections that follow will discuss the menu options in order. Most often you will choose the “Host – Connect” menu option to start your sessions. The client must be able to establish a connection with the StayLinked Server using UDP-based transactions. For help configuring your network and radio settings please refer to the manufacturer documentation. Once your settings are complete, the Tools > Ping option can help confirm that network connectivity has been properly established.
Host
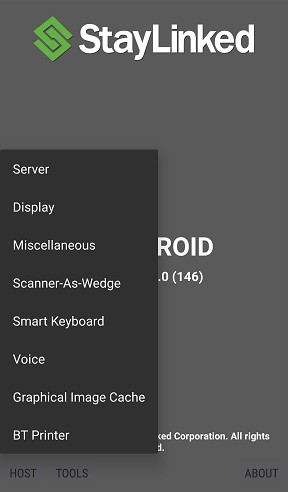
The ‘Host’ menu provides options for connecting to the host, disconnecting from the host, quitting a session and configuring the settings of the StayLinked client. Some client versions will offer a toggle SIP option, which will show or hide the on-screen input panel for tap capable keyboard input.
Connect
Select the ‘Connect’ option from the ‘Host’ menu to start a connection to the StayLinked Server. The client will step through connecting to your StayLinked server but may provide the Host Timeout error message if the handshake cannot complete. Once connected, the device will typically display a Telnet Session sign-on screen.
More information on the client-server handshake can be found in the troubleshooting section, or in the guide for Host Timeout.
Disconnect
Select the ‘Disconnect’ option from the ‘Host’ menu to disconnect from an active session. This option is only available if the device is connected to an active session. If you disconnect from an active session, the session remains active on the StayLinked Server, waiting for the device to reconnect at a later time. If you wish to terminate the active session, then select the ‘Quit Session’ menu option.
Quit Session
Select ‘Quit Session’ option from the ‘Host’ menu to terminate an active session. This option is only available if the device is connected to an active session. If you quit an active session, the session is removed from the StayLinked Server, freeing up a licensed seat.
Host > Configure
Under the host menu, the configuration of the client contains only a small number of the available settings. In this section you can enter the StayLinked host address, and port number, configure display options, control the behavior of the StayLinked client application on the device, and adjust the scanning options for wedge scanning devices. (Scan as Wedge does not appear on all devices).
Only the most common features are configured directly on the client. Several configuration options are available using the Client Settings feature of the Administrator. These settings are not only cold boot persistent but can automatically be deployed to all of your devices without the need to configure each device manually. Please see the Administrator User’s guide for additional details.
Clients prior to v16.1 build 276 will prompt for a configuration password. The default value is esp. ios and and also work for the respective operating systems.
If no password prompt appears, you can use the following instructions to re-enable a configuration access prompt.
Server
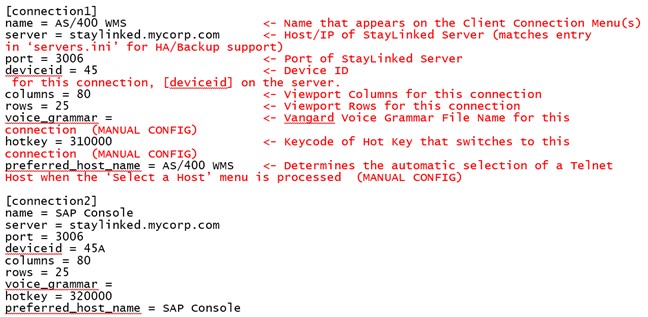
The settings on the Server tab allow you to configure the IP and Port of the StayLinked Server. In cases where the device may need to connect to one of multiple StayLinked servers, you would configure the device to use a supplemental configuration file called servers.ini. Please see the section below for details about the options and format of this configuration file.
- Most Clients default to an address of experience.staylinked.com which allows for a connection to an online demonstration server. This StayLinked Experience is restricted to the portrait display only. This server does offer a wide range of display types that demonstrate how StayLinked features can be utilized in a variety of WMS/ERP environments.
Server IP: Host name or IP address of your StayLinked server. The Operating System must be configured and able to resolve host names to use them as a valid address. Some client version may limit the number of characters allowed.
Server Port: Port number server is listening on. The StayLinked server is configured by default to listen for new connections on port 3006.
Use Device ID: Allows you to specify a [deviceid] value specific to this device. This value can be used in StayLinked scripts or will be used for iSeries virtual device names when the client connects to a device group that contains the [deviceid] mnemonic in the device name prefix field. Devices that do not contain a Device ID value in the StayLinked client will use the windows system name.
Max Connections: This setting will change the server address dialogue to include multiple StayLinked servers. When the option is selected for only one server, the user will automatically be connected to that server when selecting ‘Connect’. If multiple servers are added to this list, the user will be presented with a selection under the connect menu.
When a value higher than one is selected, the client will offer connection parameters for each possible connection. Android and iOS clients will list each connection, which can be configured independently.Windows clients will display a table that require you to press enter to populate each cell in the server list.
All clients populate a connections.ini file. This file can be copied from one device to others if you want to mirror the configuration options. Note that you must also configure the max connections option for the table to be used. Without increasing the max connections, the connections.ini configuration file will not be used, instead using the standard staylink.ini options.
Display
The following options are available on the Display configuration tab (right):
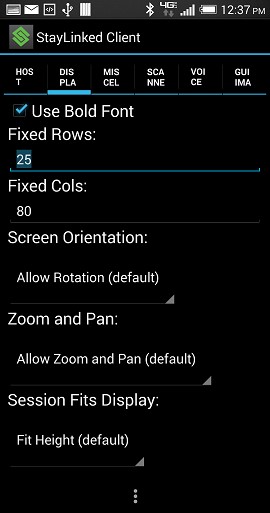
Use Bold Font will force all characters into a high-intensity display. Disabling this option will result in narrower characters and allow more characters to be displayed on the screen at any given time.
Fixed Rows and Columns are available to set the dimensions of the display space.
Terminal emulation screens are typically 24 rows by 80 columns. Some emulation specifications can be larger, but most devices cannot clearly display that much text on a usable screen. The portion displayed by the client is called the viewport.
Multi-touch devices should be configured to use the entire emulation space. With these clients, you are able to pan and zoom across the entire emulation space (optional). Reducing the row and column will prevent users from accessing this area on your devices.
Screen Orientation selects the rotation options, allowing or restricting the user from turning the device to switch between portrait and landscape views.
Zoom and Pan allows the user to dynamically grow and shrink the display size and shift the display left to right and up or down to see different sections of the display space.
Session Fits Display sets the default zoom size to fit the height or width of the display space to the screen size.
Miscellaneous
The Miscellaneous settings are typical of any StayLinked client.
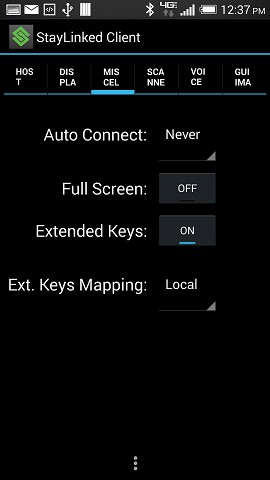
Auto Connect will default to never, which requires the user to manually connect to the server to start a session. Setting the value to once will automatically start a connection when the client is started. Using a setting of always will start a new session any time the user ends the current session. This will also disable the client ability to disconnect from an active session. StayLinked recommends a setting of never or once on devices that perform functions other than terminal emulation. Sessions started using the ‘always’ connection option can still be disconnected from the StayLinked Administrator’s Connections List.
Full Screen configures the Client to remove operating system dialogue bars whenever possible. This option is disabled by default and should not be used when third-party programs are being used to secure your devices.
Extended Keys will allow the client to display a ‘ribbon’ along the base of the screen. This ribbon slides left and right and displays many common commands. The ribbon can be customized by creating an extkeys.ini file with your desired options. This file and the configuration options are described in section 2 of this guide.
Extended Keys Mapping changes the processing of extended keys options from the Client to StayLinked Server. This option has no effect if you create a custom ‘extkeys.ini’ to make your own custom extended keys toolbar.
Local – The client sends ‘mnemonics’ to the server, [pf3] if you press the F3 toolbar button, [enter] if you press the Enter toolbar button, etc.
Server – The client sends the appropriate keycode as if you pressed a button on the keyboard. Since these items generate keyboard event codes, the keyboard map on the server is used to determine what action to take for each toolbar button.
The ‘Extended Keys Mapping’ option controls only the behavior of the ‘built-in’ toolbar button ribbons, All, Input, Cursor and FKeys.
More details regarding the extended keys configuration and options can be found in the extended keys section later in the document or in the general Client User Guide found in the documentation section of the StayLinked downloads site.
Scanner-As-Wedge
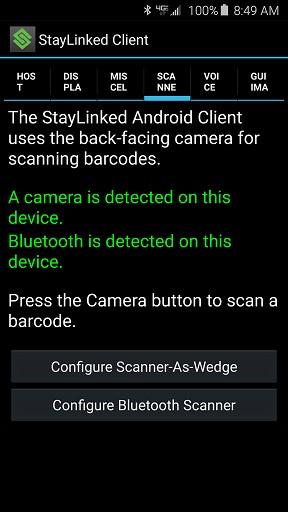
Devices with an integrated scanner will typically work automatically, supporting the scanner test and reporting a barcode symbology. Devices that attach an external or Bluetooth scanner may require additional configuration. Scan devices operating in HID mode will require standard scanner-as-wedge configuration as described in our scanner-as-wedge technical reference document. These clients also support the ‘autowedge’ feature when configured with a scan delimiter of 0. Devices operating in SPP mode can be natively operated by the StayLinked Client but require that the scan device is paired with the Android device before it can be selected from the StayLinked Client scanner configuration screen.
Both scanner-as-wedge and Bluetooth mode are displayed as options below. Bluetooth mode will offer a selection of all Bluetooth devices, and often include an icon that suggests the type of paired device.
More information on scan configuration can be found in the technical reference for scan configuration. Also note that without a symbology id, barcodes will report their symbology as unknown/unsupported.

Smart Keyboard
Keyboards also support the operating system swipe gesture to switch between keyboards. This gesture is supported by the device operating system and hardware, so tuning and control would be accomplished in the device operating system.
A single long press or press and hold will hide the StayLinked menu bar that displays File, Host and About.
A two-finger tap will show and hide the keyboard.
Smart Keyboard options include the following:
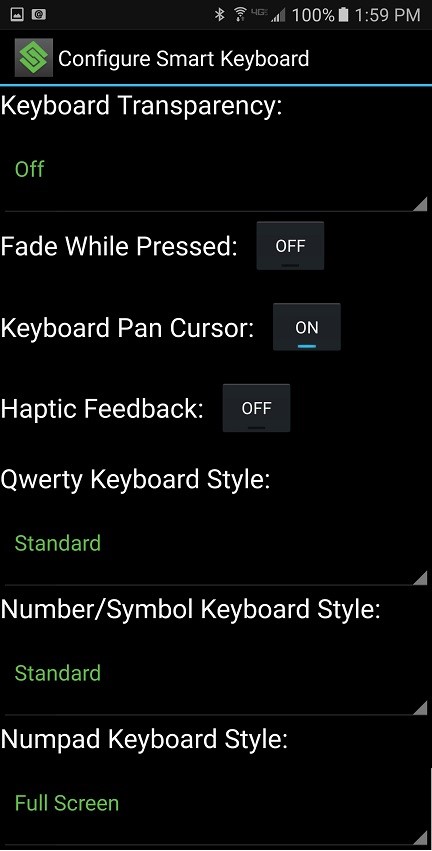
Keyboard Transparency: SmartTE keyboards support alpha levels. This sets how transparent the keyboard is, which can allow the user to see the screen through the keyboard.
Off – Disables transparency allowing the keyboard to block the emulation screen behind it. This is an alpha level of 100.
Low – Low transparency is a slightly transparent keyboard. This is an alpha level of 80.
Medium – Medium transparency is the mid-level transparent keyboard. This is an alpha level of 60.
High – High transparency shows more of the emulation space than the keyboard. This is an alpha level of 40.
Fade While Pressed: This option will dim the keyboard if pressed and held. The keyboard will return to the normal transparency when released.
Keyboard Pan Cursor: This option will shift the display if the cursor is behind the on-screen keyboard. Disabling this option will leave the cursor behind the keyboard, which would still be visible if the keyboard is at least partially transparent.
Haptic Feedback: Not all devices support vibration options. If supported, the device will slightly vibrate for each keypress to help users know when a key has been entered.
QWERTY Keyboard Style: Select the default QWERTY keyboard style between the options; Disabled, Standard, Small, AZERTY, Full Screen, 4-Column Right, 4-Row Full, and 4-Column full.
Number/Symbol Keyboard Style: Select the default Number/Symbol style between Standard and Azerty keyboard layouts.
Numpad Keyboard Style: Select the default Number Pad keyboard style between the options; Disabled, Full Screen, 2-Row, 3-Row, 2-Column Right, 5-Row and 3-Column Right. In addition to the Smart Keyboard options list above, the following standard options are available on most SmartTE devices.
When a client attempts to connect to the StayLinked server it will check for a keyboard map. You can add a keyboard using the StayLinked Administrator. Navigate to the emulation settings section and select keyboard maps. Then right click in the list of keyboards and select add.
Once the keyboard map is opened, select File and Save Changes to add it to your server’s list of installed keyboards. Additional information on keyboard maps and their use can be found in the Technical Reference on the subject in the Documentation section of our portal site.
If your device displays the error message “eSP0003 No VT Keyboard Map Found”, you have not added the keyboard map that matches your device type and emulation. This message will show one of the three main device types of VT, 5250 or 3270, based on the emulation type specified in your telnet host entry.
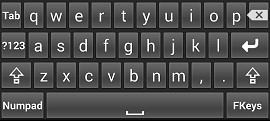
This Client provides several different on-screen keyboards for emulation use. These generate keyboard event codes in the same manner as other StayLinked Clients. More information on keyboard maps can be found in the Keyboard Map Technical Reference document on the StayLinked downloads site.
Alpha QWERTY
Function Keys
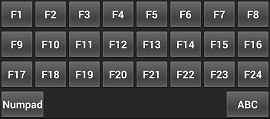
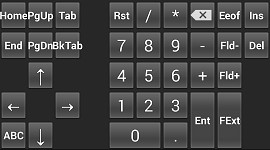
Numeric
Voice
Voice and Text to speech will allow the client to provide voice feedback when licensed by the StayLinked Server. Speech products may incur an additional cost.
Please contact your StayLinked reseller for details.
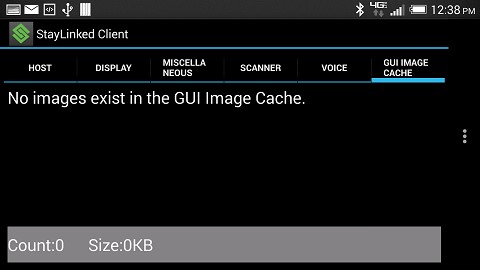
GUI Image Cache
Provides a list of images that have been replicated to your Client device for display speed. Graphical telnet mode requires additional Server configuration options to map these image files to display elements.
More information on GUI telnet mode can be found in the StayLinked Administrator User’s Guide.
BT Printing (Bluetooth)
For devices that have been configured with a ‘Printer Type’ setting of Bluetooth, this menu provides options for data transfer modes and printer selection. Note that this setting is not available in the client user interface. It must be set using the StayLinked Administrator or by scanning a Scan2Configure barcode for “Printer_Type = 6” for Bluetooth.
Scanning this barcode into a client scan test will enable to Bluetooth configuration dialogue. If this barcode will not read, you can create your own using Scan2Configure in the StayLinked Administrator section for Client Configuration.

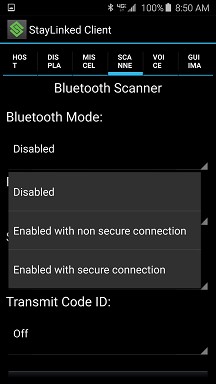
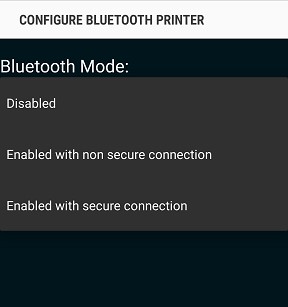
The first option, Bluetooth Mode offers options for secure or non-secure communications:
The second option offers a printer selection from a list of paired devices:

Once Bluetooth printing is enabled and a device has been paired, printing commands from the telnet host will be relayed to the attached device.
Please refer to the manufacturer documentation for instructions on pairing your printing device with your mobile computer.
Tools
Various tools are available for the testing of a StayLinked client. Not all devices support all features, but the available features will include the same possible options.
Note that this section of the client does not allow for any configuration, but only the reporting and display of information.
Radio Stats
Network Type: Shows if the device reports that the network is established by cellular or wifi.
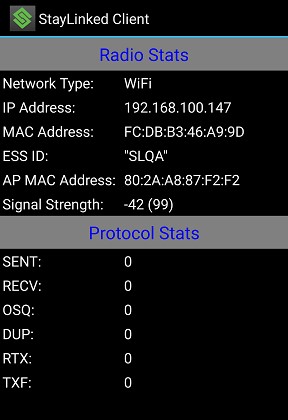
IP Address: Current IP address of the device.
MAC: Current MAC address of the device.
Note that some device operating systems do not provide visibility of the hardware network address. This value may reflect a different unique identifier provided by the device OS.
ESSID: Station ID of the Access Points to which the device is connecting.
AP Mac: MAC Address of the Access Point to which the device is currently associated.
Signal: Depending on whether or not the device is currently in radio coverage, one of the following will be displayed in the “Signal:” field.
- Signal strength expressed as a percentage
- "Not Associated”
As the device is moved in/out of radio coverage, the value of the “Signal:” field will toggle between the values above. Where the “Signal:” value changes to "Not Associated" indicates dead zones, obstructions in the communication path, or fringe areas of radio coverage.
Stats information is sometimes hidden for wired devices, or devices running a client that can’t request details from the device’s network stack.
The Stats section displays radio and StayLinked protocol performance data.
TxRate: Current transmit rate in Megabits per second.
TxRetry: Number of transmit retries.
Sent: Number of StayLinked packets sent.
Recv: Number of StayLinked packets received.
OSQ: Number of out-of-sequence StayLinked packets.
RTX: Number of StayLinked packets retransmitted.
High values in the OSQ and RTX fields may indicate network issues. StayLinked will only transmit net changes to your devices. This means that packets received out of sequence will be discarded until the next sequential packet is received at the device.
Ping
Select the ‘Ping’ option from the ‘Tools’ menu to test network access between the StayLinked client and the selected host machine.
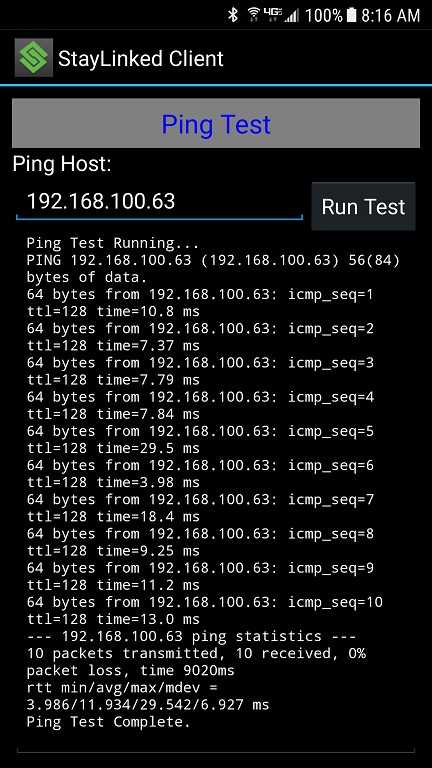
During a typical ping, the results will be displayed in the number of milliseconds that the packet took to make the round trip to the destination and back. Lower numbers are better. If your numbers become excessively high, connectivity will be sluggish or unreliable.
If the results say Host Unreachable, no route was available to make the round trip, or the packets were dropped before the round trip could complete.
If the results report Unable to Resolve, the name used was not listed in the name server, or the name server was not reachable.
Enter the host IP address (defaults to the StayLinked Server) and choose "Ping" to cause the client to attempt to ping the host.
Scan Test
Select the ‘Scan Test’ option from the ‘Tools’ menu to test scanning on the device.
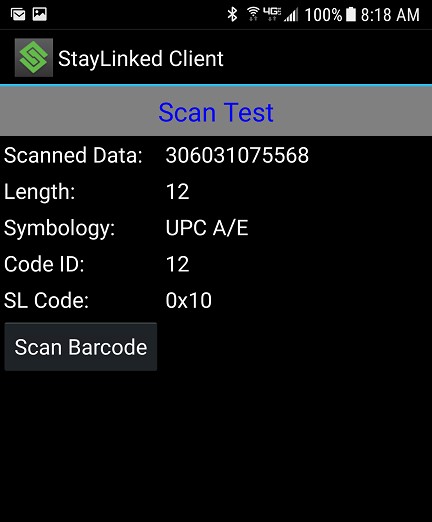
If you scan data when this test screen is displayed, you should see the scanned data, the length of the scanned data and the symbology type of the scanned data. If you do not see your scanned data on this screen, then it is most likely caused by an external scanner that is not or has not been configured to identify scan data.
More information on scanning can be found in the guide for scan configuration on our downloads site.
Key Test
Select the ‘Key Test’ option from the ‘Tools’ menu to test the keyboard on the device.
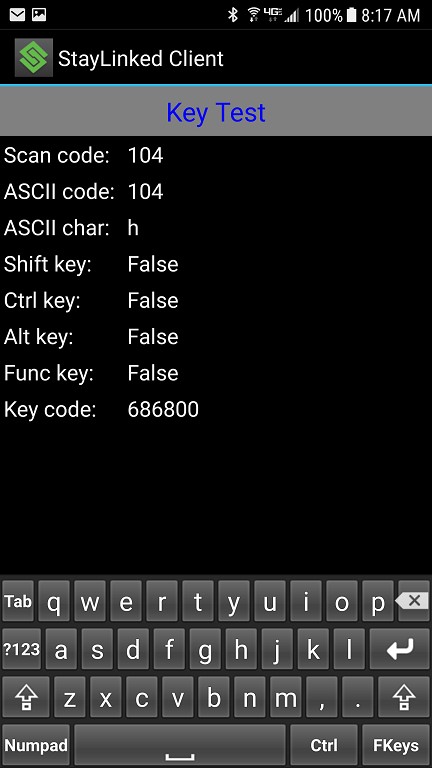
Press any key on the keyboard to display its Scan code, ASCII code and Key code. The Key code is an important reference value to be used when programming keyboard maps using the StayLinked Administrator. Dismiss the dialog with a tap on the back button.
About
Select the ‘About’ option from the ‘File’ menu and the ‘About’ dialog will be displayed.
This dialogue allows a reset of the unique value used by the StayLinked server to identify this device. When reset, the value will be repopulated based on the hardware in which the client is installed. This is typically required only in cases when the unique ID was replicated to multiple devices by cloning the installation. This UID value is referenced in the StayLinkedManager.log file when devices connect to the server during an initial connection request.
SmartTE capable devices will offer several menu options that don’t appear on traditional TE clients as long as the client is not locked down. This includes links to StayLinked on the web and access to the public StayLinked Experience server.
The public StayLinked Experience server walks a new user through the different products that the StayLinked company offers including SmartTE, Evolve and others. Each section shows a brief explanation for the product and invites the user to go to a webpage to request more information. Under SmartTE, there is a live demo of a simulated warehouse TE application. There are also options to see the app reformatted to have dynamically created buttons, or fully redesigned to show a more modern user experience.
Client Guide – Extended Keys
Running Third Party Programs
Share the post "Client Dialogues"