How does StayLinked help with printing?
- StayLinked provides printing through devices which must be connected to a printer and are running the SmartTE Thin-Client.
- StayLinked is not involved in Host-based print jobs that originate from the WMS application and are directed to print queues or print spoolers for printers. StayLinked cannot print to printers that are not connected to devices running SmartTE Clients.
To what kinds of printers can StayLinked print?
- Serial Printers – These are printers that are connected to the device with a serial cable. You can configure the Serial COM settings to be used for printing in the Administrator->Device Group->Manage Printing dialog.
- Bluetooth Printers – These are wireless printers that are paired to the device using Bluetooth. You can configure the Bluetooth settings using StayLinked Client Settings.
- WiFI Printers – These are wireless printers that the SmartTE Thin-Client will connect to via a TCP/IP socket. You can configure the WiFi Printing settings using StayLinked Client Settings.
What kinds of things can be printed with StayLinked?
- For any emulation type, you can print host screens to the connected printer using special StayLinked mnemonics like [screen_print] and [screen_dump]. The SmartTE Server will send the text of the currently displayed host screen to the SmartTE Thin-Client to be printed on the connected printer. There are Host Entry Emulation Properties that can add formatting instructions to these screen prints.
- For any emulation type (except TESS), you can print documents where the printer instructions (CPL/ZPL, etc.) are displayed and delineated on a host screen. For this ‘Screen-based Printing’, the SmartTE Server will extract/scrape the printer instructions from the host screen and send those printer instructions to the SmartTE Thin-Client to be printed on the connected printer. You can configure Screen-based Printing options in the Administrator->Device Group->Manage Printing dialog.
- For the various supported VT emulations, the SmartTE Server will process and collect printer instructions enclosed in the VT Printer Pass-Through ESC sequences starting with <ESC>[5i and ending with <ESC>[4i. Once the VT Printer Pass-through has ended, the SmartTE Server will send the collected printer instructions to the SmartTE Thin-Client to be printed on the connected printer.
- For TESS emulation, the SmartTE Server will process and collect printer instructions from TESS Printer Port Passthrough Commands (>). Once the TESS PPP commands have completed, the SmartTE Server will send the collected printer instructions to the SmartTE Thin-Client to be printed on the connected printer.
Local Printing with StayLinked for 5250
StayLinked provides a method of printing labels locally on an RF device that has a printer attached. Label data is communicated to the device through a specially designed 5250 display record format (Screen) that contains the printer control language commands that are to be transmitted to the device and then to the printer. There are two configuration steps required to enable local barcode printing on StayLinked RF devices, configuring the StayLinked Device Group and designing a 5250 display screen containing printing commands.
Configure a StayLinked Device Group
The StayLinked Device Group contains a ‘Manage Printing’ dialog that describes to the StayLinked Server how to print to the local device. The dialog describes how to identify the 5250 display screens that contain printer data. It describes what actions to take when printing is completed and what action to take when printing is cancelled. The dialog also describes the connectivity parameters for the connection from the device to the local printer. Following is a typical dialog that enables local printing with StayLinked:
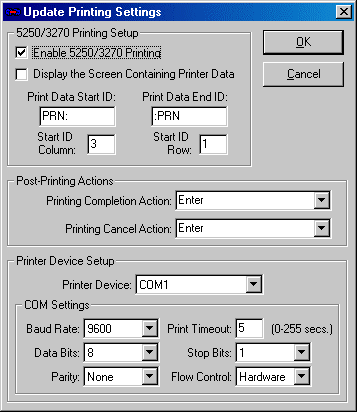
In this configuration, we have enabled 5250 printing. For 5250 printing, we have decided to hide the printing data screen from the user. Instead the user will see a client-side printing dialog on the device. We have described where on the 5250 screen to look for the Start ID and what the Start ID characters are. We have also described the End ID for the printer data.
For Post-Printing Actions, we want an Enter key to be pressed whether the printing was completed or cancelled. An alternate option would be to have F12 be pressed when the printing is cancelled, causing the RPG program to take special action. The user does not press these keys; the server will send them automatically.
For Printer Device Setup, the device will communicate to the printer over serial port COM1: at 9600 baud with 8 data bits, No Parity, 1 stop bit using Hardware flow control. A printing timeout of 5 seconds tells the Stay-Linked client to wait no more than 5 seconds for a response from the printer before displaying an error message.
Starting in v15.4, screen-based printing supports [NEXTROW] in the StartID and [ITE] for the CRLF ID.
Design a 5250 Printer Data Screen
Following is a sample 5250 display file record format that is displaying ZPL-II printer control language that will be recognized by the StayLinked Server. The printer command causes a Code 3 of 9 barcode to be printed at the top of the label with the data ‘123456’:
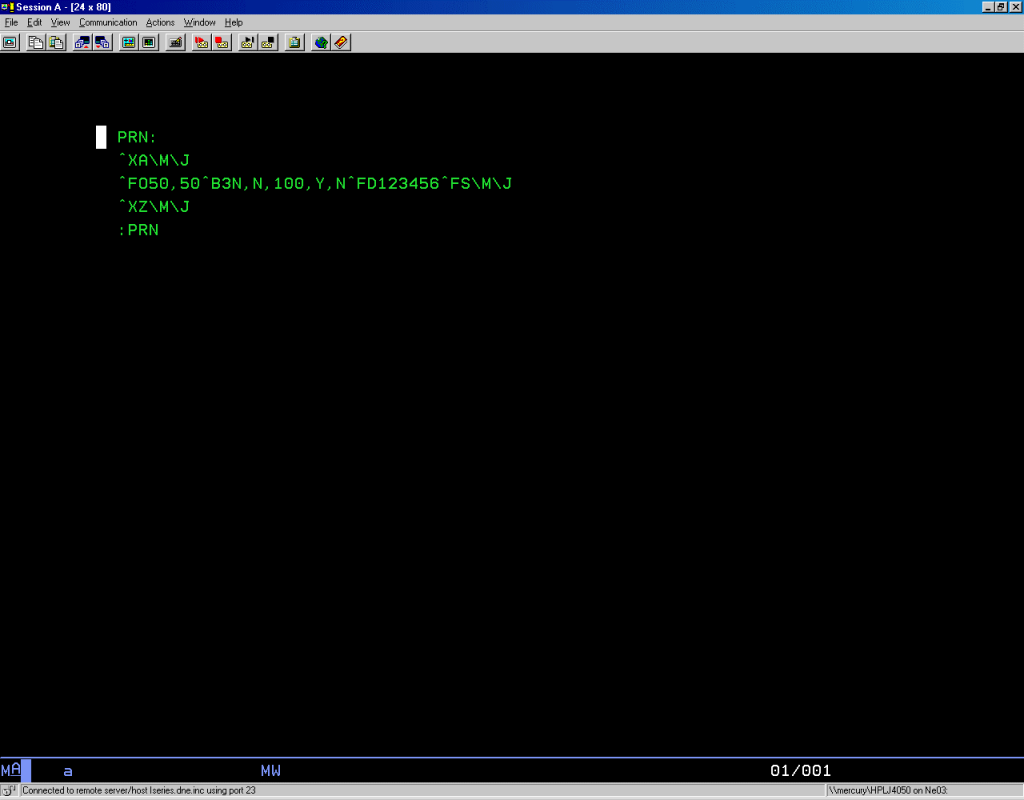
The ZPL-II commands on this screen are:
^XA
^FO50,50^B3N,N,100,Y,N^FD123456^FS
^XZ
There are other indicators on this screen that have significance:
PRN:
This is the ‘Print Data Start ID’ and is located at column 3 and row 1. This matches the Device Group Printing settings.
\M\J
These characters appear at the end of each printer command line and signify a Carriage Return and Line Feed. The Stay-Linked Server will translate these into a CRLF to be sent to the device as a part of the printer commands.
:PRN
This is the ‘Print Data End ID’ and is located after the last printer command. The Stay-Linked Server will ignore any data after this indicator for the purposes of printing.
Following is a sample 5250 display file record format that is displaying CPCL printer control language that will be recognized by the Stay-Linked Server. The printer command causes a relatively complex label to be printed:
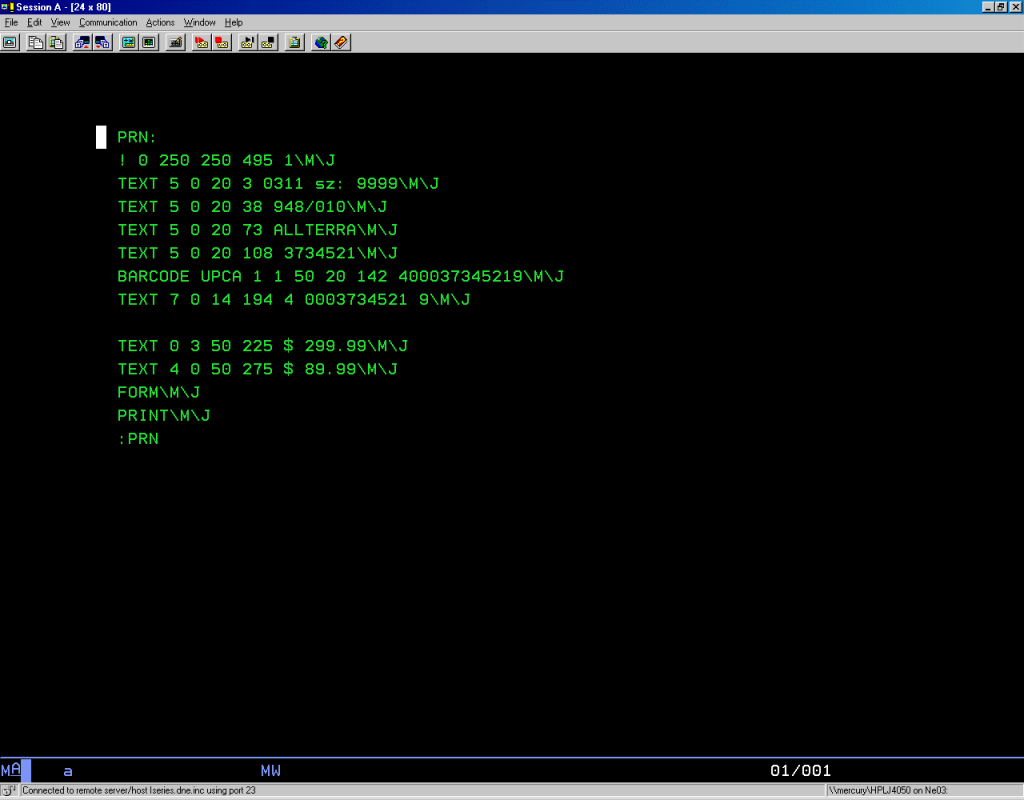
Once again, the PRN: is the ‘Print Data Start ID’ and is located at column 3 and row 1, matching the Device Group Printing settings.
At the end of each printer command line, the \M\J characters signify a Carriage Return and Line Feed. The StayLinked Server will translate these into a CRLF to be sent to the device as a part of the printer commands. Finally, the :PRN is the ‘Print Data End ID’ and is located after the last printer command. The Stay-Linked Server will ignore any data after this indicator for the purposes of printing.
For testing purposes, we recommend that you configure your device group and create a display file record format just like these. When the printing screen is presented, the printer control commands will be extracted and transmitted to the device for printing on the local device per the device group printing configuration.
Share the post "Printing with StayLinked"