The Scan2Command and Scan2Configure Profiles management options, introduced with Version 9.0.0 of StayLinked, provides a method by which you can design and print sheets of barcodes that can be scanned by devices running the StayLinked client. These barcode sheets can be used both to configure the client software and also to command the client or the telnet sessions.
Scan2Command Profiles
The Scan2Command Profiles will provide barcode sheets that can contain any StayLinked mnemonic or other client commands or scripts to be executed on the device or in the Telnet Session. There are three types of values that can be represented in a Scan2Command Profile.
Mnemonics – These values, when scanned, will command the telnet session to take some action, like press Enter, or press a Function Key, etc.
Client Commands – These values, when scanned, will instruct the StayLinked Client software to take some action locally on the device. Examples are, toggle the SIP, switch sessions, switch font sizes, exit the session, etc.
Scripts – These values, when scanned, will command the telnet session to follow a script of instructions. An example would be a single barcode that the user can scan to log onto the Telnet Server.
Here is a sample logon script for a 5250 session:[clear]myuserid[fldext]mypassword[enter]
Here is a sample logon script for a VT session: myuserid[enter][delay]mypassword[enter]
Scan2Configure Profiles
The Scan2Configure Profiles will provide barcode sheets that can contain one or more ‘Client Settings’ that will be used to configure the behavior of the StayLinked Client on the device. These barcode sheets can be printed using 1D symbologies where each client setting is represented in a single barcode. Or, you can print the Scan2Configure profile sheet using 2D symbologies where all of the client settings are combined into one (or more) 2D barcodes images that can be scanned to configure the device. The Scan2Configure profile sheets are typically scanned using the client-side ‘Scan Test’ user interface, or they can be scanned while running a StayLinked Session. The Scan2Configure profiles can also include an optional ‘Restart Client’ post-config command that will be acted upon after all of the client settings have been processed, causing all of the new settings to be loaded on startup.
This section describes the configuration and usage of the Scan2Command and Scan2Configure features. When you select one of these options from the server tree or the Manage menu, a list of current profiles will appear in the main display panel. Clicking the right mouse button on a profile will cause a small menu to appear with options to Add, Edit, and Delete a profile.
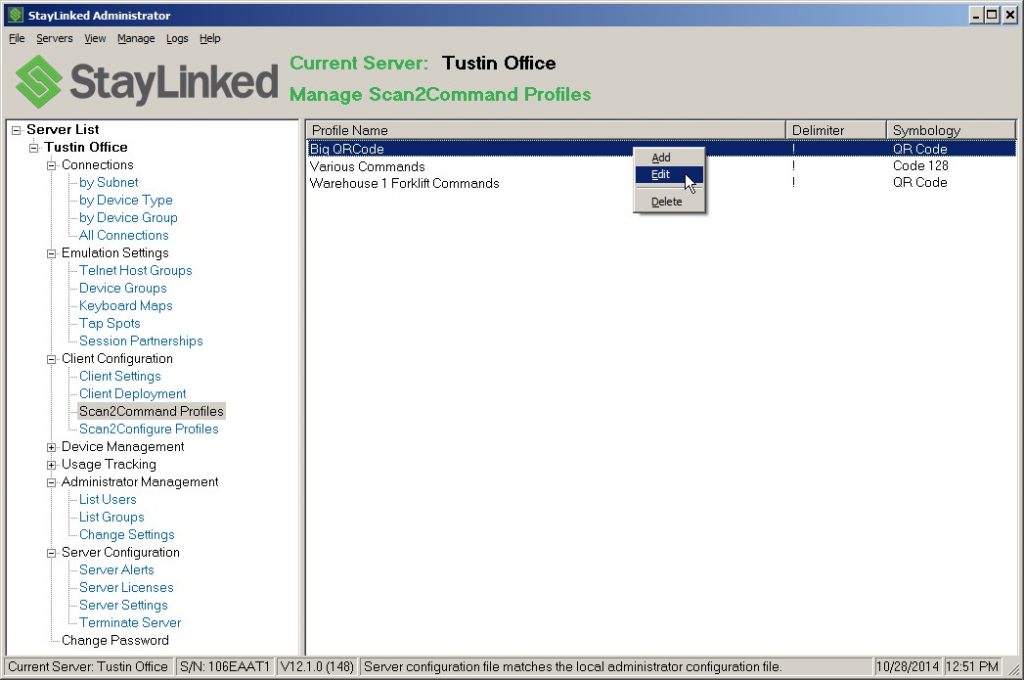
Scan2Command/Scan2Configure – Add – Select this menu option in order to add a new profile.
Scan2Command/Scan2Configure – Edit – Select this menu option in order to modify the contents and attributes of the selected profile. You can also use this option to print an existing profile.
Scan2Command/Scan2Configure – Delete – Select this menu option in
order to remove the selected profile from the list.
When you ‘Add’ or ‘Edit’ a profile, you will be presented with the Profile dialog:
Profile Name: This text box is used to enter the unique name for this Scan2Command or Scan2Congfigure Profile.
Symbology: Select from this list the symbology to be used for printing the profile barcode sheet. You can select from the following symbologies: Code 39 Full ASCII (1D), Code 128 (1D), PDF417 (2D), QRCode (2D) or DataMatrix (2D).
Symbology Notes: If you select Code 39 Full ASCII, then you must ensure that your scanners are configured to read Code 39 Full ASCII. If you select a 2D symbology for your Scan2Congfigure profiles, this will cause the client settings to be combined into one (or more) 2D barcode images.
From the File Menu:
Save Changes: Select this menu option to save the current profile.
Print: Select this menu option to print the current profile.
Print Preview: Select this menu option to preview the printed current profile.
Settings – Barcode Delimiter: Select this menu option to change the delimiter used to identify a Scan2Command or Scan2Configure barcode to the StayLinked Client software.
Settings – Barcode Spacing: Select this menu option to change the vertical spacing between printed barcodes.
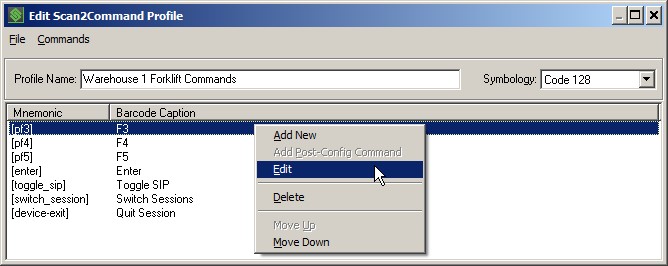
From the Commands/Settings Menu:
Add New: Select this menu option to add a new command or setting.
Add Post-Config Command: Select this menu option to add a post-configuration command. This option is only available for Scan2Configure profiles.
Edit: Select this menu option to edit the selected command or setting.
Delete: Select this menu option to delete the selected command or setting.
Move Up: Select this menu option to move the selected command or setting up in the list.
Move Down: Select this menu
option to move the selected command or setting down in the list.
If you select to Add or Edit a Scan2Command Command entry, you will be presented with a dialog similar to this:
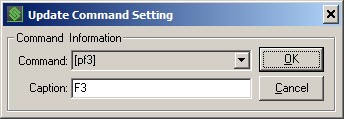
Command: You can select a command from the drop down list, or directly type in a command or script to be encoded into the barcode.
Caption: Type in a meaningful caption that will be printed below the barcode image.
If you select to Add or Edit a Scan2Configure Setting entry, you will be presented with a dialog similar to this:

Setting: In Add mode, you can select a client setting from this drop-down list.
Setting Value: Depending on the selected Client Setting, you enter a value into a text box or select from a drop-down list of available values.
Barcode Caption: Type in a meaningful caption that will be printed below the barcode image.
Print ID: Check this box if you would like to have the ‘Setting ID’ encoded into the barcode data rather than having the ‘Setting Name’ encoded into the barcode data. The ‘Setting ID’ is a three-digit numeric value that will create a smaller barcode that if you encode the ‘Setting Name’.
Share the post "Administrator User Guide – Scan2Command and Scan2Configure Profiles"