Overview
This article describes the security compatibilities and capabilities of the StayLinked Session Management and Device Management Solution and its unique Client2Host architecture. The StayLinked ‘Client2Host’™ architecture overcomes all of the security challenges associated with the traditional model of running “device- side” Telnet Client software on terminal devices that communicate over the network (wireless/wired) with a host Telnet Server process and target applications. This article provides the details of how the StayLinked model for implementing Telnet-based device to host application communication differs from the traditional model by creating a secure “end-to-end” environment that does not feature TCP or Telnet protocols over the RF network connection at all.
In each StayLinked Session, there are two separate IP connections that are being managed, the Client2Host® protocol and the Telnet protocol. The StayLinked solution provides communications security for each of these two IP connections utilized from the device to the host application.
The Client2Host® Protocol
For the IP connection between the StayLinked Client and the StayLinked Server, the ‘Client2Host’ communications architecture is implemented. This ‘Client2Host’ communications architecture, designed from the ground up for the RF environment, utilizes a proprietary reliability protocol that is encapsulated in the UDP protocol. Since StayLinked uses UDP, it is able to avoid the IP traffic and connection issues that are inherent in the TCP protocol and exacerbated in a wireless environment. The StayLinked Reliable Protocol is quiet, only transmitting data across the network on the demand of the client. If the client device is inactive, then there will be no traffic generated on the network. The StayLinked Reliable Protocol implements a ‘Micro-Packet’ technology
The ‘Micro-packet’ technology:
- Ensures that UDP packets successfully arrive at the destination host in the same order users provided the input, regardless of network packet delivery order.
- Enables more reliable delivery of data by never transmitting packets greater than 512 bytes in length, thereby avoiding packet fragmentation and MTU issues.
- Enables StayLinked traffic to better utilize low-bandwidth or high-utilization network connections.
Since all of the session traffic between the StayLinked client and the StayLinked Server is encapsulated in the StayLinked Reliable Protocol, StayLinked is able to avoid transmitting any TCP or TELNET protocols over the wireless network. In other words, there will be no TELNET clear-text traffic traveling across the network while running StayLinked.
Wireless Security Compatibility
The StayLinked ‘Client2Host’ reliable protocol is UDP-based, and thus is inherently compatible with any transport set security measures (Layers 1 – 4) that a customer might implement. For example, StayLinked will run well through a VPN tunnel. Moreover, even if the VPN connection is broken and then re-established, the StayLinked client will be able to reconnect to the existing telnet session, resuming operation at the same screen and same cursor location.
StayLinked is also compatible with standard RF security schemes like WEP, LEAP, PEAP, WPA, etc. This transport and RF compatibility allows customers to implement network security measures with assurance that the StayLinked solution will continue to operate within the new architecture. Additionally, StayLinked is compatible with various authentication methods such as Kerberos, RADIUS, etc. StayLinked sessions themselves are authenticated by the Telnet Host’s login process.
Additional Network Layer Security
StayLinked supports some traditional network security configurations by implementing a firewall- friendly communication architecture. The StayLinked Server supports Static-NAT configurations and allows for configuration of Port Restriction rules in order to be compatible with any port filtering switch or firewall. In the case of port filtering, since StayLinked is UDP-based and transmits no TCP or TELNET over the network, you can disable all TCP traffic through the switch or firewall, including ports usually supporting the TELNET protocol. Further, you can restrict open UDP ports to only those required to connect your licensed number of StayLinked devices.
Following are a description of the UDP ports used by the StayLinked Client2Host protocol:
Ports used for inbound communications from the Device (source) to the Server (destination):
Inbound packets are typically filtered at the firewall. These are the UDP ports that will be used by the StayLinked Server.
UDP Port 3006 – This is the port where the StayLinked Server is listening for connection requests.
UDP Port Range – These are the ports that will be dedicated to each device connection to the server. This is a user-defined port range that is configured in the StayLinked Administrator->Server Settings->Firewall Settings. You will need enough ports opened up in the firewall so that each device session will have an available port. Usually, this is based upon how many connections are licensed. By default the server uses ports 3007 to 3999.
Ports used for outbound communications from the Server (source) to the Device (destination):
Usually, outbound packets are not filtered at the firewall. But, if you need to open outbound ports, these are the UDP ports used by the StayLinked Client.
UDP Port 3771 – This is the listening port used by the StayLinked Client for connections from the StayLinked Server.
UDP Port 3772 – This is the listening port used by the StayLinked Client to receive session status requests from the Server during any communication interruptions.
UDP Port 3773 – This is the port opened and used by the StayLinked Client to listen for any TFTP transfers from the StayLinked Administrator (legacy file transfer mechanism).
UDP Port 3774 to 3782 – This is the listening port range opened and used by the Stay-Linked Client for connections from the Stay-Linked Server for the (up to 9) additional sessions that may be started when running ‘multi-connections’.
Application Layer Data Encryption
StayLinked provides two different data encryption options for securing the data that is transmitted between the StayLinked Client on the device and the StayLinked Server on the host. The data encryption feature applies to all connections.
Level 1 Encryption – This encryption method utilizes a native, proprietary, dynamic-symmetric 64- bit key, stream-cipher symmetric encryption algorithm to encode the cargo of the StayLinked ‘Client2Host’ reliable protocol packets. This encryption technology is designed to be compatible with older, legacy devices that are not powerful enough to support the high-end, public encryption algorithms. This encryption option is available for all StayLinked clients on all platforms.
Blowfish Encryption – This encryption method provides an increased level of data security for the StayLinked packets that are transmitted between the StayLinked Thin-Client and the StayLinked Server. StayLinked Blowfish encryption utilizes the Blowfish/ECB/PKCS5Padding cipher. You may also specify key rotation with up to four keys defined and you can specify a key rotation interval.
This encryption option is available only for StayLinked Clients of at least Version 9.1.
Twofish Encryption – This encryption method provides a very high level of data security for the StayLinked packets that are transmitted between the StayLinked Thin-Client and the StayLinked Server. StayLinked Twofish encryption is a symmetric key block cipher with a block size of 128 bits and key sizes up to 256 bits. As with Blowfish, this option also offers a specify key rotation with up to four keys defined and you can specify a key rotation interval.
Twofish Version Requirements – This encryption option is available only for StayLinked installations with the Android Client at Version 15.2 (build 222 thru 226) connecting to a Server at Version 15.3 (build 212). This implementation used the Twofish/CBC/PKCS5Padding method that is replaced with Twofish/GCM/NoPadding in Android Client version 15.3 (build 228 and newer), iOS Client (build 144) and Server (build 214 and newer). These implementations are not backwards compatible or interchangeable and it is recommended that security sensitive companies use the newest implementation possible.
Telnet, TESS, TLS/SSL, and SSH Protocol Overview
At the heart of the StayLinked Host-based Terminal Emulation architecture is the StayLinked Server which runs directly on the same host platform as the emulation server and host applications. This host-based architecture provides an inherent level of security by isolating the telnet connection and communication within the host platform. In this host-based architecture, there are no telnet protocol packets transmitted across the network and no clear-text data exposed to the network. Additional levels of terminal emulation security are also supported by the StayLinked solution. In those cases where SOX or PCI compliance are required, the StayLinked solution supports both SSH and TLS/SSL-Telnet terminal emulation connections to the host system. This section will describe the StayLinked support for Telnet, TLS/SSL-Telnet and SSH connections to host systems.
Note that the VT-SmartTE emulation type supports SSH with a wider range of algorithms than VT-SSHv2. VT-SmartTE supports an emulation property to enable SSH, which replaces the older VT-SSHv2 option.
The Telnet Protocol
Normal telnet connections feature the telnet protocol transmitted from the telnet server to and from the telnet client. The telnet client will typically connect to the telnet server on port 23 which is the official Telnet port. The data carried by the telnet protocol is not encrypted and contains information in clear-text. This protocol is TCP-based and provides the telnet connection between the StayLinked Server, running on the host, and the Telnet server which should be also running on the same machine. When the StayLinked Server and Telnet server are running on the same machine, the Telnet protocol is transported on the ‘local loop back’ connection which is internal to the machine and is inherently reliable. In some cases, the Telnet server may not be running on the same hardware as the StayLinked Server. Under these conditions, the Telnet protocol is transported over the regular network topology and is naturally more exposed to observation, failure or interruption.
The TLS/SSL-Telnet Protocol
In order to secure the data carried by the telnet protocol and also to secure the connection to a telnet server, the SSL (Secure Socket Layer)or TLS (Transport Layer Security) protocol may be employed (typically used for 5250 and 3270 emulation). With TLS/SSL-Telnet, the telnet client will connect to the telnet server on port 992 which is the official TLS/SSL-Telnet port. To run TLS/SSL-Telnet connections, both the telnet server and the telnet client must support the TLS/SSL protocol. Usually, the telnet server and telnet client (StayLinked) will provide options for configuring TLS/SSL support.
Software Prerequisites for StayLinked and TLS/SSL-Telnet
To run SSL-Telnet connections with StayLinked, you must be on StayLinked version 8, build 134 or later. As of StayLinked server version 14, SSL connections are no longer allowed, and TLS 1.0 is the default protocol. With StayLinked version 14.5, support for TLS 1.1 and 1.2 was added.
TLS/SSL Configuration for StayLinked Telnet Hosts
Once your StayLinked Server is configured to provide TLS/SSL-Telnet support, it is very simple to configure an TLS/SSL-Telnet connection for your wireless devices.
To enable TLS/SSL, you must add the following to ‘Emulation Properties’ in the ‘Telnet Host Entry’ using the StayLinked Administrator:
TLS Session – To request an encrypted TLS/SSL session, set this property to True. This is the minimum configuration required to run TLS/SSL-Telnet sessions.
To enable TLS 1.1 and higher, you must ALSO add the following to ‘Emulation Properties’ in the ‘Telnet Host Entry’ using the StayLinked Administrator:
TLS Use JSSE for TLS v1.1-v1.2 – This setting switches to using JSSE instead of SSLite. This has the added benefit of using Java’s Certificate Authority (CA) file instead of the StayLinked Well-known CA file.
TLS Version Support – Allows the user to pick the version of TLS to use with JSSE (default is 1.0).
Well-known or Trusted CA Server Certificates
The simplest implementation of TLS/SSL-Telnet with StayLinked is to use a certificate signed by a Well-known or Trusted CA. If your telnet server’s certificate is signed by a Well-known or Trusted CA, then the only configuration option required is to turn on the ‘TLS Session’ Emulation Property as described above. If your certificate is signed by a Well-known CA and StayLinked does not recognize it, try turning on ‘TLS Use JSSE for TLS v1.1-v1.2’ as described above to use Java’s CA file.
Private or Third-party Server Certificates
You can also use a Private or Third-party Server Certificate with StayLinked, but there is some additional configuration required in addition to the above settings. If, ‘TLS Use JSSE…’ is not turned on, the CA chain that signed the certificate must be imported into a PKCS12 (Personal Information Exchange Syntax Standard) file named ‘CustomizedCAs.p12’. The password for this file must be set to ‘hod’. If however, ‘SSL Use JSSE…’ is turned on, then the CA chain must be imported into a JKS (Java KeyStore) file named ‘CustomizedCAs.jks’. The password for this file must be set to ‘hodpwd’. Second, the file must be placed in the StayLinked Server main folder, ‘..\stay-linked’. With the Customized CAs file properly created and located, the StayLinked Server will be able to operate using your Private or Third-party Server Certificate.
Client Certificates
Client authentication is similar to server authentication except that the telnet server requests a certificate from the client to verify that the client is who it claims to be. The certificate must be an X.509 certificate and signed by a certificate authority (CA) trusted by the server. You can only use client authentication when a server requests a certificate from a client. Not all servers support client authentication. Client Certificates can be obtained from a Certificate Authority or can be a Self-signed Certificate. The Client Certificate should be exported to a password-protected PKCS12 file. The public portion of a self-signed client certificate should be added to the telnet server’s trusted list. The Client Certificate must be placed in the StayLinked Server main folder, ‘..\stay-linked’, on the server. Now, you must add three additional ‘Emulation Properties’ to the ‘Telnet Host Entry’ using the StayLinked Administrator:
SSL Client Certificate Provided – Set this value to True to indicate that the client has a certificate to provide to the server.
SSL Client Certificate URL – Set this value to the file name of the client certificate.
SSL Client Certificate Password – Set this value to the password of the client certificate.
The SSH Protocol
For VT emulation, an alternative to the telnet protocol is the SSH (Secure Shell) protocol. The Secure Shell (SSH) is a set of protocols for implementing secure sessions over a non-secure network (such as a standard TCP/IP network). In order to use SSH, you must set up SSH server software on the host. Security features include the following:
- Secure login
- Strong authentication of server and client
- Several user authentication methods
- Encrypted sessions
Note that TESS emulation does not provide the option for SSH and cannot be configured for secure protocols when in use with StayLinked.
SSH Version Support
The following table describes the SSH Version support currently implemented in StayLinked:

SSH Transport Algorithm Support
SSH is available under the emulation types VT-SmartTE (preferred) and VT-SSHv2. Using VT-SmartTE for SSH requires an emulation property for the option SSH Session set to true.
The following table describes the SSH Transport Protocol algorithms currently supported by the StayLinked VT-SSHv2 emulation type.
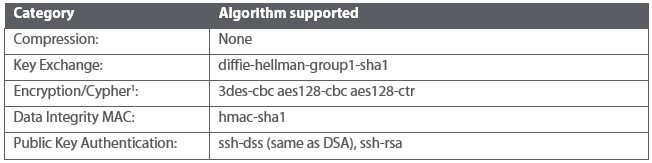
1 StayLinked always gives priority to 3des-cbc over aes128-cbc. If you want to use aes128-cbc, 3des-cbc needs to be disabled on the server side. Contact support for alternative supported algorithms.
The emulation type VT-SmartTE supports a wider range of security options (List as of V15.5):
Key Exchange: ecdh-sha2-nistp256,ecdh-sha2-nistp384,ecdh-sha2-nistp521,diffie-hellman-group-exchange-sha256,diffie-hellman-group16-sha512,diffie-hellman-group18-sha512,diffie-hellman-group14-sha256,ext-info-c,kex-strict-c-v00@openssh.com
Encryption/Cypher: aes128-ctr,aes192-ctr,aes256-ctr,aes128-gcm@openssh.com,aes256-gcm@openssh.com
Data Integrity MAC: hmac-sha2-256-etm@openssh.com,hmac-sha2-512-etm@openssh.com,hmac-sha1-etm@openssh.com,hmac-sha2-256,hmac-sha2-512,hmac-sha1
Host Key Algorithm/Public Key Authentication: ecdsa-sha2-nistp256,ecdsa-sha2-nistp384,ecdsa-sha2-nistp521,rsa-sha2-512,rsa-sha2-256
SSH Authentication protocol Support
For the SSH Authentication protocol, StayLinked supports the following under the VT-SSHv2 emulation type:
- Keyboard-Interactive (SSH Version 2)
- Password (SSH Version 2 and SSH Version 1.5)
- Public Key (SSH Version 2 and Version 1.5, but only RSA in 1.5)
Keyboard-Interactive Authentication
Configuring your SSH Server for keyboard-interactive authentication
The server configuration for keyboard-interactive authentication differs depending on the vendor or source of the SSH support. Refer to the documentation for your SSH server software for information on how to configure the SSH server for the keyboard-interactive authentication method.
Your SSH host may need to disable keyboard interactive if a scripted password is not accepted. By default, StayLinked will honor the keyboard interactive setting and require the user to manually enter the password. Starting in version 15.3, an emulation property is available to ignore the host requirement for keyboard interactive login.
Configuring the StayLinked Server for keyboard-interactive authentication
You do not need to configure StayLinked for keyboard-interactive authentication. The StayLinked SSH client will look for whether keyboard- interactive authentication is configured on the server. If it is configured on the server, then StayLinked will prompt the user for keyboard input.
StayLinked will display a logon prompt according to the data received from the host. This logon prompt allows you to input responses from the keyboard. If your server is configured for keyboard- interactive authentication, then the StayLinked ‘Startup Scripts’ will not be available for automated logon because manual keyboard entry of the user and password is required.
Password Authentication
Configuring your SSH Server for password authentication
The server configuration for password authentication differs depending on the vendor or source of the SSH support. Refer to the documentation for your SSH server software for information on how to configure the SSH server for the password authentication method.
Configuring the StayLinked Server for password authentication
You do not need to configure StayLinked for password authentication. If the SSH Server is not configured for keyboard-interactive authentication, then the StayLinked SSH client will display a login prompt for a user id and password. The user can type-in their user id and password or the StayLinked ‘Startup Scripts’ can be implemented for automated logon.
Starting in version 15.3 of the StayLinked Server, SSH passwords are no longer limited to the width of the device screen. Prior server versions were limited to passwords that could be typed into the number of columns configured on the Client.
Public Key Authentication
Configuring your SSH Server for public key authentication
The primary requirement for public key authentication is to import into the ~/.ssh/authorized_keys file (in the User’s home directory) the public key file information for a public/private key pair (typically in a file called id_rsa.pub). Refer to the documentation for your SSH server software for more information on how to configure the SSH server for the public key authentication method.
Configuring the StayLinked Server for public key authentication
For StayLinked to use Public Key Authentication, the private-public key file will need to be imported into a jks (Java KeyStore) file. StayLinked can then utilize this jks file by placing it in the ‘../stay-linked’ folder on the server and setting the following ‘Emulation Properties’ to the ‘Telnet Host Entry’ using the StayLinked Administrator:
Use SSH Public Key Authentication – Set this value to True to indicate that you want to use Public Key Authentication.
SSH Public Key Alias – Set this to the Alias of the Public/Private key set in the Keystore File.
SSH Public Key Alias Password – Set this to the password of the Private key in the Keystore File if one is set.
SSH Public Keystore File Path – Set this to the location of the Keystore file on the server. It will look in ‘../stay-linked’ if only a filename is given.
SSH Public Keystore Password – Set this to the password of the Keystore file.
Security Diagram and Summary of Benefits
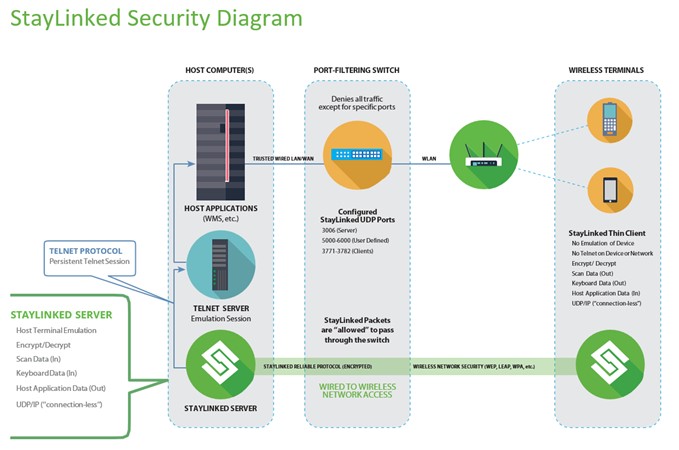
Client2Host® connections from the Client to the Server
- Utilizes the connection-less UDP protocol for WLAN-friendly communications
- Client2Host reliability protocol is ‘quiet’, reducing network utilization
- Implements ‘Micro-packet’ technology for reliable data transmission
- No ‘Clear Text’ is ever transmitted across the network
- No TCP protocol is ever transmitted across the network
- Compatible with transport set (Layer 1–4) security protocols
- Compatible with wireless network security protocols
- Compatible with standard authentication protocols
- Firewall-compatible communication architecture
- Allows for the filtering of the common, high-risk TCP protocols
- Supports proprietary ‘Level 1‘encryption for Client to Server communications
- Supports highly secure Blowfish encryption for Client to Server communications
Connections from the StayLinked Server to the Host Computer
- Telnet protocol is supported and typically contained completely within the host computer
- TESS protocol is supported and typically contained with the host computer
- Secure TLS/SSL-Telnet protocol is also supported for communications with the host computer
- Secure SSH protocol is also supported for communications with the host computer
StayLinked Administrator Secure Communications
NOTE: Communication between Server and Administrator is not encrypted, other than the login process. We recommend only communicating on a trusted or secured connection.
The StayLinked Administrator console application runs on a Windows-based computer and communicates with the StayLinked Server for the purposes of configuration and for session management. These tasks will typically be performed from within the same network as the StayLinked Server and so, no special network communications configuration is required.
In some cases it may be desired to use the StayLinked Administrator to manage the StayLinked Server through a firewall. In this case, a special StayLinked Server configuration and special firewall access rules will need to be coordinated so that the StayLinked Administrator management traffic can navigate through the firewall.
StayLinked Administrator Communications Protocols
The StayLinked Administrator uses two different protocols to communicate with and manage the StayLinked Server. The StayLinked Administrator sends commands to UDP Port 3006 from an OS assigned UDP port and receives responses from UDP Port 3006 back to the OS assigned UDP port. Some of these commands will instruct the StayLinked Server to provide additional data to the Administrator. This additional data will be delivered through a TCP socket connection that is opened on the server. The StayLinked Administrator will attempt to connect to the TCP socket on the server in order to send or receive additional data to or from the StayLinked Server. In order for these communications to be able to navigate through a firewall, you will need to open UDP Port 3006 for the Administrator commands, and also a fixed range of TCP Ports for the TCP socket connections. By default the server uses port range 3010 to 3019.
Configuring the StayLinked Server for a fixed TCP port range
In order to have the StayLinked Server open TCP ports only in a specific range that will match your Firewall rules, you must configure the StayLinked Server for that specific TCP port range. You will accomplish this configuration by manually modifying one of the server configuration files. The specific StayLinked Server configuration file that you will modify is located on the server machine:
../stay-linked/config/espadmin.xml
In this file, you will add an additional XML node just above the last line of the file, like this:
<espadmin>
…
…
…
<adminfirewall lowport="3010" highport="3019"/>
</espadmin>
The above range matches the default in the latest version of StayLinked. You will want to specify at least 10 available ports in the range that you select. This should be enough ports to support multiple StayLinked Administrator consoles managing the server concurrently. This TCP port range should be opened in your firewall access control list in addition to UDP Port 3006.
Once you have saved the changes to this file, there is no additional action required on the server. These new settings will take effect the next time the StayLinked Server is restarted.
Share the post "Secure Communications"