This section describes the StayLinked Administrator application, which provides centralized management of your StayLinked servers, hosts, and wireless devices. The section begins by walking you through your first use of the administrator, connecting to your StayLinked server, retrieving the server serial number, and installing the license key. After that, the various functions of the administrator are described.
Running the Administrator for the First Time
This section walks you through your first use of the administrator: the splash screen, connecting to your StayLinked server, retrieving the server serial number, and installing the license key.
The Administrator Splash Screen
When the StayLinked Administrator is executed, you will see the following splash screen for a few moments.
Connecting to the StayLinked Server
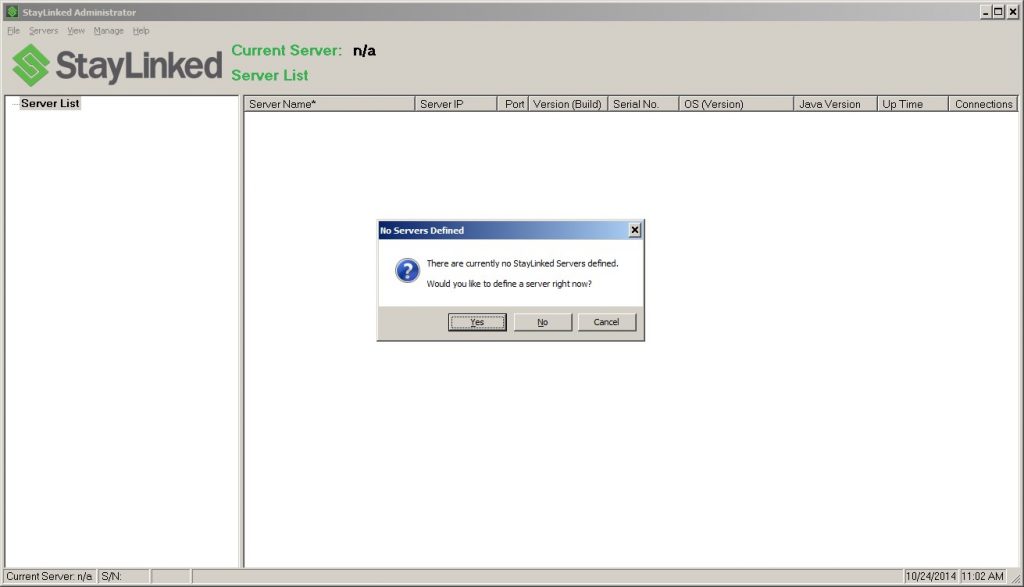
The first time you run the StayLinked Administrator, it will not know about any StayLinked servers you may have running. If no servers have been defined yet, the StayLinked Administrator will prompt you to add a server upon startup.
If you answer “Yes”, you will be prompted to add the server information. The following dialog will be presented:
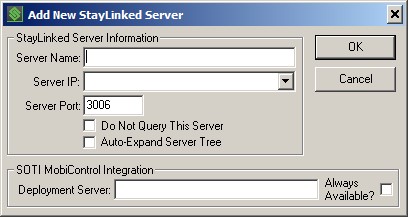
Server Name: Enter a name to identify the StayLinked Server – anything will do – no more than 50 characters (15-20 characters is a good size).
Server IP: Enter the IP address or host DNS name where the StayLinked server can be found. Of course, you will need to have a route to the server system from the Administrator PC.
Server Port: Enter the UDP port number on the StayLinked Server to which the administrator connects. The default port is 3006.
Do Not Query This Server: You can specify that the Administrator not query this server, in case the server is not always available. If you check this box, the server list will show that this server has been ‘skipped’, but you can still select it to connect.
Auto-Expand Server Tree: Check this option to have the Server Tree be expanded automatically when you log onto the server.
SOTI MobiControl Integration: Additionally, you can enable integration with SOTI MobiControl by entering the URL of the MobiControl Deployment Server. This value can be a Host Name or IP address of the SOTI MobiControl Deployment Server. To make this feature available from the ‘Connections List’ of the Administrator, make sure to check the ‘Always Available?’ checkbox.
Retrieving the Server Serial Number
Once you have added the server definition, the server will appear on the Administrator console. If the IP address you provided is correct and the StayLinked server is currently running, you will see the server build and serial number in the Server List panel. Provide the serial number to the StayLinked customer service team to obtain your free evaluation license key, otherwise the server will run in ‘Demo Mode’ which will limit your ability to fully evaluate the software. If running a ‘Demo Mode’ license, the administrator will warn you when you log onto the server. A StayLinked Server running in ‘Demo Mode’ will be restricted to a maximum of three connections for one hour at a time.

Installing the License Key
To install your license key, you must first log in to the server. This is done by clicking on the server name. The following dialog box will appear.
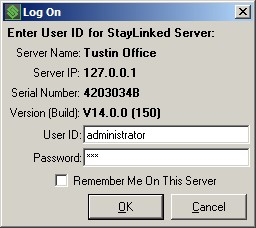
Enter the default User ID “administrator” and the default Password ‘esp’ for your server. Check the ‘Remember Me On This Server’ if you would like your User ID to be remembered. Click OK.
After logging in to the StayLinked server, you will see a list of available functions appear in a tree on the right side of the Administrator, under the server. Expand the ‘Server Configuration’ branch of the tree. Use the right mouse button and click on the ‘Server Licenses’ function. A small menu will appear. Select the ‘Add’ function from the menu to enter your license key.
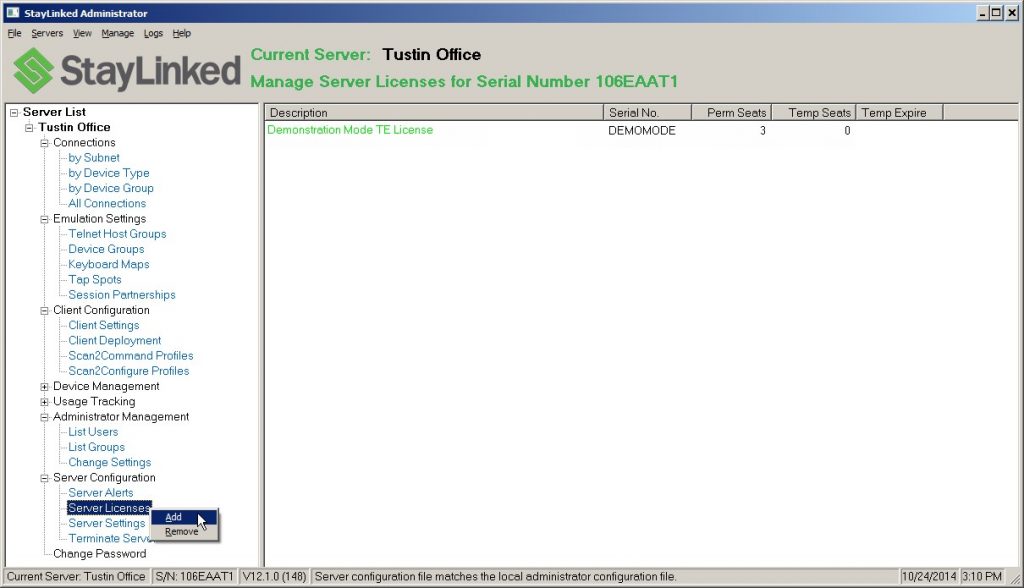
Fill-in the appropriate client quantities. The ‘Permanent Clients’ value and the ‘Temporary Clients’ value must match the values provided with your license information. Cut-and-paste your 23 character license key into the text box.
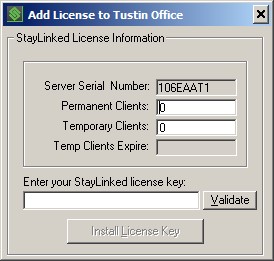
Click ‘Validate’ and then click ‘Install License Key’. You will be prompted to replace the currently installed DEMO license key. Click the ‘Yes’ button to complete this step. Finally, after the new license is installed, you will be automatically logged off the server. Please re-select the Server and log back on after installing a license.
Note that some features or options may not be available unless the appropriate license type is installed on your system.
Administrator Quick Tour
This section provides a quick overview of the StayLinked Administrator user interface.
The Administrator Screen
The following screen shot details the various sections of the Administrator screen, followed by a brief description of each section.
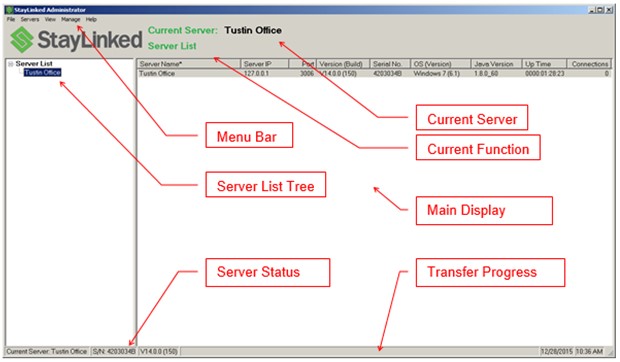
- Menu Bar – The pull-down menu bar is used to access and various Administrator functions.
- Servers Tree – This Explorer-style outline control provides a list of all defined servers. Indented below each server are additional branches describing function groups. These group branches can be expanded to show the server functions for that group. Click on a function name to select it. Depending upon the function, a pop-up window or a list may appear in the main display panel. In some cases, a second click of the function name with the right mouse button will show a small menu of additional options.
- Main Display Panel – Shows a list of defined servers, server functions, or function details pertaining to the current function. In some cases, double-clicking an item in the list will perform a default action. In some cases, clicking on items in the list with the right mouse button will show a small menu of additional options.
- Current Server – Shows the currently-selected server. All functions apply to this server.
- Current Function – Shows the function whose list appears in the main display panel.
- Server Status Bar – Shows currently-selected server, it’s serial number and version.
- Transfer Progress Bar – Shows the progress and status of file transfer transactions between the Administrator and the Server.
The Administrator Menus
The menu bar at the top of the Administrator screen provides access to a number of features and functions. Following is a brief description of each menu item.
- File Menu – Allows you to set Administrator Options and to Exit the program.
- Servers Menu – Allows you to Add, Edit, and Delete server definitions for this Administrator. Also provides methods to import and export the server configuration and to print and export the current server list. Options and also provided to Log On and Log Off of a server. All of the Server menu options refer to the currently selected server with the exception of the Add option. Additionally, there is a ‘Quick Connect’ option that will provide temporary access to servers that have not been added to the list.
- View Menu – Provides an option to refresh the List that appears in the main display panel. Another option provides a means of forcing the main display panel to Display the Server List. The last option let’s you toggle the Server Tree view on and off.
- Manage Menu – Provides a nested menu of all the server functions. These functions are available from the server tree (when visible) and from the main display panel when the Manage Server list is displayed. The Manage menu option provides an alternate method of selecting these functions when the server tree is not being displayed. The selected function will apply to the currently selected server. Note: The available options depend upon Administrator User permissions.
- Logs Menu – Provides a list of various server logs. The selected log will be retrieved from the current server. These logs provide various types of details about the server and are a valuable tool for diagnosing the overall health of the server and any issues that may be occurring. More details on the contents and settings for logs can be found in the Logging section of the knowledgebase.
Note: This Logs menu is visible only if Administrator User permissions allow. Your administrator version will determine to log options available. - Help Menu – Provides access to the StayLinked web site and application version information.
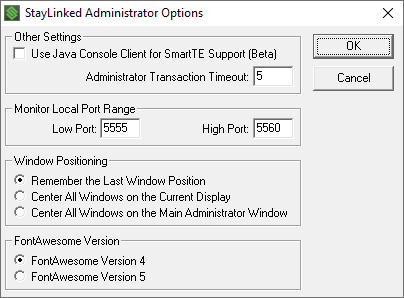
Administrator Options
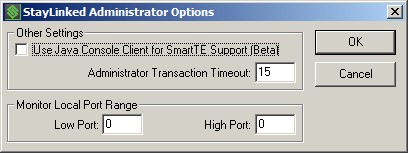
When you select the File->Options menu, the Administrator Options dialog will be displayed:
New options were added in v15.3 for Window Positioning and FontAwesome Version.
A new option has been added in v16.1 for BETA Evolve features. Note that this release makes the Java Console Client the default for new installations. If session monitor, share, or take control features in the connections list are not functioning normally, you can uncheck the first checkbox to go back to the Windows command-prompt style monitor.
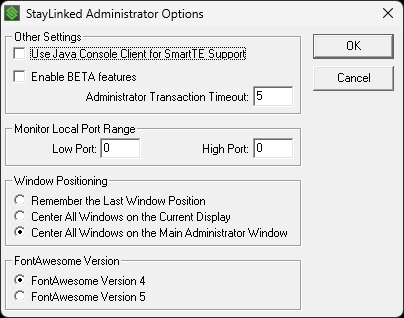
Use Java Console Client for SmartTE Support: Check this box to use the Beta Java Console Client when performing the Monitor, Share, Take Control or Start Console Session functions. The Java Console Client is capable of displaying SmartTE graphical elements rendered on dynamic graphical or reformatted graphical telnet screens. If this option is not checked, the original DOS Console Client will be used for these features and graphical elements will not be available. The Java Console Client requires that you have a current version of the Java Runtime installed on your Administrator PC.
Enable BETA Features: This options is specific to Evolve, which is a complimentary product that requires special licensing. Most Evolve customers are involved in services arrangements specific to the customer environment and needs. The SmartTE product does not require any Evolve features, articles will explicitly reference Evolve if those features and licensing are reqiured.
Transaction Timeout: Configure this option to adjust the transaction timeout value. If a StayLinked Server is located at a remote location with a poor network connection, it is possible that when the Administrator requests a transaction with the Server, the transaction could timeout. This option configures the maximum amount of time that the Administrator will wait for a response from the server before declaring a transaction timeout.
Monitor Local Port Range: Configure a Monitor UDP port range to match your Firewall if needed.
Window Positioning: Added to help users with multiple monitors or mobile computers to prevent dialogues or windows from appearing outside of the available display area.
FontAwesome Version: Configure the Administrator to display characters in newer FontAwesome libraries when working with icons and graphical screen designs.
Three font files are installed into the Windows font folder for use with the StayLinked Administrator.
- 'fontawesome.ttf' is the original Font Awesome Version 4 font file.
- 'fontawesome5.ttf' is the Font Awesome Version 5 font file added in v15.3 of the Administrator installation.
- 'staylinked.ttf' is the new proprietary StayLinked font file added in v15.3 of the Administrator installation.
The Administrator uses auto-selection logic for the 'fontawesome' font during the design of Graphical Button Captions and SmartTile Button Captions.
This Administrator dialogue determines which version of the FontAwesome font file to use for these auto-selection graphical element captions.
The Administrator will also detect a new Unicode range to trigger the use of the new 'staylinked.ttf' font file. Characters within the Unicode EE00-EEEF will use 'staylinked.ttf'. Characters within the range of Unicode F000-F8FF will use the FontAwesome.ttf icon in the selected version.
Share the post "Administrator User Guide – Using the StayLinked Administrator"