Getting Started with SmartBrowser Licensing
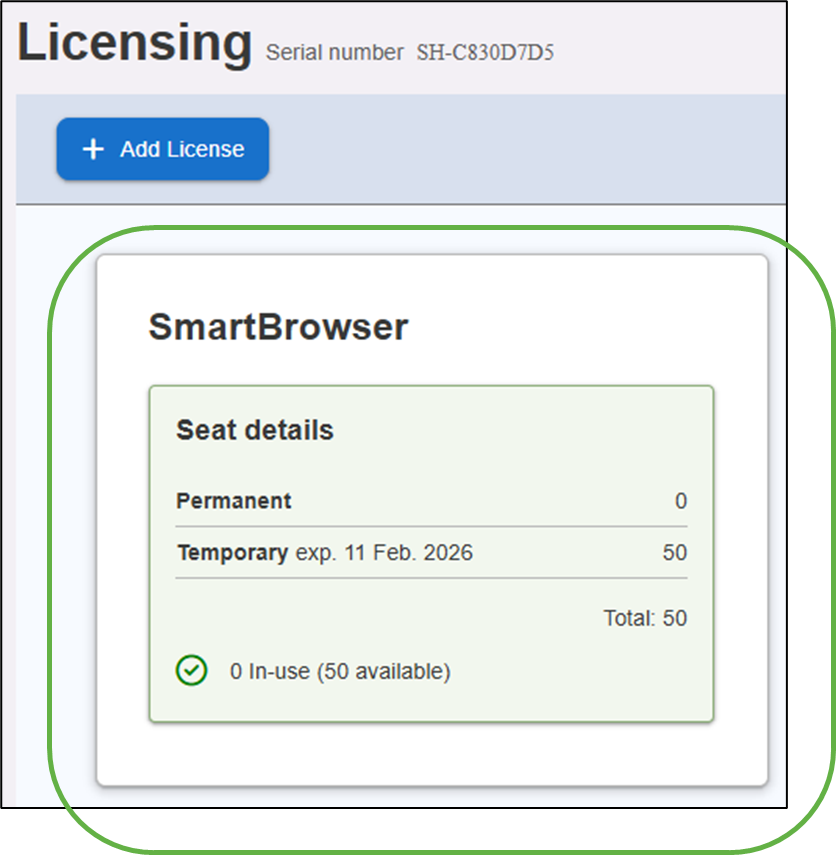
The first thing we need to get started is a license. The example shown below is a temporary license; typically used for evaluation of StayLinked software. The license information from StayLinked includes the following information:
StayLinked SmartBrowser
Server Serial Number: C830D7D5
Permanent Clients: 0
Temporary Clients: 50
Temp. Clients Expire: 11 Feb 2026
StayLinked License Key: NJOW9FQIT9RULT5BN2ORC2A
Adding and Configuring a New License
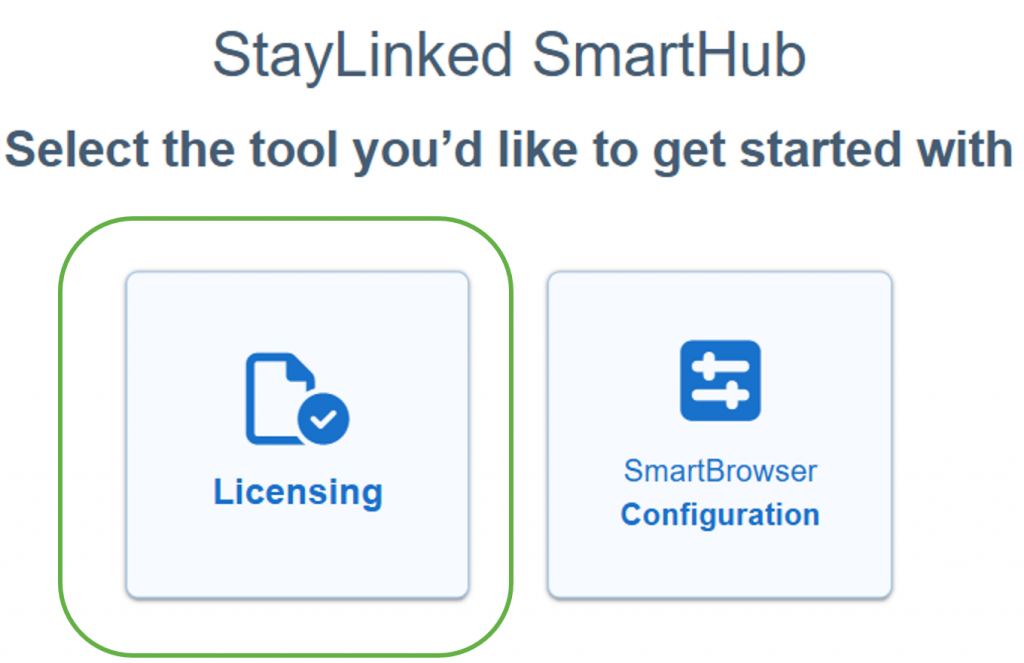
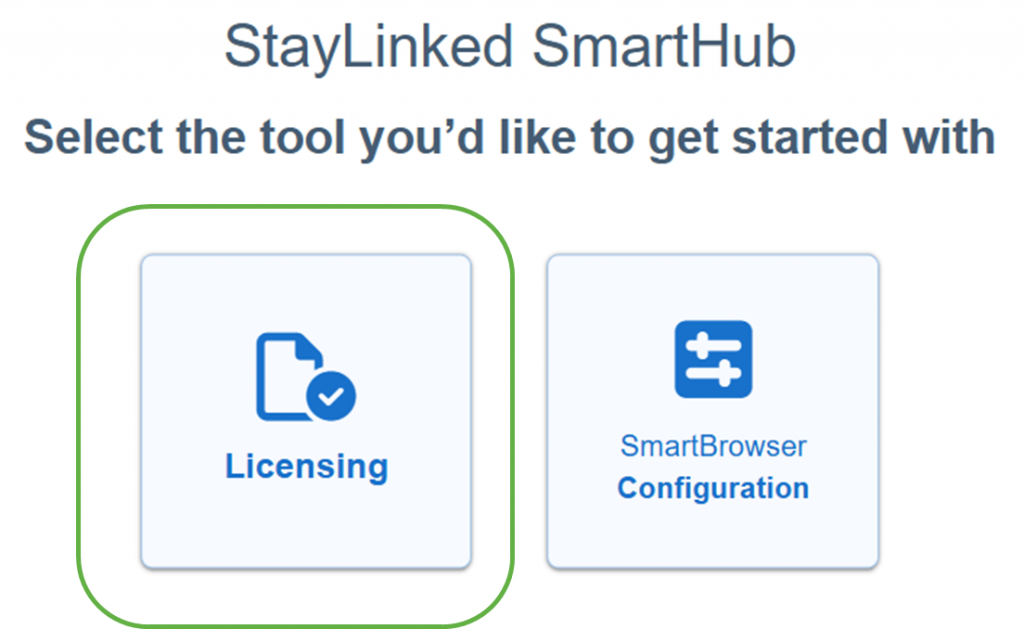
From the SmartHub home page, select ‘Licensing’.
On the next page, select ‘Add License’.
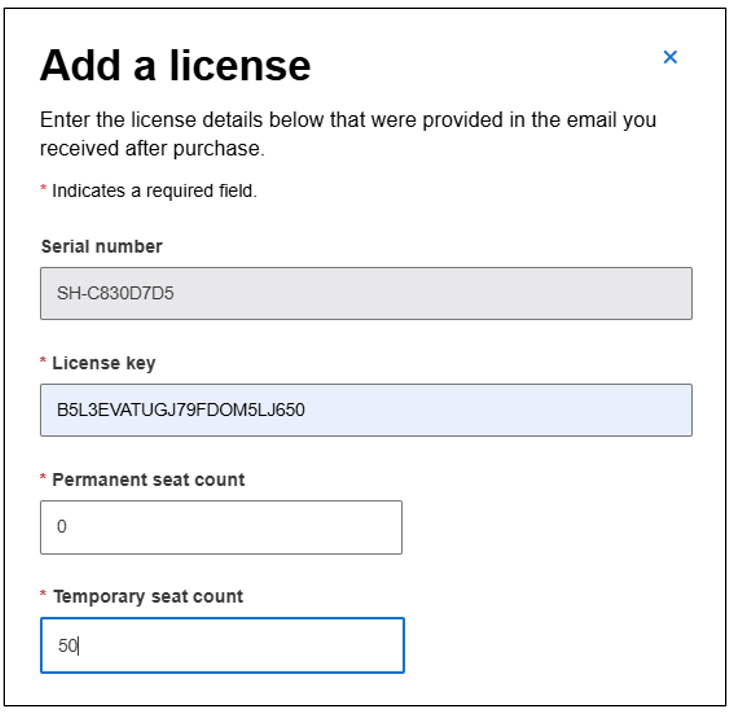
'Serial number' is pre-filled. Enter the rest of your license details as required. Note that these details must be identical to the license information received from StayLinked.
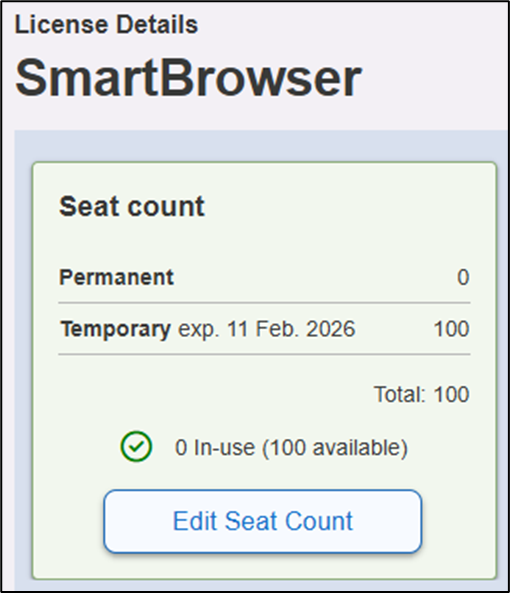
Our license now appears on the ‘Licensing’ page shown below. Tap anywhere on the license tile.

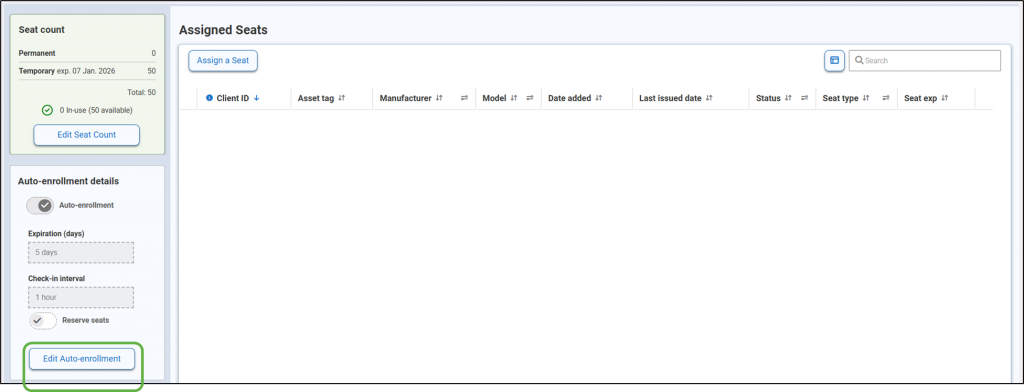
The 'License Details' dashboard provides information on all of the mobile devices SmartHub is aware of; including their identity, when they were granted seat assignments, the latest status, type of the seat and expiry date down to the minute. The details on the license we just added are shown at the top left of the screen. Instructions on extending the capacity of an already existing license are here.
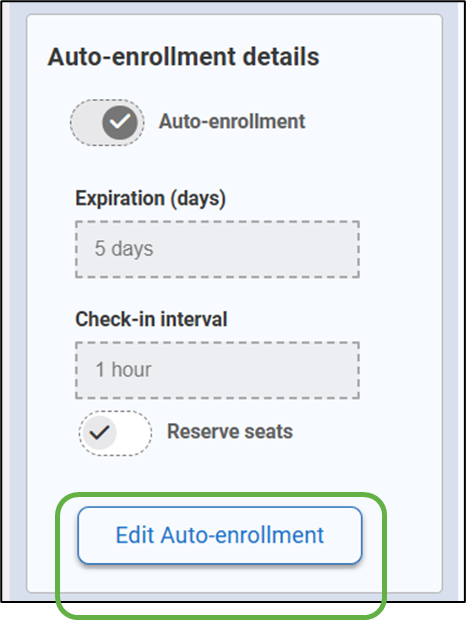
First let’s configure the Auto-enrollment details. Select ‘Edit Auto-enrollment’.
Auto-enrollment Seat Management
A seat management model should be chosen between Auto-enrollment and Manual assignment. Auto-enrollment assigns license seats automatically as devices check in, reclaiming seats when devices become inactive. Manual-assignment requires an administrator to assign seats explicitly and provides greater control, but with more administrative effort and less automatic cleanup. Systems may incorporate both models. A more in-depth comparison is Here.
For this example, we will cover Auto-enrollment.
The options we set for Auto-enrollment define the initial settings for all devices checking into the SmartHub to lease a seat.
In the 'License Details' dashboard in SmartHub, Tap ‘Edit Auto-enrollment’ at the bottom of the page.
It is important to note that SmartBrowser initiates the check-in process by checking in with SmartHub to lease a seat. SmartHub does not initiate communication with SmartBrowser.
Using Auto-enrollment, mobile devices checking in with SmartHub will automatically be assigned a seat if available.
The options we choose for Auto-enrollment define the default settings for all devices checking into the SmartHub to lease a seat.
Select ‘Edit Auto-enrollment’.
Expiration can be set 1 to 5 days. For this example set to 3 days.
Check-in interval can be set from 1 to 4 hours. For this example set to 3 hours.
Tap ‘Save changes’.

Configuring a Device for Auto-enrollment
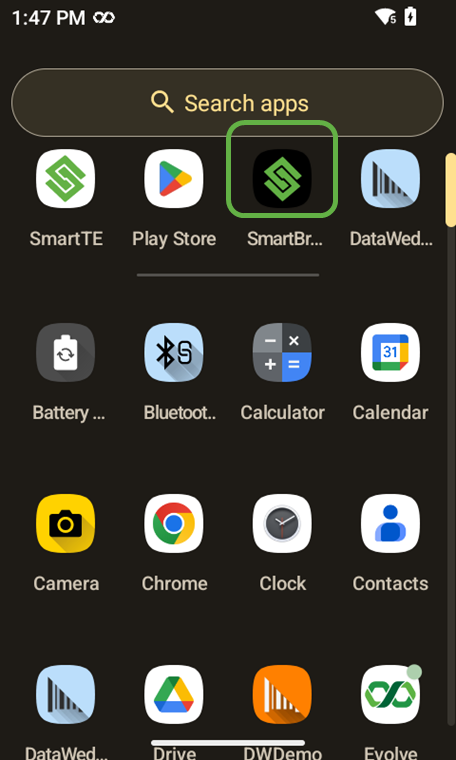
Now let’s configure our first device to check-in for a seat. On your mobile device, tap the SmartBrowser icon.

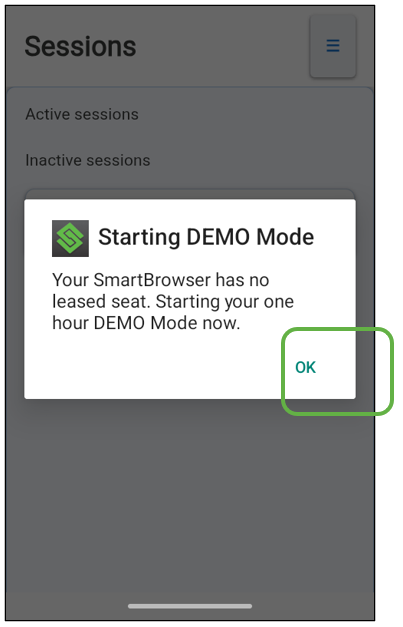
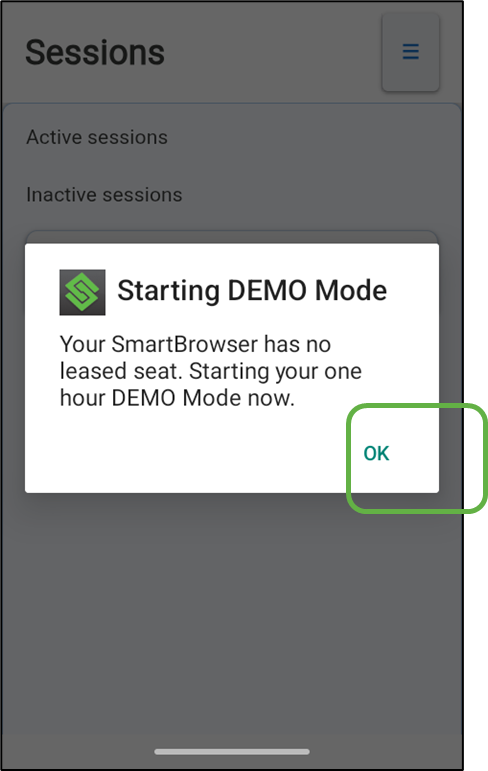
Without a leased seat, SmartBrowser runs in DEMO Mode. DEMO Mode provides a 1-hour usage period, with reminder prompts at 10 minutes and 5 minutes before the session ends. When the DEMO period expires, all sessions close and SmartBrowser must be restarted to continue.
Tap ‘OK’.
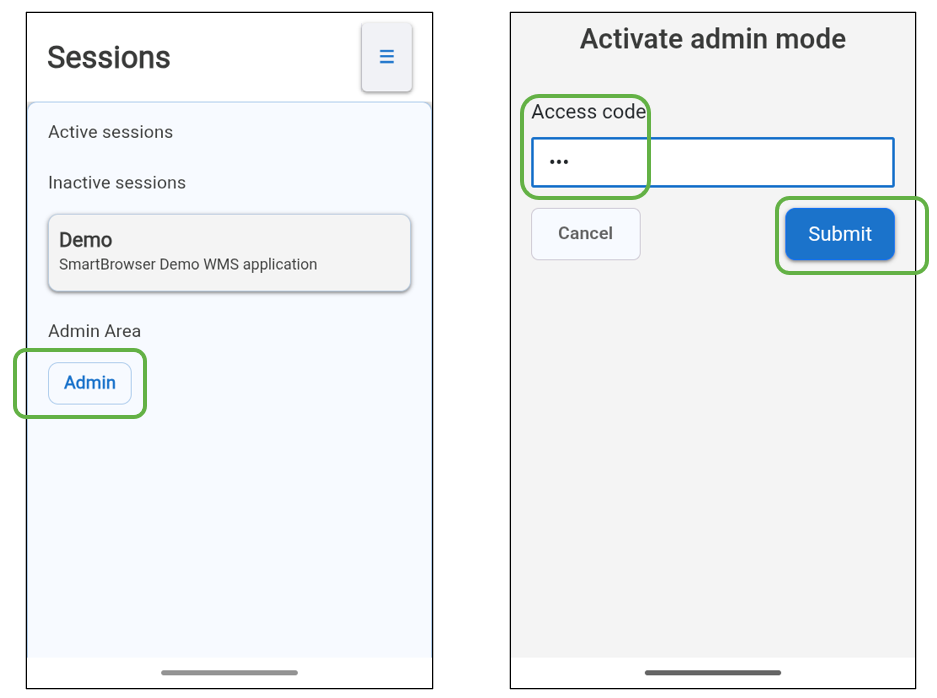
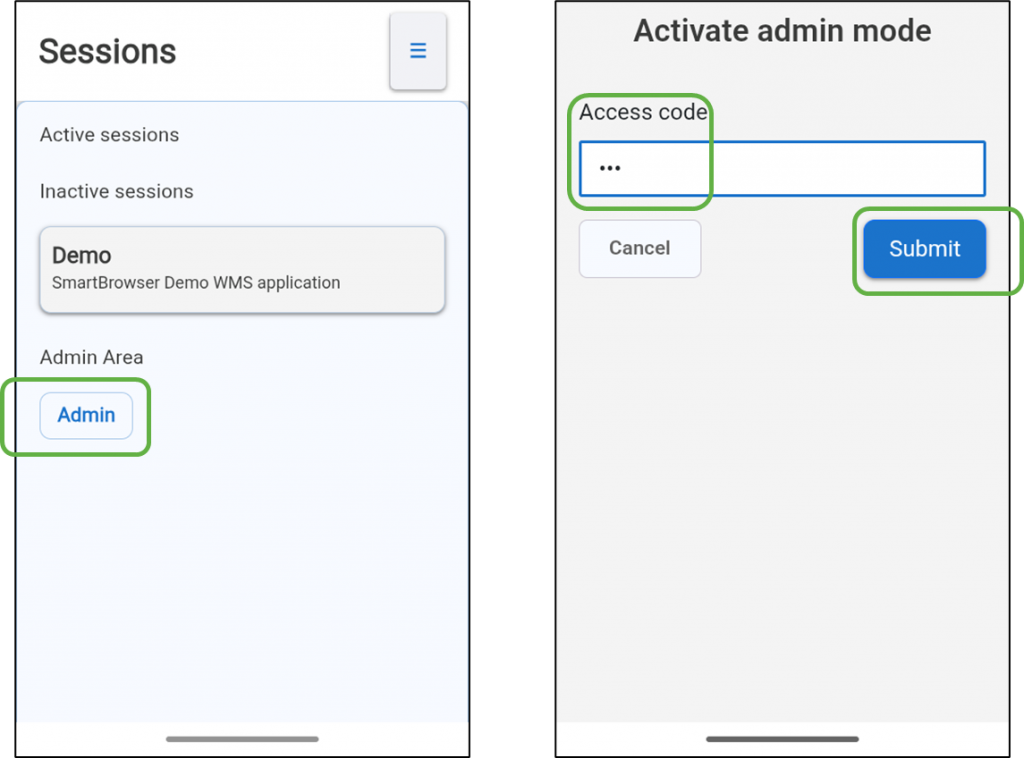
Tap ‘Admin’.
Enter the access code. The default is ‘esp’.
Tap ‘Submit’.
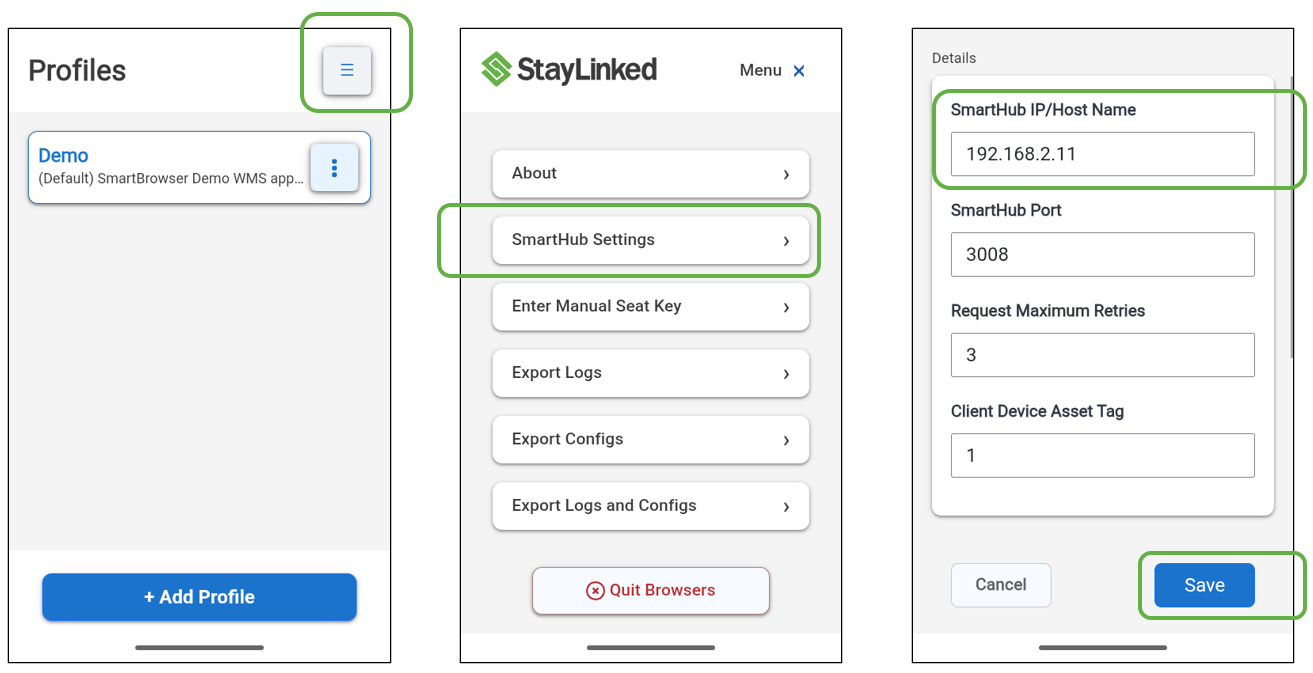
Tap the hamburger menu at the top right of the display.
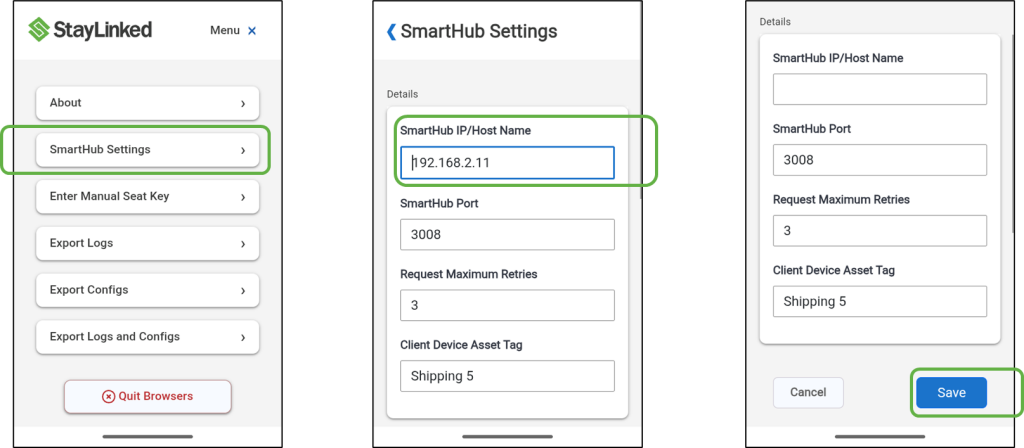
Tap the ‘SmartHub Settings’ button.
Enter the IP address of the computer hosting SmartHub. Leave the rest of the options at default and tap ‘Save’.
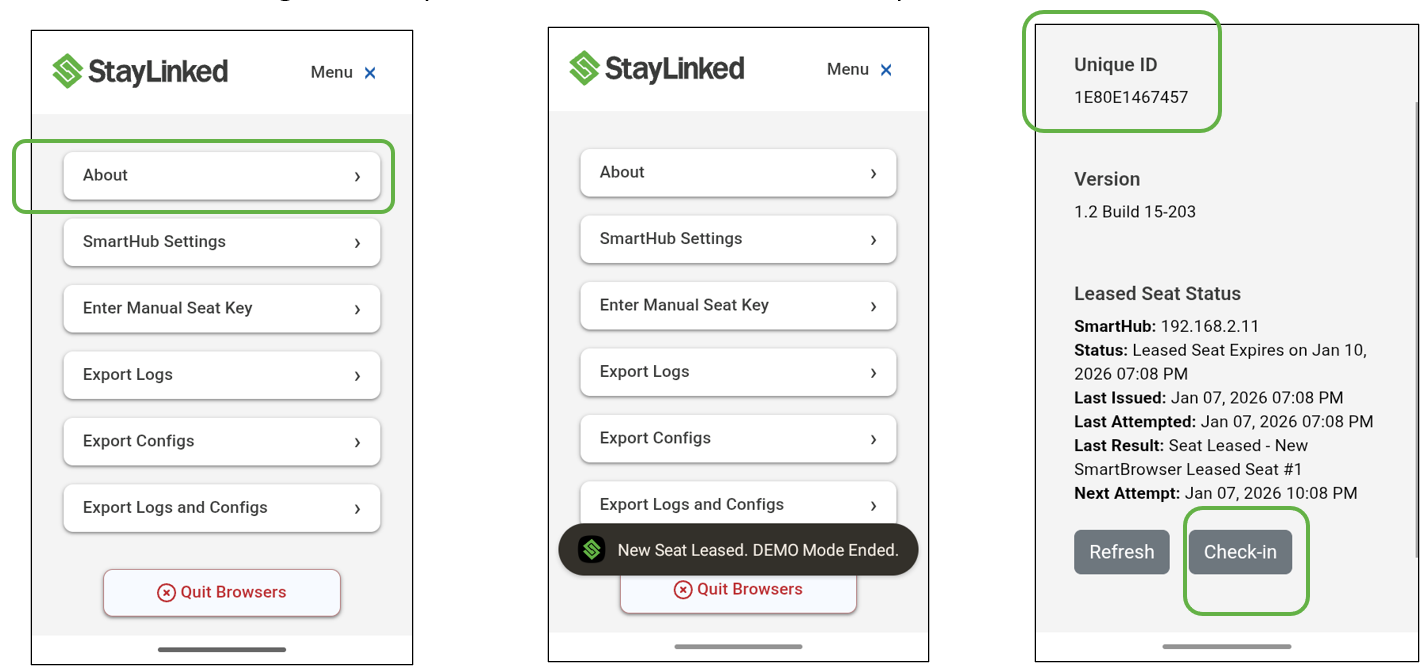
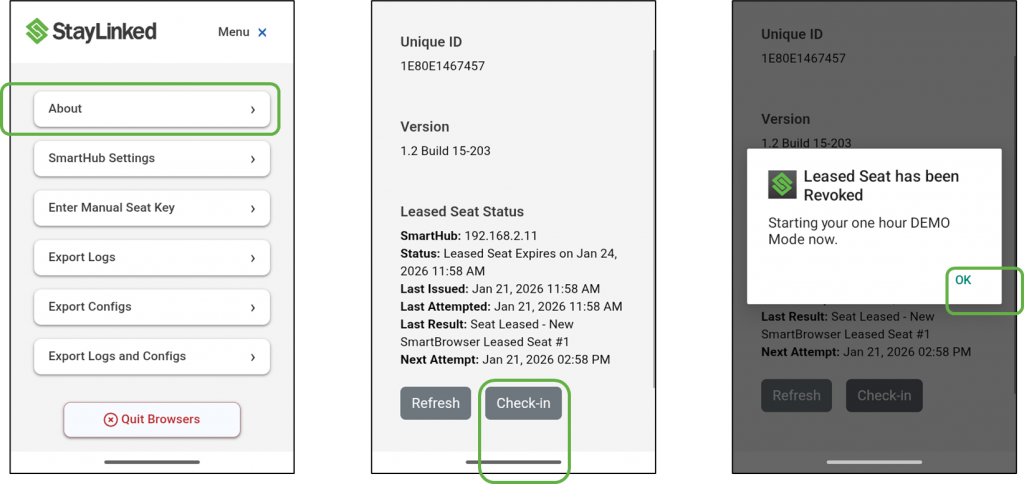
Tap ‘About’.
By the time you view this screen, your device may have already leased a seat from SmartHub. When this occurs the device will display the message 'New Seat Leased. DEMO Mode Ended’.
If your device has not yet leased a seat, try tapping the ‘Check-In’ button on the 'About' screen.
The Android OS has assigned a Unique ID for the device, shown on the top left of the 'About' screen.
Back in the 'License Details' dashboard in SmartHub the newly licensed device appears in the list of assigned seats as shown below. If it is not visible, try refreshing the browser page on the computer hosting SmartHub.
The License Details dashboard provides information on all known mobile devices, times they were granted seat assignments, the latest status, type of the seat and expiry date down to the minute.
Select the blue ‘Client ID’ of our first licensed device.

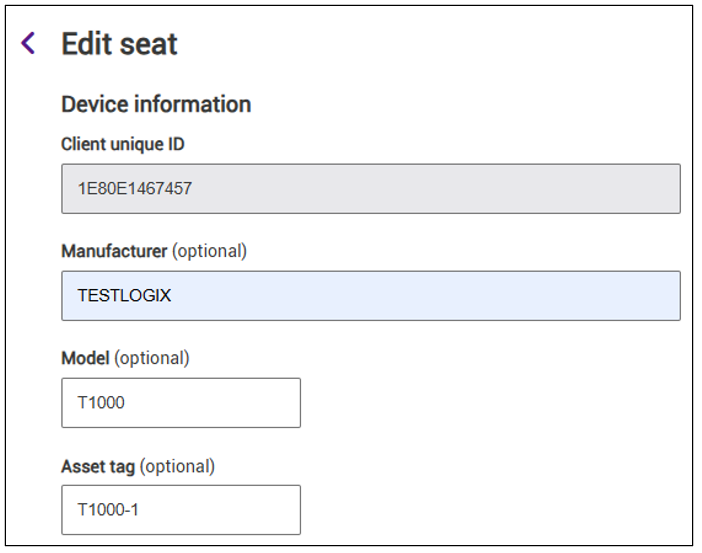
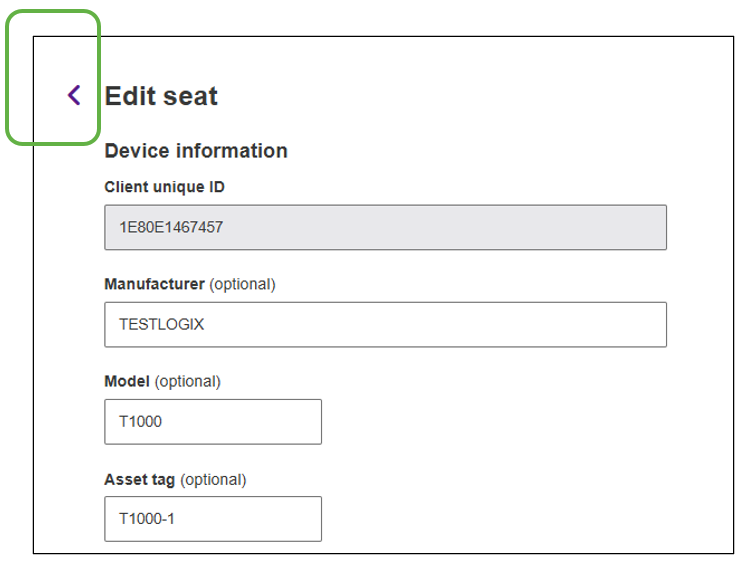
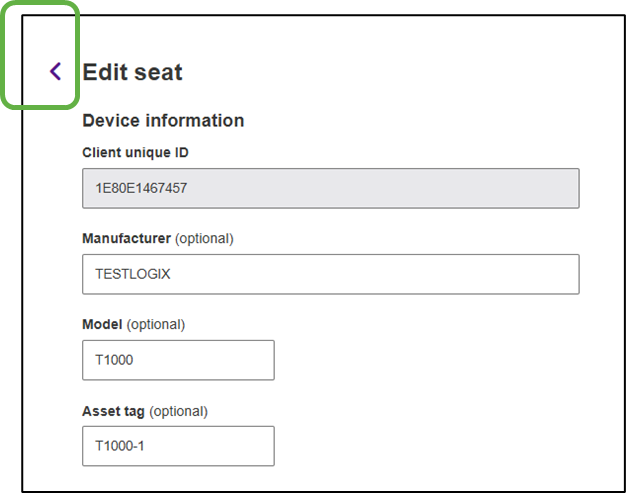
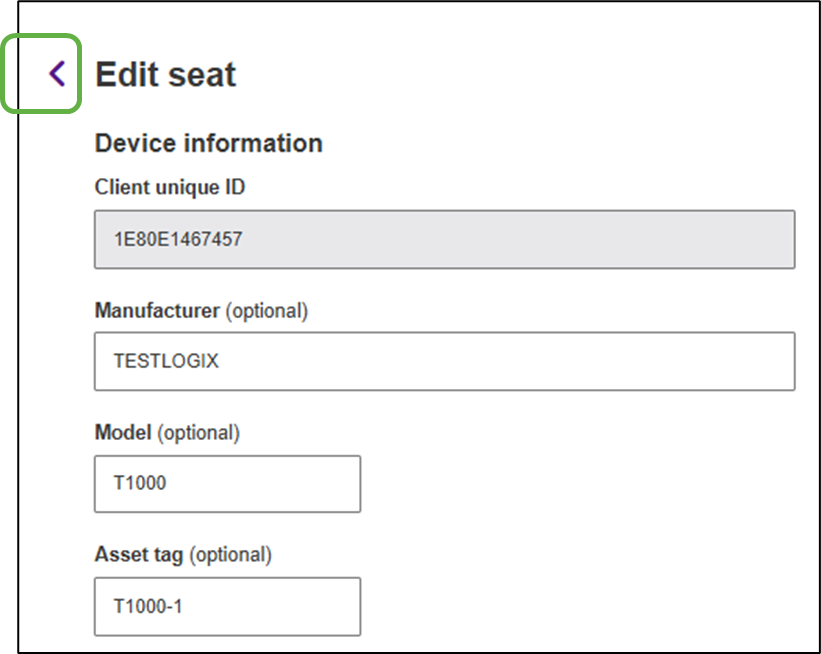
The ‘Edit seat’ pop-up menu is where the behavior is configured for a single mobile device/seat. Client ID, Manufacturer and Model are pre-filled. Manufacturer and Model can be edited. Asset tags are common on mobile devices, and we have entered ‘T1000-1’ for this one.
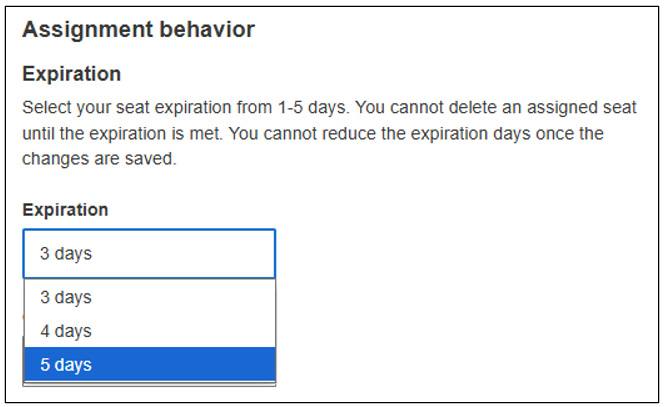
In the Assignment behavior section, the seat expiration period and check-in interval for a specific device can be adjusted. Previously we configured the default Auto-enrollment details for our entire license at an Expiration of 3 days. For this device, let’s set it to expire in 5 days.
SmartTip! We can increase the expiration date in this section from that of the Auto-enrollment details, but we cannot reduce it.
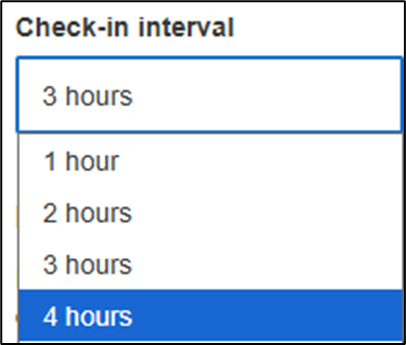
Now let’s adjust the check-in interval to 4 hours.
Now on the bottom of the page, select ‘Save Changes’.
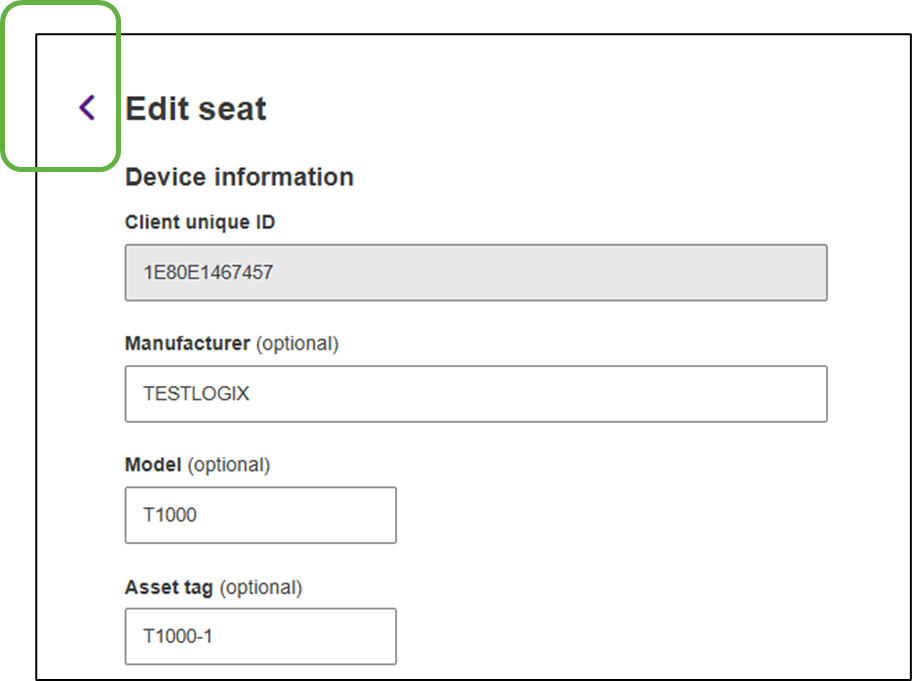
Click on this back arrow to return to the ‘License Details’ dashboard.
The updates we made for this Client ID are now reflected on the ‘License Details’ dashboard as shown below.

Reserving a Seat
Situations arise that may require reserving a seat for a particular device or group of devices.
Some example situations are:
- Supervisor or IT administrator devices
- High-priority workflow devices
- Devices used for safety or compliance tasks
- Devices operating in areas with limited connectivity
Reserving a seat guarantees that a specific device always retains access to SmartBrowser, regardless of activity patterns or fleet changes.
Important Notes on Reserved Seats:
- Reserving a seat for a specific device is intended to protect license capacity, not to prevent seat expiration. 'Reserved' does not mean 'permanent access' if the device can't check in before its seat expires.
- A reserved seat ensures that license capacity in SmartHub is set aside for the designated device.
- Reserved seats continue to occupy a license seat until they are explicitly unreserved and deleted from the Assigned Seats list in SmartHub.
- Reserved seats still expire based on their configured seat expiration date.
- If a device with a reserved seat is unable to reach SmartHub, the device enters Demo Mode once the seat expires. When the device is able to check in again, it automatically reclaims its reserved seat.
- If a device with a reserved seat is lost or destroyed, an administrator must revoke the seat for that device.
- After the seat reaches its expiration date, the administrator can delete the assigned seat from SmartHub.
- At that point, the seat is returned to the available seat pool and can be reassigned to another device.
Let’s reserve the seat on the device we just assigned one to.
Select the blue ‘Client ID’ of our device that just leased a seat.

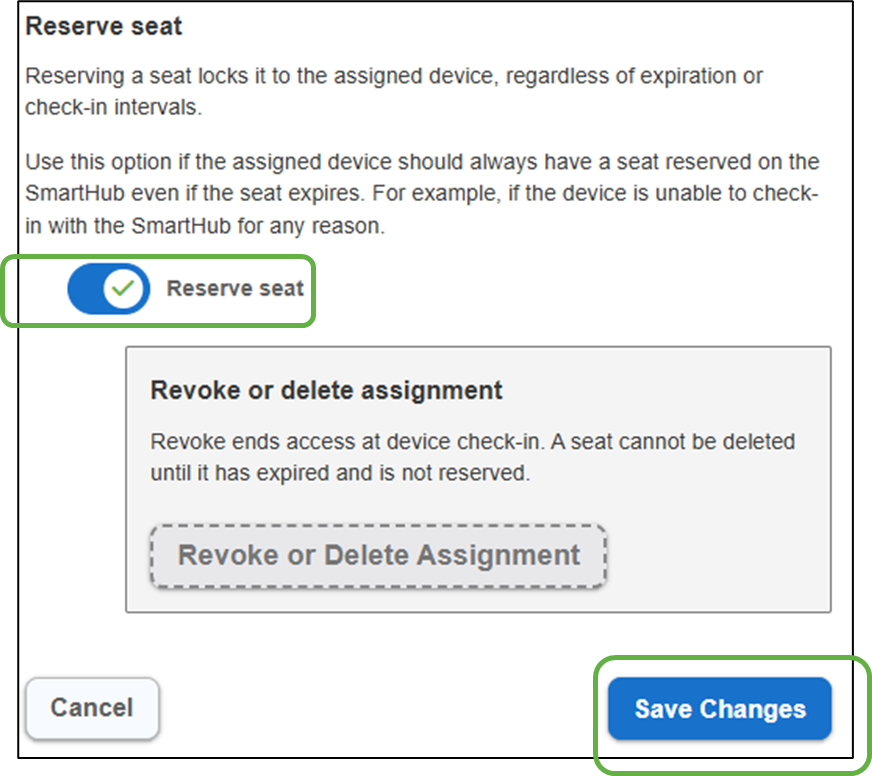
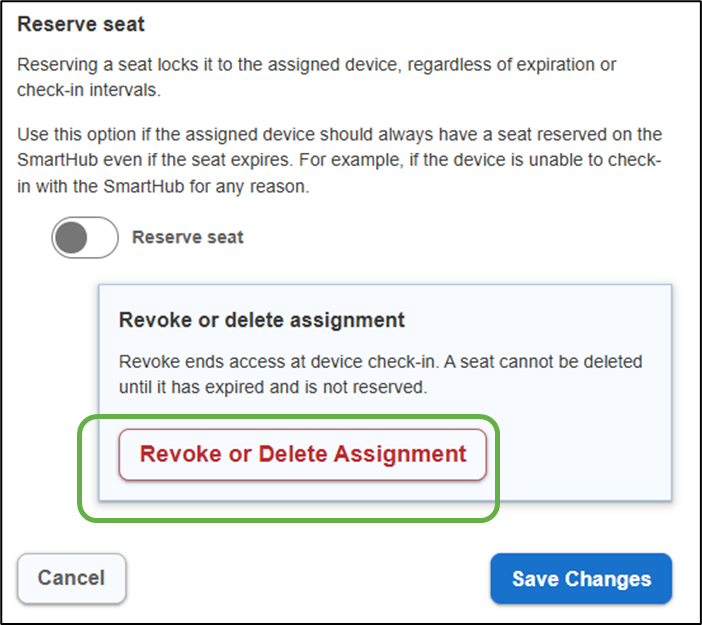
Select the slide control to reserve the seat.
Select ‘Save Changes’.
Click on this back arrow to return to the ‘License Details’ dashboard.
Back in the ‘License Details’ dashboard, our device is now shown as ‘Reserved’.

Revoking an Assigned Seat
Situations arise periodically where seats must be revoked on certain devices. Revocation prevents unused devices from holding seats indefinitely.
Some example situations are:
- Manually enrolled devices. Manual enrollment does not reclaim seats automatically.
- Devices with reserved seats that no longer require reservation
- Lost devices
- Devices being sent for repair
- Retired devices
- Devices that are mis-enrolled
- Security – access removal for compromised devices
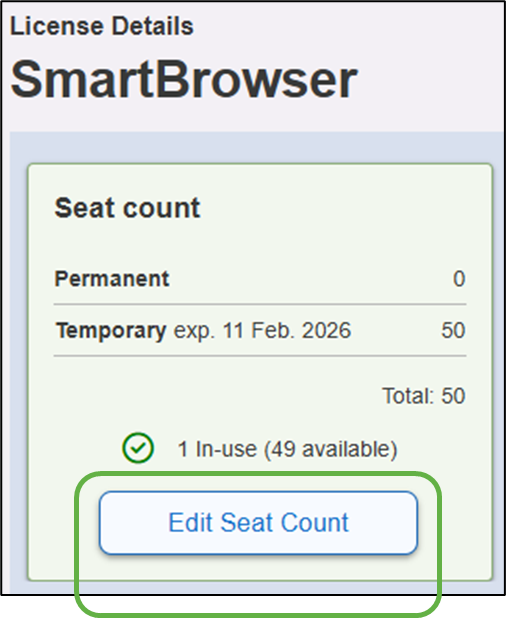
Notice the seat count below indicates ‘1 In-use (49 available)’. The one in use is our test device.
Let’s revoke the license seat on this device now.
Select the blue ‘Client ID’ of our test device.

Before this particular license seat can be revoked, first it must be unreserved.
Select the slide control to un-reserve the seat
Select ‘Save Changes’

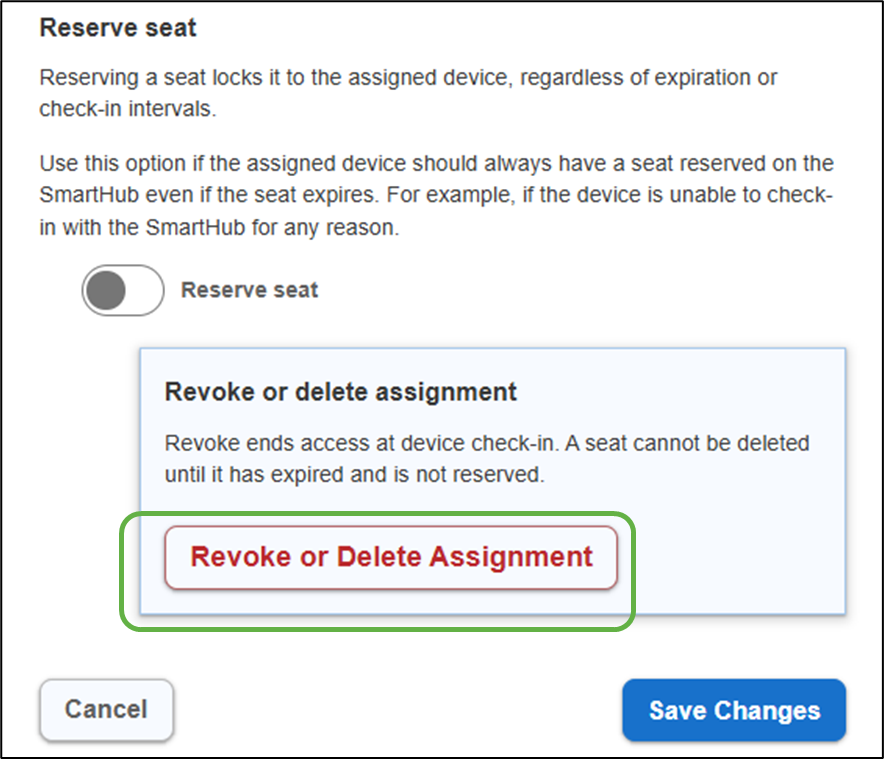
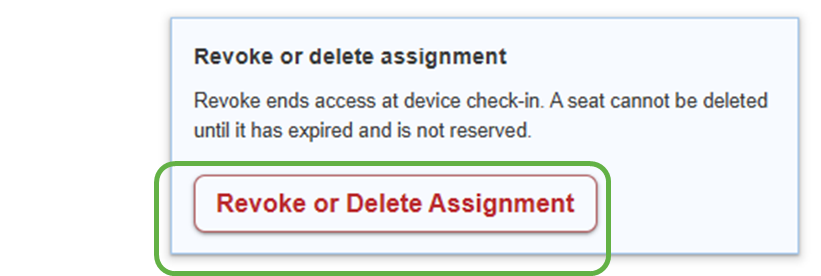
Notice when the seat is not reserved, the option to Revoke or Delete Assignment is active (shown in red).
Select ‘Revoke or Delete Assignment’ now.
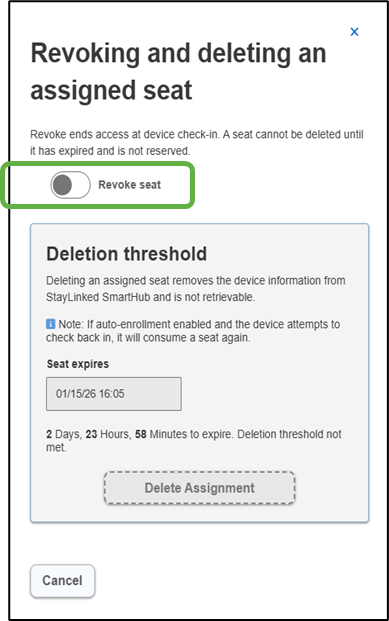
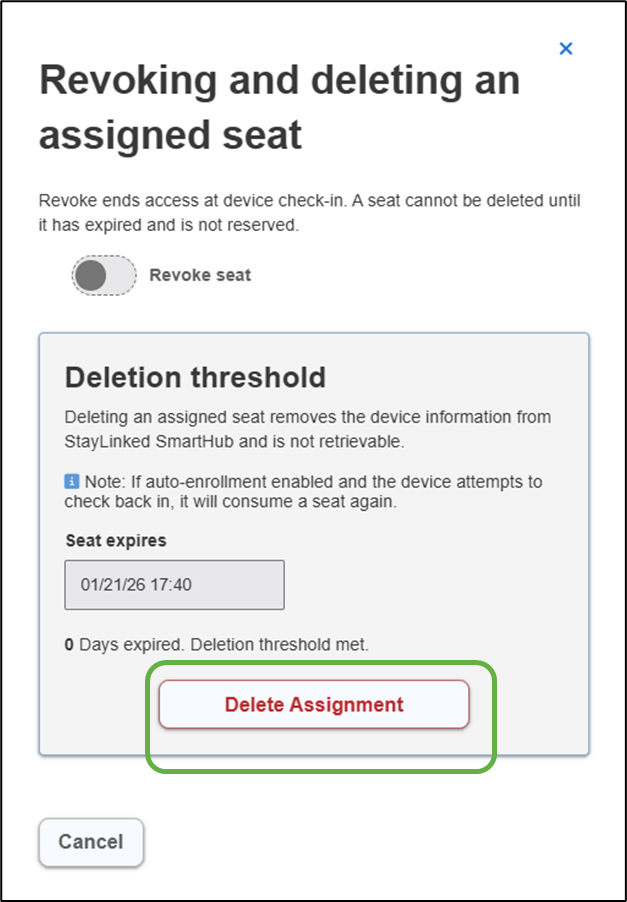
Select the slide control to Revoke the license seat
Click on this back arrow to return to the ‘License Details’ dashboard.
Back in the ‘License Details’ dashboard, once the browser window is refreshed, our device status has changed from ‘Active Auto’ to ‘Revoked Auto’ and the seat type changed from ‘Reserved’ to ‘Dynamic’.
Notice that although the seat is revoked in SmartHub, the Seat Count still indicates ‘1 in-use (49 available)’.
The seat count will return to 50 available once the device checks in to learn its seat assignment has been revoked OR the Seat expiry date is reached.

Revoked Seat Behavior
Devices that have had their license seat revoked and are running in Demo mode will continue to check-in with SmartHub at the default interval of 1 hour.
To prevent a device from automatically acquiring another license seat on check in:
- Leave the device entry in the Assigned Seats list on the License Details dashboard in SmartHub.
Or
- Clear the credentials for SmartHub IP/Host Name in the SmartBrowser client on the device.
Rather than waiting one hour for the device to check in, open the ‘About’ menu in the SmartBrowser client on the device.
Tap ‘Check-in’.
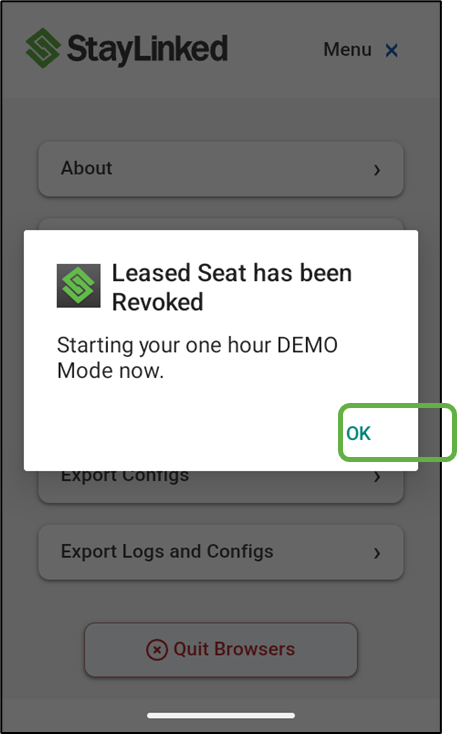
Once the device checks in, SmartHub revokes its license and SmartBrowser enters Demo Mode.
Tap ‘OK’
When the SmartHub browser window is refreshed, notice the seat count has updated to ‘0 In-use (50 available)’
As well, a new selection for ‘Delete Expired Assignments’ appears in red. Selecting this option removes ALL expired seat entries from the dashboard.
Select ‘Delete Expired Assignments’ now.

Select ‘Delete’ in the next window to confirm.
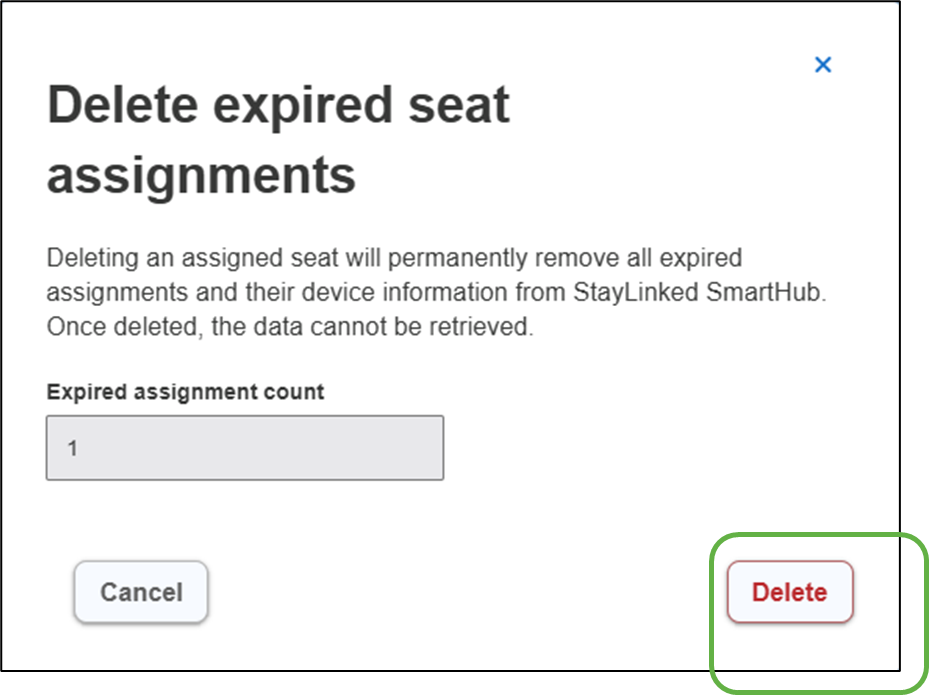
All expired assignments are removed.

Instructions on deleting a single seat assignment are HERE.
Manually-assigned Seat Management
Unlike the Auto-enrollment method of seat management, Manual-assignment requires an administrator to assign seats explicitly. This provides greater control, but requires more administrative effort. Systems may incorporate both models. A more in-depth comparison is Here.
Manual enrollment might be used:
- In highly controlled or regulated environments
- Devices that operate offline or with limited connectivity
- Testing, staging, or lab environments
- Smaller device fleets that do not wish to incorporate a SmartHub
Configuring a Device for Manual-assignment
On your mobile device, tap the SmartBrowser icon.
With no license seat leased yet, SmartBrowser runs in DEMO Mode. DEMO Mode provides a 1-hour usage period, with reminder prompts at 10 minutes and 5 minutes before the session ends. When the DEMO period expires, all sessions close and SmartBrowser must be restarted to continue.
Press ‘OK’.
Tap ‘Admin’
Enter the access code. The default is ‘esp’.
Press ‘Submit’
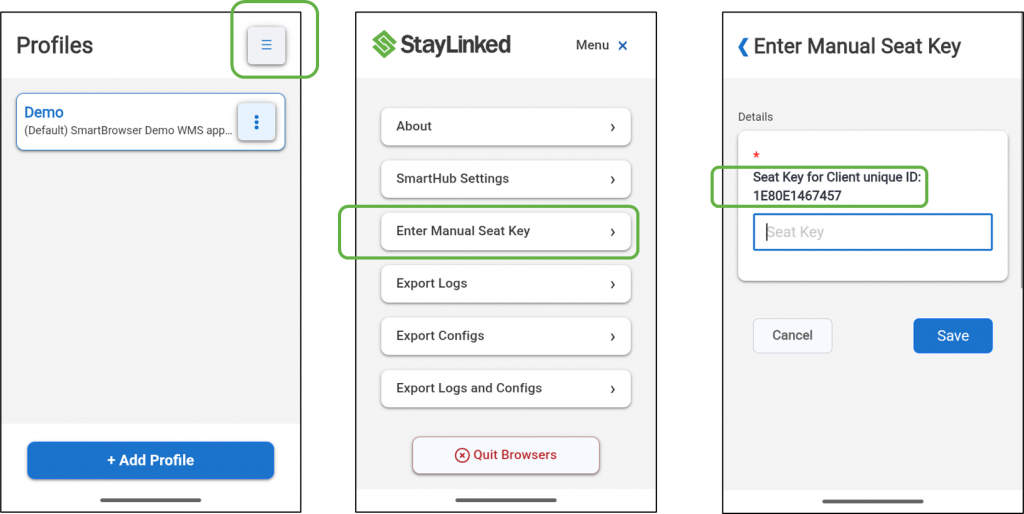
Tap the hamburger menu at the top right.
Tap the ‘Enter Manual Seat Key’ button.
The next screen prompts us for a ‘Manual Seat Key’.
Notice that the unique Client ID is displayed. This unique ID is generated by the Android OS of the mobile device.
In SmartHub, select the ‘Assign a Seat’ function from the 'License Details' dashboard.
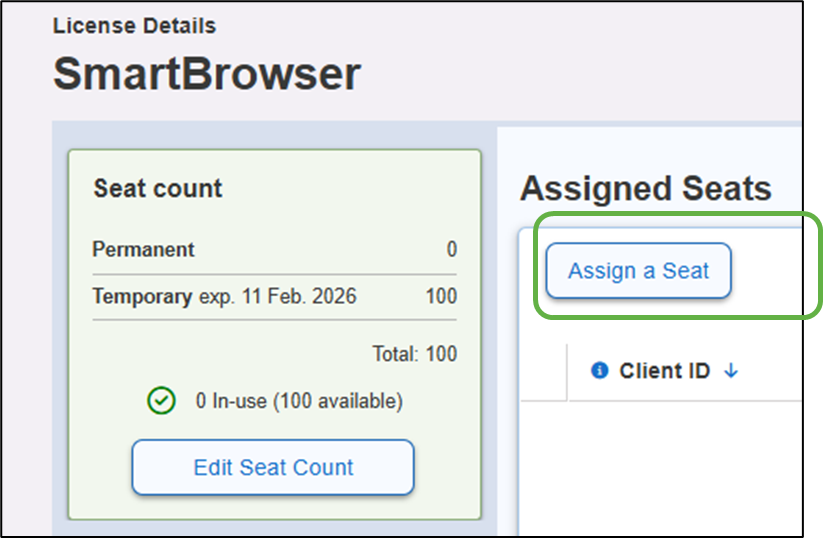
A pop-up menu appears.
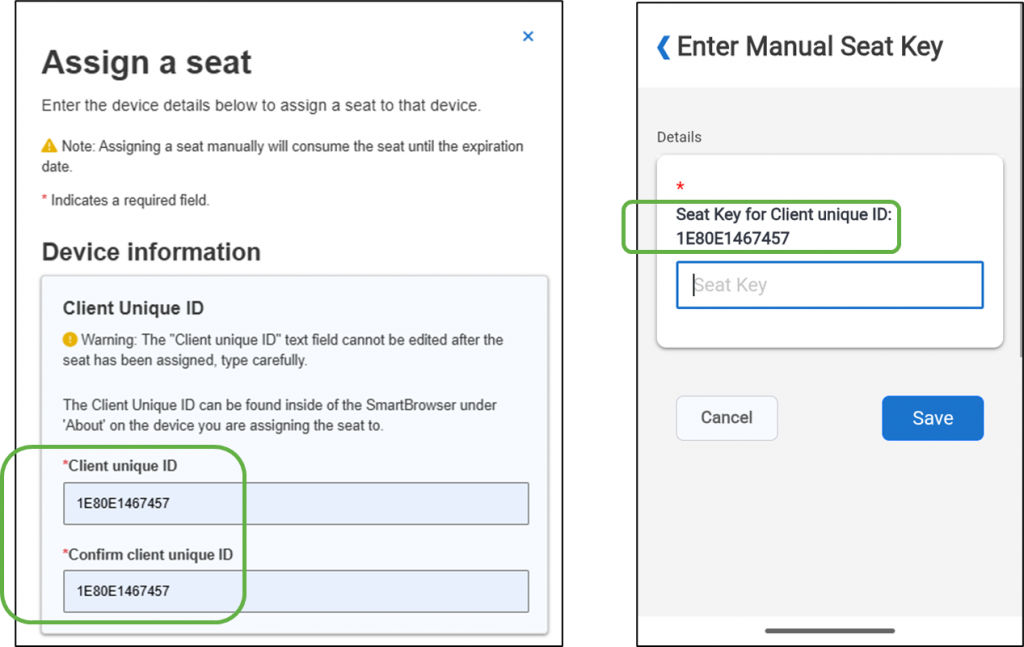
Very carefully, enter the Client ID of the mobile device into the appropriate fields in the SmartHub pop-up window.
SmartTip! The Client ID cannot be edited after the seat has been assigned. If an error is made entering the client ID, there are 3 possible corrective actions:
- Wait for the seat to expire per its defined expiration (1 to 30 days).
- Contact StayLinked support for a temporary license seat until the assigned seat expires.
- Follow these instructions to retrieve a mis-assigned seat here.
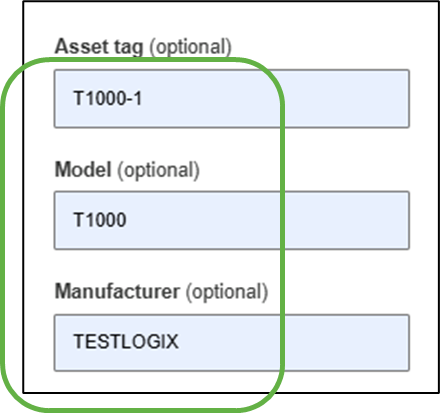
The following fields are optional, but helpful in managing large device fleets.
Although a device configured for Manual-assignment isn’t checking into SmartHub to renew its seat, the device still appears in the 'License Details' dashboard in SmartHub so an administrator can monitor where all seats have been assigned.
SmartTip! If the device is ever given the SmartHub IP/Host Name and checks into SmartHub, the values for Model and Manufacturer will be overwritten in SmartHub by the values provided by the device itself.
Unlike Auto-enrollment, the expiration timeframe for a Manually-assigned seat can be set to a maximum of 30 days.
Let’s set the expiration to 30 days.
You may wonder why a check-in interval must be defined for a manually-assigned seat that will not check-into SmartHub for a license renewal. This is in place to support revoking the manual license if required. We can leave this at the default of 1 hour.

When the Manually-assigned seat expires we may want to make absolutely sure there is a license seat available for when we manually re-assign the seat.
For this example, we will leave this at default.
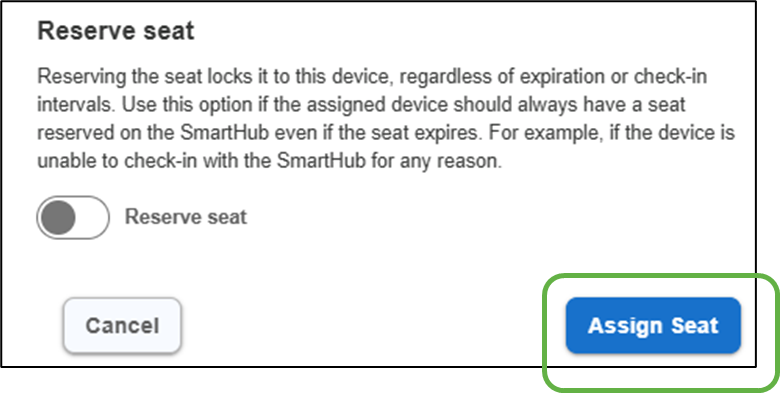
Now select ‘Assign Seat’ at the bottom of the pop-up menu.
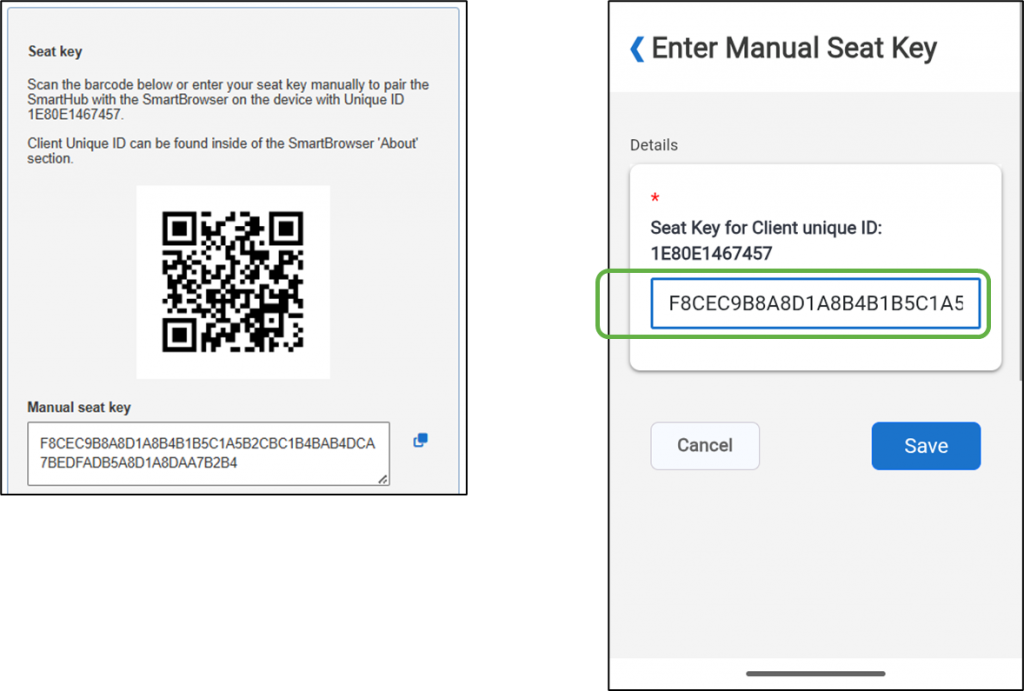
A pop-up window appears in SmartHub containing the Manual seat key.
The key information can be manually entered into the Seat Key input field in SmartBrowser or we can scan the QR code with the mobile device to enter the information. The QR code can be saved as an image and printed or it can be scanned directly from your browser screen.
Once we confirm the information is correct, tap ‘Save’ on the mobile device.
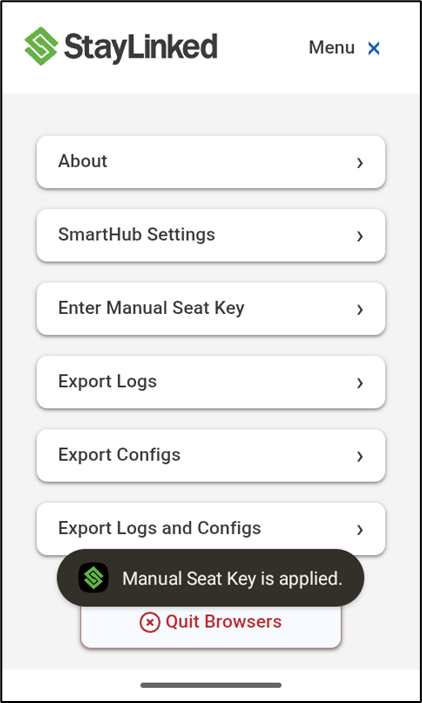
Our mobile device indicates a ‘Manual Seat Key is applied’.
Select the back arrow at the top left of the ‘Edit seat’ pop-up window.

Our device now appears in the 'License Details' dashboard in SmartHub.

Revoking a Manually-assigned seat
Cases where we may want to revoke a manually-assigned seat:
- The unique Device ID entered into SmartHub when assigning the seat was incorrect (mis-assigned).
- Device is leaving the fleet (repair or retirement) and we wish to retrieve the seat for use on another device.
- Security – access removal for compromised devices.
SmartTip! If the device is lost or damaged to the point where SmartBrowser cannot be accessed, the license must expire naturally per its configured expiration timeframe (up to 30 days) before it is free to use on a different device. In this case, contact StayLinked support for a temporary license if required. See also Spare License Strategy here.
Notice the seat count below indicates 1 seat in use, 99 available.
Select the blue ‘Client ID’ for the seat we wish to revoke.
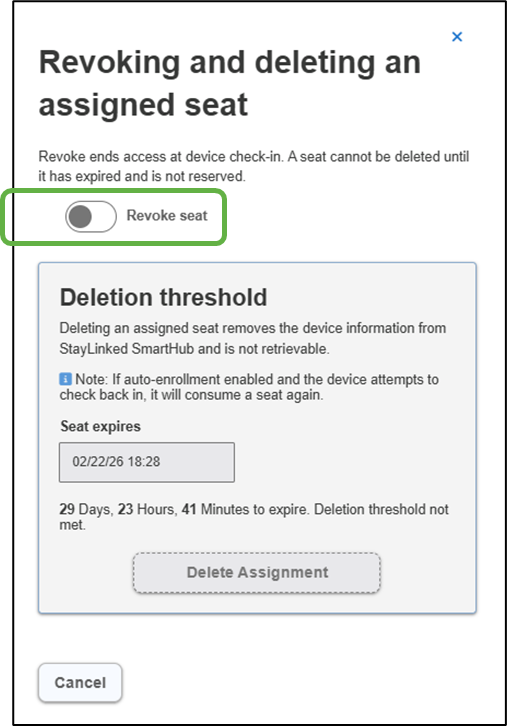
From the ‘Edit seat’ pop-up window select ‘Revoke or Delete Assignment’.
In the next pop-up window turn the slider for ‘Revoke seat’.
Select the back arrow at the top left of the ‘Edit seat’ pop-up window.
Back in the 'License Details' dashboard the seat status now indicates ‘Revoked Manual’.
Note that although the status of this seat shows ‘Revoked Manual’ our Seat count below still indicates '1 In-use'.

Select ‘SmartHub Settings’ from the admin menu in SmartBrowser on the mobile device.
Enter the IP address or Host Name for your SmartHub.
Tap ‘Save’.

The mobile device will check in with SmartHub, learn its seat has been revoked, and enter DEMO Mode.
Tap ‘OK’
Select ‘SmartHub Settings’ again and delete the SmartHub IP/Host Name. This will prevent the device from checking in with SmartHub and being granted a seat via auto-enrollment.
Tap ‘Save’.
Refresh your browser page for SmartHub
Our seat count now indicates ‘0 In-use’ and a selection for ‘Delete Expired Assignments’ appears.
Expired seat assignments can be deleted en masse or individually. Both methods are covered here.
Appendix A: Deleting a Single Seat Assignment
Seat assignments can alternately be deleted individually.
Select the blue ‘Client ID’.

Scroll to the bottom of the Pop-up window and select ‘Revoke or Delete Assignment’.
In the pop-up window, select ‘Delete Assignment’.
The seat assignment entry is now deleted.

Appendix B: Extending License Capacity
It is very common to extend license capacity as more devices are brought online. This section covers expanding an existing license.
From the SmartHub home screen select ‘Licensing’.
Tap anywhere on the license tile.
Select ‘Edit Seat Count’.
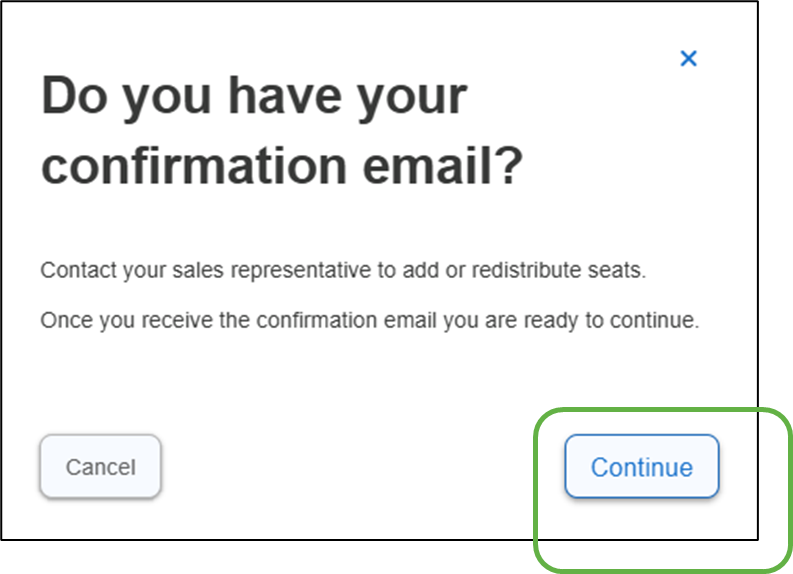
Select ‘Continue’.
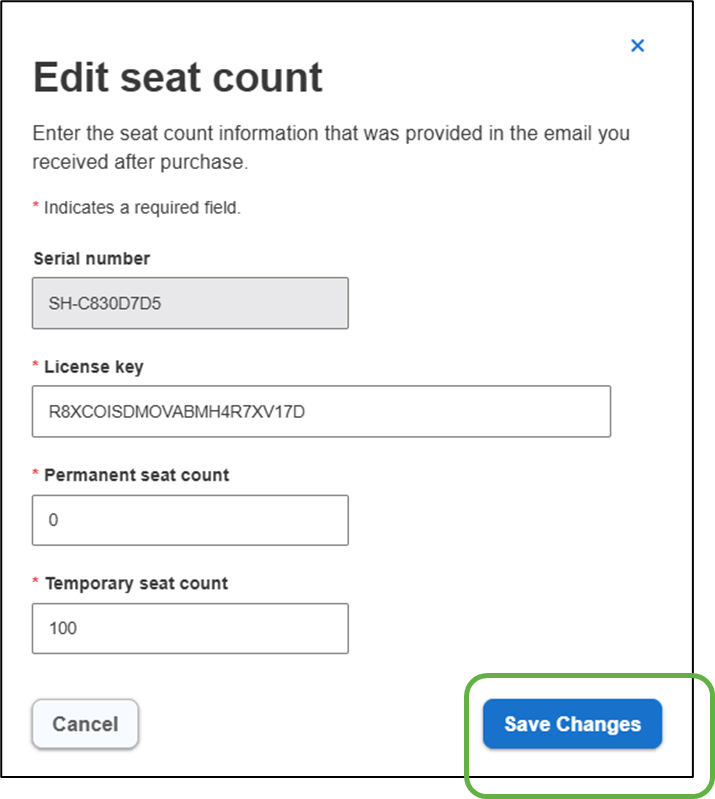
Serial number is already filled in. Enter the rest of the license details as required. Note that these details must be identical to the license information received from StayLinked.
Select ‘Save Changes’.
A pop-up message appears indicating the seat count change was successful.
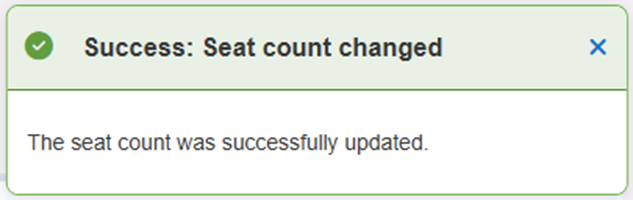
The License Details are now updated.
Share the post "License Seat Management Quick Start Guide"