
A package is a bundle of settings and configurations for the SmartBrowser device. This allows configurations to be easily distributed across devices. This article will describe the various Package Configuration options and their functions.
Package Details
Package name
This is the name of your SmartBrowser Package (SBP). It is used to identify this configuration package in SmartHub and on exported packages.
Version
Version number for this package. Version numbers are incremented automatically when you edit a published package. The published version stays available to devices until you republish. You can edit this field to set a version number manually.
Packages with the same or older version number will be ignored by the SmartBrowser devices.
Organization
Name of your organization. Used to identify the company name (or customer, department, warehouse, etc.) the package is intended for.
It is recommended to keep a consistent naming system for the organization.
Description
The description is for any optional notes about this configuration for your team. These notes are not displayed on the SmartBrowser device.
Device type
Displays the intended device type for this package. These include all, handheld, wearable, tablet, or vehicle mount.
Change browser client access code.
Selecting this button will open a pop-up menu prompting the user to set the device-level admin access code. Enter the new access code in the "Password" text box, then enter the same access code in the "Confirm Password" text box. Finally, select the "Confirm" button to apply the new access code.
It is important to note that these changes will only be applied once the SmartBrowser device has consumed the package.
Localization settings
The localization settings allow you to set the preferred language for the built-in messages and dialogs in SmartBrowser.
Primary language
Sets the primary language used for the built-in messages and dialogs in SmartBrowser. By default, it will use the primary language set on the SmartBrowser device. The primary language can also be set to English (US), Arabic, German, Spanish, French, and Italian.
Secondary language
Sets the secondary language used for built-in messages and dialogs in SmartBrowser. If the primary language is not supported, the secondary language will be used instead. The supported secondary languages are English (US), Arabic, German, Spanish, French, and Italian.
Session timeout
Session inactivity timeout
Sets the number of minutes of inactivity before SmartBrowser ends all active sessions. Setting this value to 0 disables automatic timeout.
User agent
User agent string
Optional custom browser user agent string sent with page requests. Leave blank to use the SmartBrowser default. Use only if your web application requires a specific user agent.
SmartHub settings
SmartHub IP/Host Name
Hostname or IP address of the SmartHub server this configuration connects to for updates and management.
SmartHub Port
Sets the TCP port SmartBrowser uses to reach SmartHub. The default port is 3008.
Request Maximum Retries
Sets how many times SmartBrowser retries a failed SmartHub request before giving up.
Cache configuration
Clear cache on SmartBrowser launch
When enabled, the stored page cache is deleted every time SmartBrowser starts.
Clear cache on launch of first session
When enabled, the stored page cache is deleted when the first warehouse session begins after launch.
Clear cache when all sessions have ended via the "End Sessions" button
When enabled, the stored page cache is deleted when all sessions are ended using the "End Sessions" button.
Cookie configuration
Clear cookies on SmartBrowser launch
When enabled, stored cookies are deleted every time SmartBrowser starts.
Clear cookies on launch of first session
When enabled, stored cookies are deleted when the first warehouse session begins after launch.
Clear cookies when all sessions have ended via the "End Sessions" button
When enabled, stored cookies are deleted when all sessions are ended using the "End Sessions" button.
Scan / keystroke
Native keystroke pass-through
When enabled, scanned keystrokes go straight to the WebView like Chrome, instead of SmartBrowser rewriting them in JavaScript. Use for specialized sites that reject SmartBrowser key injection.
Custom keyboards
Show keyboard button
When enabled, the on-screen keyboard button in the admin drawer is shown so users can open custom keyboards manually.
Enable soft keyboards
When enabled, SmartBrowser allows custom soft keyboards for text fields. When disabled, the device system keyboard is used.
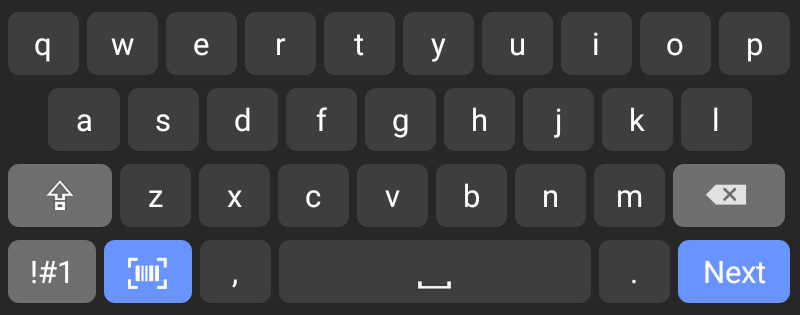
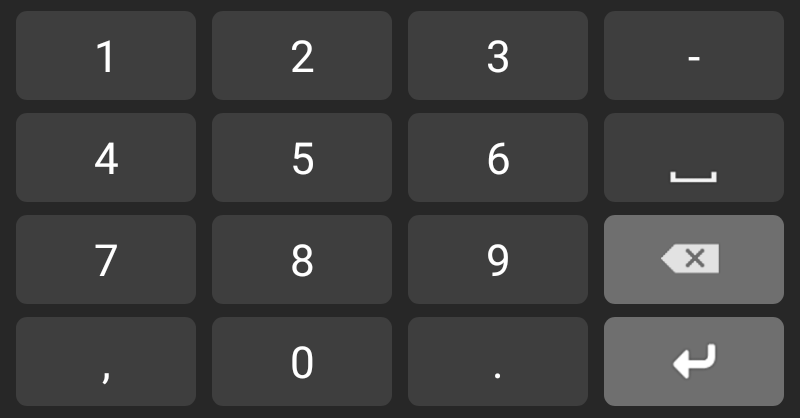
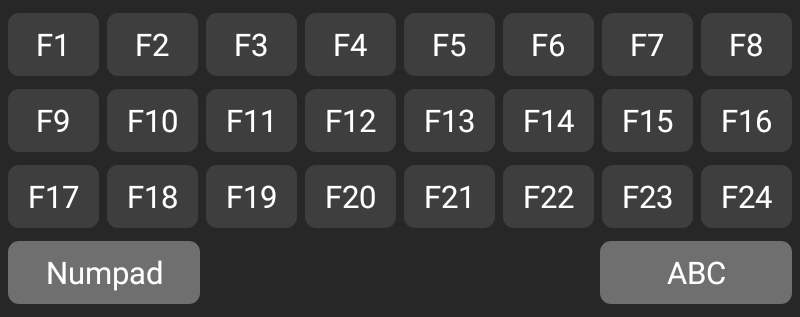
When enabled, additional custom keyboard settings are displayed. The preset options for these keyboard layouts are QWERTY, numpad, email, function keys, symbol 1, and symbol 2. Screenshots of these keyboard layouts are included below.
QWERTY
Numpad
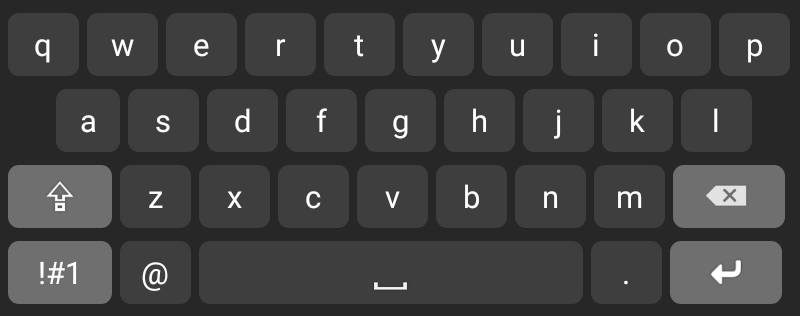
Function keys
Symbol 1
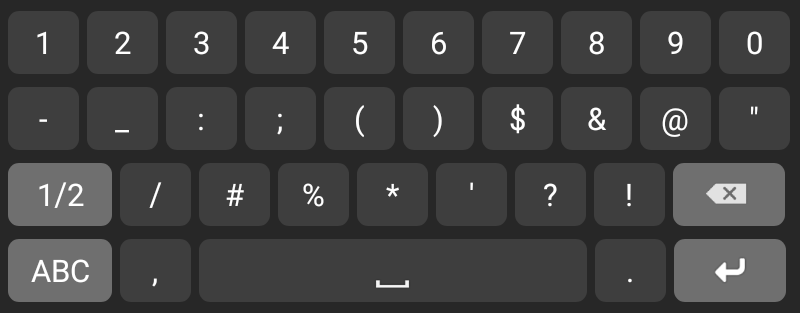
Symbol 2
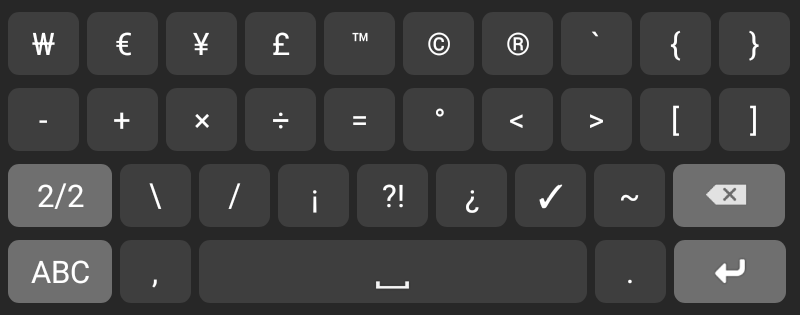
When not using a preset from the dropdown menu, select "Other" from the dropdown menu, then enter the custom keyboard name in the text field that appears to the right of the dropdown menu.
The keyboard file must also be included in the advanced file operations. Any missing keyboard files will cause the software to revert to its appropriate default keyboard.
Default keyboard
Sets the custom keyboard layout used for general text input when soft keyboards are enabled.
Number input keyboard
Sets the custom keyboard layout used for HTML number input fields.
Telephone input keyboard
Sets the custom keyboard used for telephone input fields.
Email input keyboard
Sets the custom keyboard used for email input fields.
URL input keyboard
Sets the custom keyboard used for URL input fields.
Use system keyboard for cross-origin iframes
When enabled, pages loaded inside cross-origin iframes will automatically use the device system keyboard instead of custom keyboards. Custom keyboard input cannot be injected into iframes from a different origin. Disable this only if you want to force custom keyboards everywhere, including cross-origin iframes.
Barcode scanner
Strip leading zero from UPC-A barcodes (Zebra devices)
When enabled, UPC-A barcodes delivered as 13-digit EAN-13 codes (with a leading zero) are automatically trimmed back to their standard 12-digit UPC-A form. Disable this if your application expects the full 13-digit value.
Drawer and status/navigation bars
Full screen layout
When enabled, the drawer menu and the status and navigation bars will be hidden to maximise the content area.
This is not kiosk mode: users can still swipe from the top or bottom edge to temporarily show the system bars. It also does not change the separate SmartBrowser full-screen window flag (fullScreenMode). True kiosk mode will be offered separately. Full screen mode requires SmartBrowser to be restarted after the package update to take effect.
When enabled, all other settings relating to the Status/Navigation bar and the drawer menu will be inactive.
Show drawer menu
When disabled, the bottom drawer tab stays hidden until the user performs a two-finger swipe up from the lower part of the screen. A short tap on the page collapses the drawer again.
Status/Navigation bar behavior
Controls how the Android status bar is shown. The two options for this setting are "default (uses settings below)" and "swipe (hides bars until swiped)".
Default follows the configuration options listed below to set the status/navigation bar behavior.
Swipe hides bars until the user swipes from the screen edge. The Individual settings below are preserved but disabled and inactive while swipe is selected.
Show Status Bar
When behavior is default, shows or hides the Android status bar at the top of the screen.
Status bar icon color
Sets the color style for status bar icons. The two options available are dark and light. Use dark on light page backgrounds and light on dark backgrounds.
Show Navigation Bar
When behavior is default, shows or hides the Android navigation bar at the bottom of the screen.
Navigation bar icon color
Sets the color style for navigation bar icons. The two options available are dark and light. Use dark on light page backgrounds and light on dark backgrounds.
Network check
Enable network checking
Master switch for all network connectivity features in SmartBrowser. When disabled, connection checks, blocking, and No Connection dialog behavior are inactive. Individual settings below are preserved but disabled and inactive until you turn this back on.
When to check
The following settings control when network checks are performed.
Check before opening a page
When enabled, before SmartBrowser navigates to a new page, verify that the device has a usable network connection. If the check fails, the current page stays visible and a "No Connection" dialog is shown instead of loading the new URL.
Monitor open pages (single page application)
When enabled, watch for connection loss while the user stays on the same page. This check is intended for single-page applications that rarely navigate. This helps catch Wi‑Fi drops without requiring a new page load.
Single page application monitoring settings are only active if this setting is enabled.
Check before delivering a scan
When enabled, when a barcode scan is delivered to the page, run a connectivity check first. Prevents scans from being sent while the device is offline.
What to verify
The following settings control which checks are performed at each network check.
Device network is on
When enabled, confirm that Wi‑Fi or mobile data is turned on and the device reports a connected network interface. This is the fastest check and does not test internet or server reachability.
Gateway is reachable
When enabled, try to reach the local network gateway (router). Useful when Wi‑Fi shows connected but traffic cannot leave the local network.
Server is reachable
When enabled, try to reach the application server using the profile URL host, or the custom probe URL below. Detects site-specific outages even when general internet access works.
Server check on every navigation
When enabled, includes the server reachability test on every navigation check. This is more accurate but slower. When disabled, navigation checks may use lighter stages only.
Custom probe URL (optional)
Enter a fixed URL to probe a specific endpoint for server reachability checks. This field is enabled when "Server is reachable" or "Server check on every navigation" is enabled. Leaving this field empty will test against each profile URL host.
While disconnected
The following settings control what actions can be performed on the SmartBrowser device while disconnected.
Block page requests
When enabled, while the "No Connection" dialog is showing, additional page requests are blocked so the WebView does not partially load content in the background.
React to OS network changes
When enabled, SmartBrowser listens for Android network connect and disconnect events in order to react quickly when the OS reports a change.
Detect repeated request failures
When enabled, SmartBrowser tracks failed WebView requests. If several failures occur within a short time window, treat the connection as degraded and show the No Connection dialog.
Enabling this setting displays the "Failure count before alert" and "Failure window (milliseconds)" settings.
Failure count before alert
Sets the number of failed page requests within the failure window before SmartBrowser treats the connection as degraded.
Failure window (milliseconds)
Sets the time span in milliseconds used to count failed requests for traffic health detection.
Single page application monitoring
The following options control the behavior of single page application monitoring.
These options are only active when "Monitor open pages (single page application)" is enabled.
Periodic background checks
When enabled, scheduled background connectivity checks are run at the interval set by the "Single page application check interval (seconds)" option.
Single page application check interval (seconds)
Sets how often, in seconds, SmartBrowser runs a background connectivity check while single page application monitoring is enabled.
No Connection dialog
The following settings control which actions are available when no connection is available. It is recommended to leave these settings disabled to avoid losing the work done up to losing connection.
Show Stay button
When enabled, the "Stay" button is shown so the user can remain on the current page when a navigation or scan is blocked.
Show Continue Anyway button
When enabled, the "Continue Anyway" button is shown so the user can proceed without a working connection.
Show Retry button
When enabled, the "Retry" button is shown so the user can run another connectivity check from the dialog.
Auto-retry interval (milliseconds)
Sets the number of milliseconds between automatic connectivity retries from the No Connection dialog.
Maximum auto-retries
Sets the maximum number of automatic retry attempts from the No Connection dialog. Set to 0 to disable auto-retry.
Full connectivity check timeout (milliseconds)
Sets the maximum time in milliseconds allowed for a full connectivity check, including all enabled verification stages.
Navigation check timeout (milliseconds)
Sets the maximum time in milliseconds allowed for the lighter check run before navigation.
Logging configuration
Log to file
When enabled, SmartBrowser writes diagnostic logs to a file on the device for troubleshooting. When enabled, additional local logging configurations are displayed.
File log level
Sets the minimum severity of messages written to the local log file. The five options are Trace, Debug, Info, Warning, and Error. Trace is the most verbose, while Error logs only failures.
Max log files
Sets the maximum number of rotated log files kept on the device before the oldest file is deleted.
Flush interval in seconds
Sets how often, in seconds, log data is written from memory to the log file on disk.
Share the post "Package Configuration Options"