This section describes the various means provided to administer StayLinked servers. One or more servers can be defined for each instance of the administrator application. The level of access to the server is controlled by Administrator user IDs and passwords that are defined on each server.
Defining Servers to the Administrator
From the Servers menu, you can Add, Edit or Delete server definitions for this administrator (note: this has no effect on the server itself). You can ‘Quick Connect’ to a server temporarily. There is an option to Import or Export Server Configuration Files, Print or Export the Server List and you can also log on or log off of a server.

Logging On and Logging Off of a Server
Each time you start the Administrator, the list of defined servers will appear in the server tree. The first time you select a server from this list, you will be asked to log on to that server. You will enter your administrator user ID and password for the selected server and will be provided the level of access defined for that specific user ID on that server. The default user ID for each server is ‘administrator’ and the default password is ‘esp’. The default ‘administrator’ user ID has full access to all of the functions of the StayLinked Administrator and Server.
You can log off of a server by clicking the right mouse button over the server name and selecting the Log Off option. You will need to log back on again if you want to perform any administration. You will also need to log back on to a server if the server has been restarted since the time you logged on or if you modify any server licensing.
Detailed information about Stay-Linked Administrator User Management can be found in the article on Administrator Management.
Quick Connect to a server
In an Enterprise environment, you might be charged with managing dozens or even hundreds of StayLinked Servers distributed across your wide-area network. You could add each server to the administrator where they will be always available for selection. Or, you can simply ‘Quick Connect’ to a server when needed and the server will remain in the servers list until you exit the StayLinked Administrator. When you restart the Administrator, that server will no longer be in the list.
Export and Import the Server Configuration
You may wish to manually backup your StayLinked Server configuration or transfer the configuration to another machine running the StayLinked Server. Using the ‘Configuration->Export’ and ‘Configuration->Import’ menu options, you can perform these functions. If your Administrator user account is allowed to edit ‘Server Settings’, then these menu options will be available.
Export Server Configuration
When you select to export the server configuration, you will be prompted
for a location to save the ‘StayLinked Configuration (.slc)’ file that has a
default file name that matches the server name. The export function will create
an SLC file at this location that contains the configuration files for ‘Telnet
Host Groups’, ‘Device Groups’, ‘Keyboard Maps’, ‘Tap Spots’, ‘Client Settings’,
‘Session Partnerships’ and ‘Scan2Command/Configure Profiles’ exported from the
current StayLinked server.
Import Server Configuration
When you select to import the server configuration, you will be prompted for the location of the ‘StayLinked Configuration (.slc)’ file that you wish to import into the current StayLinked server. Once you select a valid SLC file, you will be presented with an ‘Import’ dialog that will allow you to select one or more of the various configuration files that are contained in the “StayLinked Configuration (.slc)” file:
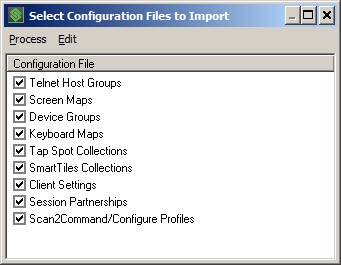
Using this dialog, you may select/deselect the configuration files that you wish to import into the current selected StayLinked Server. Once you have selected the desired configuration files for import, select the ‘Process->Import’ menu option and you will be prompted to confirm that you wish to proceed with the import of the selected configuration files. Then, a final confirmation will be offered to ensure that you wish to alter the configuration of the current StayLinked Server by importing the selected configuration files into that server. If you are absolutely sure that you wish to proceed with the import, click the ‘Yes’ button. After the selected configuration files have been imported into the current StayLinked Server, any new StayLinked Sessions started on this server will be using the newly imported configuration files.
Printing and Exporting the Server List
Print List – This menu option will send the list of connected devices to a report on your current Windows default printer. The report will include columns for Device Type, Device Name, MAC Address, IP Address, Client Version and User/Device ID.
Export List – This menu option will export the list of connected devices to a ‘Comma Separated Variable’ (.csv) file of your choice. The export will include all of the connections and columns that are displayed in the Connections List. This format is appropriate for import into common spreadsheets and databases.
Viewing Server Alerts
The StayLinked Server records information regarding server status and important events that occur during server operation. When you select ‘Server Alerts’ from the server tree or the Manage menu, the Server Alerts list will appear in the main display panel.
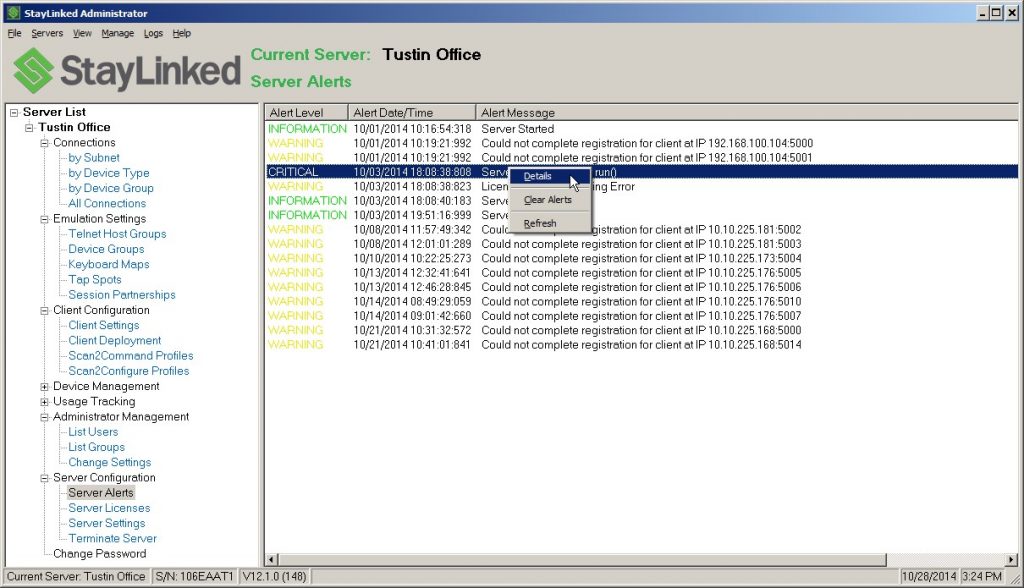
The Server Alerts are classified as one of three levels, Information, Warning and Critical. Each Alert records the Alert Level, Alert Date/Time and the Alert Message. You may view more details of a selected alert by double-clicking or selecting the Alerts-Details menu option. The Details will usually recommend actions that can be taken to resolve Warning or Critical alert conditions. Clicking the right mouse button over an alert line will cause a small menu to appear with the following options:
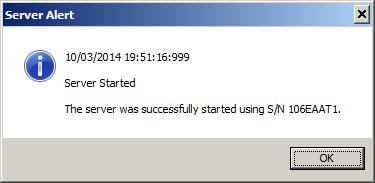
Details: This menu option displays the details of the selected alert item.
Clear Alerts: Select this option to clear the Server Alert Log that is stored on the server.
Refresh: This menu option reloads the Server Alert listing with the most recent alerts.
Managing Server Licenses
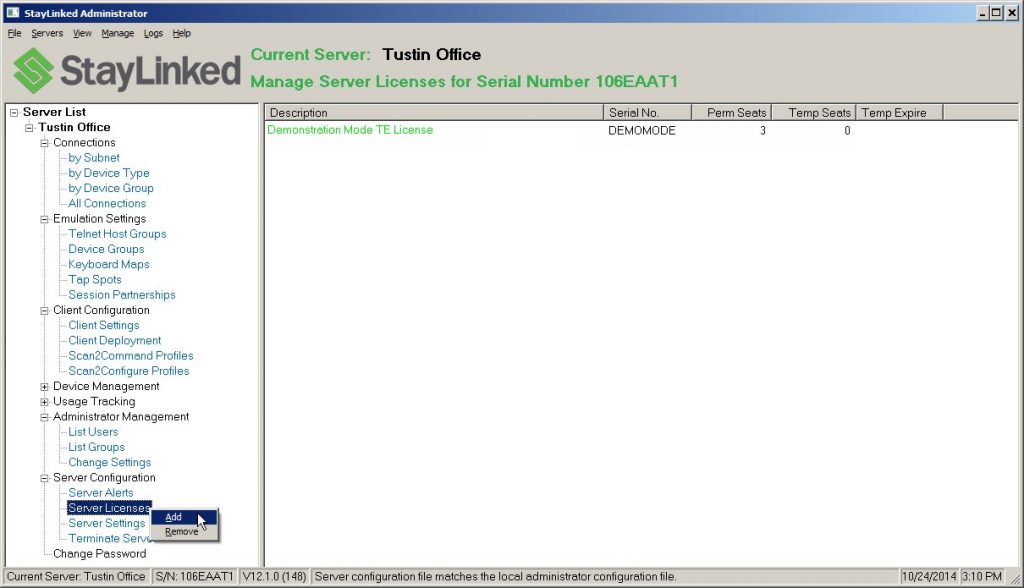
At least one license must be installed before any clients will be able to start sessions on the StayLinked Server. The StayLinked Server is pre-loaded with a ‘Demo Mode’ license key. The Demo Mode license should be removed if the server will be used with Pre-Licensed devices.
When you select ‘Server Licenses’ from the server tree or the Manage menu, a list of server licenses will appear in the main display panel, showing the type of key, serial number and number of permanent and temporary seats.
Any installed temporary license keys that are about to expire will trigger a warning dialog prompting the user to contact StayLinked Technical Support to acquire an extension or a permanent license. This list is color-coded with Green signifying active keys and Red signifying inactive, invalid or expired keys.
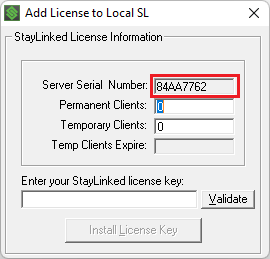
Right mouse click the Server Licenses function or anywhere on the main display panel when the list is shown to display a small menu. From this menu, you can add a new key, remove an existing key or view license key details. If you select the Remove option, you will be prompted to confirm. If you select the Add option, the Add License window will appear. Using the license information provided to you, enter the Permanent Clients Quantity, the Temporary Clients Quantity and then cut and paste the License Key into the field provided. Click ‘Validate’ and the dialog will be updated to show your license information. Click ‘Install License Key’ button to complete the procedure. If the license is successfully installed, then it will be added to the list of licenses for the current server. When a new key is installed, you will be automatically logged off the current server and then be required to logon again.
A new key for the same product and serial number will overwrite an existing key, so it is not necessary to remove the existing key first. In fact, the new key can be entered at any time, and will take immediately take effect on the server (without having to stop and re-start the server).
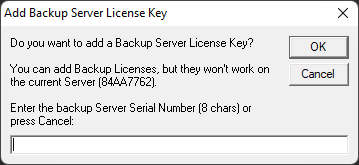
With the release of Server version 15.3 build 214, licenses can be added for a server serial number that does not match the current serial number. This allows for licensing for a backup system to be installed allowing the simple replication of production configuration files between production and backup systems. Both the Server and Administrator must be at least build 214 or the licenses for the alternate system will fail validation.
When installing a backup license, follow the process to add a license as normal, but click the serial number field to display an additional message.
This will offer the option to change the default serial number.
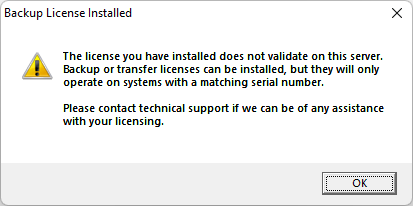
Note that the production and backup systems must be a current StayLinked server version. Older StayLinked Server releases may not be able to parse the keys in the proper order, preventing the load or the proper license. Backup and migration keys will display in red as they do not validate on the installation machine and an additional dialogue will display.
Configuring Server Settings
When you select Server Settings from the server tree, the Manage Server list or the Manage menu, a window will appear that shows the current server settings and allows you to make changes.
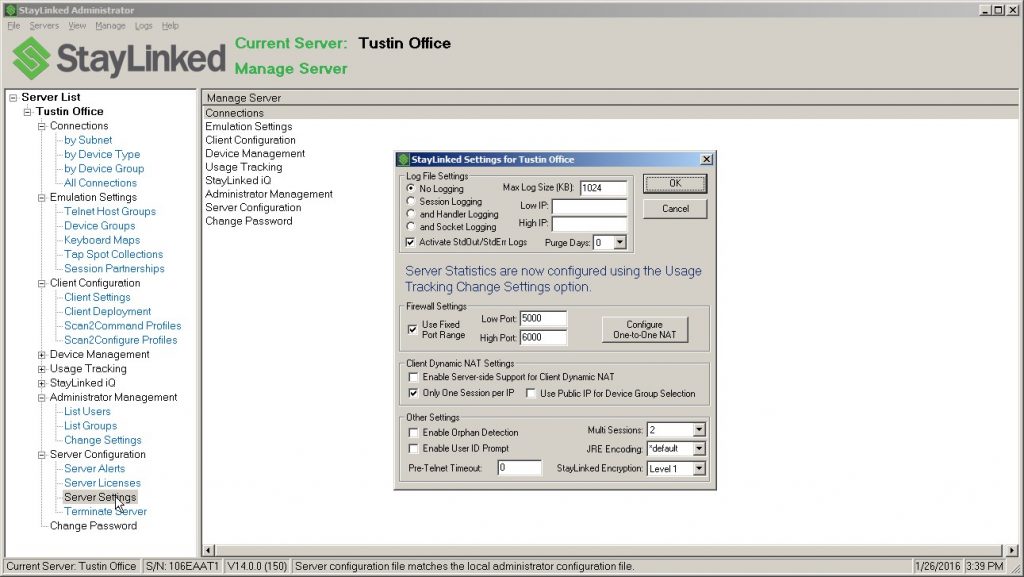
Log File Settings: These options are used to control the server logs. The server logs are used by technical support to analyze connectivity issues. This option should be set to ‘No Logging’ unless otherwise directed by technical support. The Max Log Size value controls the size of the log files. If desired, you can control the devices that generate logs by specifying a low and high IP range. You can disable collection of StdOut and StdErr Java Log files by unchecking the ‘Activate StdOut/StdErr Logs’ checkbox option. You can configure ‘Purge Days’ to have old logs purged after they have aged by some number of days that you can choose.
Server Statistics Settings: These options have been moved to the ‘Usage Tracking’ feature set. More information on server statistics logging can be found in the Technical Reference, Server Statistics Guide.
Firewall Settings: If your devices are connecting to the StayLinked server through a firewall, then you may need to restrict the ports that are assigned to devices and configure a server that is running behind one-to-one NAT.
Use Fixed Port Range: You may enable this option and then specify a range of ports that the server should use for device connections. You will need to ensure that you specify a range that is large enough to accommodate the number of licenses that you are running. When there are no further open ports available, then devices will no longer be able to connect to the server.
Configure One-to-One NAT: If your server is behind One-to-One NAT (Static NAT), then you will need to use the ‘Configure One-to-One NAT’ dialog to specify the server’s mapped external IP and its physical internal IP address.
Client Dynamic NAT Settings: If your devices are running Dynamic NAT behind a NAT Server, then you can configure the StayLinked Server to support this network architecture.
Enable Server-Side Support for Client Dynamic NAT: Select this option to have the StayLinked Server identify and handle ‘port re-assignment’ events. These events are generated by the NAT server when the port assignment cross-reference times-out due to inactivity. Typically, additional traffic from the device will be re-assigned to a different port by the NAT server. This setting will allow the server to identify these port re-assignments and handle them appropriately.
Use Public IP for Device Group Selection: This option only applies when the ‘Server-side Support for Client Dynamic NAT’ option is enabled. This option will cause the ‘Public IP’ of the NAT Server to be used for selecting Device Groups, rather than using the private, internal IP of the device itself.
One Session per IP: This option determines how existing sessions are handled when a device connects to the server. Check this option to ensure that each device consumes only one session. This option prevents duplicate sessions for a single IP. This option only applies to devices running against single session licenses. This option is automatically disabled and locked when the ‘Server-side Support for Client Dynamic NAT’ option is enabled.
Enable Orphan Detection: Check this option to enable the server to identify devices that have lost their ‘Session ID’ values. The server will then detect and reconnect devices to any session that has been orphaned for that device based upon MAC address only. This setting will typically apply to devices that store their ‘Session ID’ values in volatile memory on the device where it can easily be lost if the battery is removed for too long, or if the battery is exhausted. This setting is only available if the server is running ‘single session’ licensing only and is not running any ‘multi session’ licenses.
Enable User ID Prompt: This option will enable the collection of User Identification information for each device. The User ID Prompt can be used to assist with Asset Management or for other purposes. When a device creates a new connection, you will be prompted to enter an User ID value that will be visible on the Connection List, recorded in the Device Identification Log file and recorded in the Usage Tracking database if User ID tracking is enabled. The value entered by the user can be accessed in subsequent scripting and substitution using the special [userid] mnemonic value.
Pre-Telnet Timeout: Enter the number of seconds of inactivity, prior to starting a telnet session, before terminating the connection. This timeout will work when the user is on the ‘User ID Prompt’, waiting to enter SSH credentials or sitting on a ‘Select a Host’ menu.
Multi Sessions: This drop-down list provides for the configuration of the number of sessions that will be allowed per device when the server is licensed for Multi Session TE. The valid values are from 2 sessions to 10 sessions per device. This option will not be available if you do not have a Multi Session TE License installed on the server. The default value for this setting is 2 sessions.
JRE Encoding: This is a legacy setting that will only affect Servers prior to version 10. This setting selects the code page for Java string encoding used by the server. Generally, this value should be set to ‘*default’. This value may need to be set to match the code page of the machine upon which the server is running. If running servers older than Version 10, and the session screens on the devices are not displaying the expected characters, then you might need to adjust this value. For instance, in order to properly render VT line-draw characters, we recommend setting this value to ‘cp437’. For servers running Version 10 and newer, you can get VT line-draw support by running your Telnet Host Entry with ‘VT-UTF8’ terminal emulation.
Encryption: Select whether to enable encryption for all StayLinked sessions:
None – No StayLinked packets will be encrypted.
Level 1 – StayLinked data transferred between the Stay-linked Thin Client and the StayLinked Server will be encoded using a proprietary 64-bit encryption scheme.
Blowfish – StayLinked data transferred between the Stay-linked Thin Client and the Server will be encoded using the Blowfish/CBC/PKCS5Padding encryption algorithm.
Twofish – (v15.3) StayLinked data transferred between the Stay-linked Thin Client and the Server will be encoded using the Twofish/CBC/PKCS5Padding encryption algorithm.
(See Secure Communications Guide for details about Encrypted connections)
Using Blowfish Encryption: Blowfish encryption provides high level data security for the StayLinked packets that are transmitted between the StayLinked Thin Client and the StayLinked Server. StayLinked Blowfish encryption is available only for PPC/WM/CE/CE.Net devices that are running a StayLinked Client of at least Version 9.1.0. When you select ‘Blowfish’ as the StayLinked Encryption option, you are presented additional options in the Server Settings dialogue as described in the server settings and secure communications articles.
Using Twofish Encryption: Twofish encryption provides expanded data security for the StayLinked packets that are transmitted between the StayLinked Thin Client and the StayLinked Server. StayLinked Twofish encryption is available only for devices that are running a StayLinked Client of at least Version 15.3. Android and iOS Clients may also utilize the Twofish/GCM/NoPadding encryption when running a server of at least build 214 and compatible Clients. When you select ‘Twofish’ as the StayLinked Encryption option, you are presented additional options in the Server Settings dialogue as described in the server settings and secure communications articles.
Key 1, Key 2, Key 3 and Key 4: You may specify one to four blowfish keys. Each key can be from 8 characters to 56 characters in length. The keys are case sensitive. The Encryption capabilities of the Java Runtime used by the server will determine the maximum key length that can be used. If the Java Runtime does not support a key of the length that you have entered, that key will be automatically trimmed until it can be used. The server will only use Key 1 unless you specify a ‘Key Rotation Interval’.
Allow Unencrypted Sessions: This option will determine whether sessions will be allowed for clients that do not support Blowfish encryption. If you have a mix of DOS and PPC devices and you want them all to be able to run sessions, and you want to use Blowfish encryption for the PPC devices, then you must check this option to allow the unencrypted sessions from the DOS devices. In this case, the DOS devices will utilize the ‘Level 1’ encryption instead of the Blowfish encryption. If you want to restrict your server to allow sessions only for devices that support Blowfish encryption, then uncheck this option. In this case, any unsupported device that tries to start a session will get a ‘Device Not Allowed’ message displayed when a session is started. Those devices that do not support Blowfish encryption will not be able to run any sessions.
Key Rotation Interval (mins): If you enter more than one Blowfish key, then you may have the StayLinked Server automatically rotate between those keys at your specified interval in minutes. The valid range for the Key Rotation Interval in 5 minutes to 1440 minutes. The StayLinked Client and Server will automatically rotate between keys at each rotation interval during the entire duration of the StayLinked session.
Maintenance Mode
With the release of Server version 15.3 build 214, servers will offer an option for Maintenance Mode. This allows management of the server, but prevents the creation of any new sessions. Devices attempting to connect to a server in this state will show the standard message 'Err: Host Timeout!' meaning that the device did not receive a response from the Server.
Selecting this option will require the user to provide the password for their credentials and an additional confirmation.
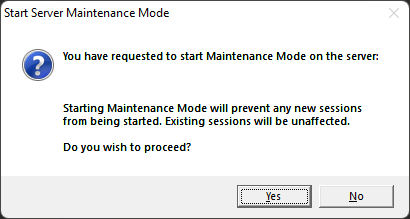
Selecting the option again will prompt the end maintenance mode and allow new sessions.
Terminating a Running StayLinked Server
The Terminate Server option is used to disconnect all client sessions and terminate the server jobs. On the IBM i platform, the server subsystem is not terminated by this command, but all subsystem jobs are terminated. All client sessions will be sent a terminate message. Those devices that are asleep at this moment will not receive the terminate message. Upon waking, these devices will go to a [Session Ended] state if the StayLinked Server is running or they will go into a [Linking] state if the StayLinked Server is not running.
When you select Terminate Server from the server tree or the Manage menu, you will be prompted for, and must enter your password in order to terminate the server.
Share the post "Administrator User Guide – Server Administration"