The StayLinked Administrator can be installed on any PC that has a need to manage the StayLinked Server settings or connections. This user interface allows granular access to different sections for each individual user profile. This allows it to be installed for use by people throughout the organization. The Administrator features are well described in the Administrator User’s Guide. This supplement is intended to help describe common use, not complete features.
Administrator Considerations
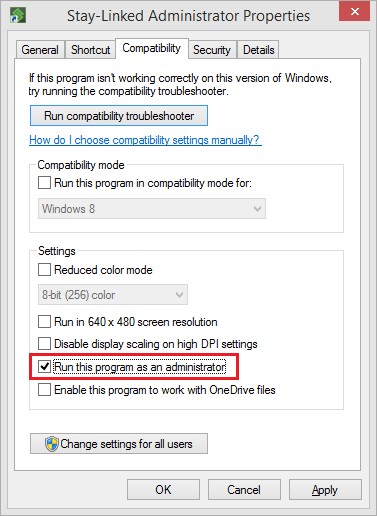
The biggest factor to keep in mind is that the Administrator will require permissions to read, write and execute files in the Administrator directories. Windows 7/8 users will want to set the program properties to ‘run as administrator’ to allow the program to write files to the program files\StayLinked Administrator directory. Without this setting, files will be placed in the Windows Virtual Store and each user will get their own working copy of any files.
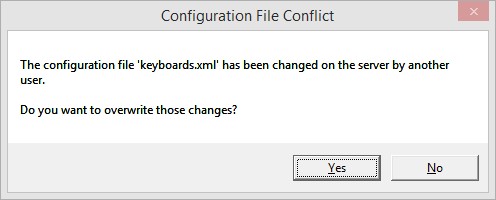
Another consideration is that the Administrator does not own any of the configuration files. These files are owned by the StayLinked Server. By example, a user opening the Administrator’s section for keyboard maps will download a clone of keyboards.xml from the Server. Any changes are made locally and then copied back up to the Server when the changes are saved. If multiple users are making changes in the same section of the Administrator, they may get a prompt that another user has saved changes while they were working. Users will then have the option to replace the file with their changes in place or leave the file alone until they can review the changes made by the other user.
In most cases, the settings are configured during the initial implementation and no regular changes are required. This means the primary purpose of the StayLinked Administrator is for session management. The Administrator’s Connections List is not file-based and can be used by any number of Administrator users.
Administrator User Accounts
Creating new user accounts is done in the Administrator Management section of the StayLinked Administrator. New accounts default to no permissions and a password identical to their username. The default account installed with the Server has a username of ‘administrator’ and a password of ‘esp’. It is recommended that this account is reserved for special use, and that custom accounts are created for Administrator users. Custom accounts reduce the chance that the master account will get locked out, preventing access.
Instructional Video: Create a New Administrator Account
The administrator account can be reset during server startup by placing a file named resetadmin.xml in the config subdirectory of the StayLinked Server. This file is automatically deleted during startup, resetting the administrator account to be enabled with the default password of esp.
Instructional Video: Reset Master Administrator Account
User accounts can provide limited visibility of Administrator features, as well as connection filters that limit the connections list or network access of each user. Regardless of connection filters, all users will be able to see the total number of current sessions in the Administrator’s list of Servers.
Standardizing Client Settings
One of the key advantages of centralized configuration is the ability to keep configuration standardized across many devices. Whether your organization has ten devices or two thousand, you usually want similar devices to have the same behavior. A user picking up any device should know what to expect. This functionality is managed in the StayLinked Administrator using the section for Client Settings. These values are based on a time stamp. When a device connects to the Server it will include a date and time that settings were last applied. If the Server has settings that are new, it will apply them to the devices as they start new sessions.
Devices that have been transferred from another Server or manually modified may not get settings from the Server if their time stamp is newer than the hosted settings. This can be resolved by right clicking a device in the connections list and selecting Commands > Resend All Client Settings or by updating the time stamp of the settings in the Client Settings section of the Administrator. More information about Client Settings can be found in the Administrator User’s Guide or by looking through the descriptions of the settings in the Administrator.
Disconnected Sessions
Disconnecting a device does not hurt the telnet session. Sessions remain live on the Server and are remotely controlled by Clients. If a Client device is turned off or ‘disconnected’ it is not in communication with the Server. The session can still go through updates from the host or StayLinked session shares, but the Client will not update until it goes through a synchronization with the Server during a handshake or synchronization event. Terminating a session closes the telnet session and ends the entire connection. Devices attempting to reconnect to a session that has been terminated at the host will get a new session.
Connections List
The various options and features in the Administrator Connections List are well described in the StayLinked Administrator User’s Guide. The Connections List contains a wide range of information that can be important. There are also right click context menus that dynamically present options based on what is currently selected. The connections list is also capable of multi-selecting sessions. Using control and clicking a device will add or remove it from the selection, while using shift will select everything between the current record and the target record.
Devices using the Client Setting for AutoConnect set to Always will roll into a new session when the session is ended at the device. This loop can be cancelled by hitting the ‘autoconnect abort key’ during a new handshake. The default key to cancel the handshake is the escape key. The other way to cancel the auto-connection is to send a ‘disconnect’ from the Administrator’s Connections List. Sending a ‘disconnect device’ command will kick the Client directly back to the device splash screen.
The Connections List is not real-time. The user will need to refresh the screen in order to see changes taking place in the connections list. A refresh will be performed each time you hit the F5 key, click the connections options in the left pane, or right click and select refresh from the context menu.
Typically, the first step in using the Administrator’s Connections List is to find the sessions(s) you would like to manage. It’s important to note that commands that are sent to the devices will not reach devices that are not ‘connected’ to the StayLinked Server. Connected sessions are those that have completed a handshake, have an active network connection and display a current session screen. Once you know the device IP address, Session number or MAC address, you should be able to see the device in the connections list.
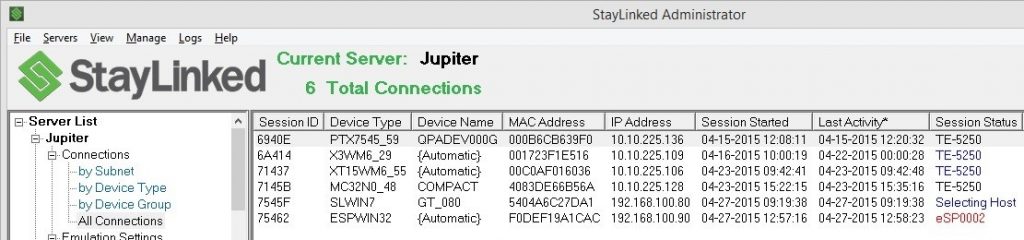
Another important column is the Session Status. As seen in this example, it can display sessions that are in an emulation session, selecting from one of the available menus, or displaying an error message from the Server. The Device Type and Device Name show the Client software installed on the device and the workstation name, respectively. More information on workstation names can be found in the technical reference article for device naming.
Device Groups and Telnet Host Groups
These configuration sections are tools for getting your devices to connect to the right working environment. When a device connects to the StayLinked Server, it passes along its network address and device type to the Server. The Server uses these values to place the connection into a device group. This device group allows the user to connect to a list of telnet servers or ‘Host Group’. Devices in your connections list will display their device group in the connection details displayed by double clicking on a connection.
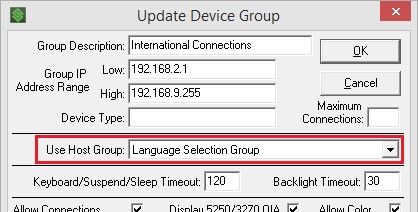
In most cases, there is no need to create special groups, since most customers have a single group for all production devices. The most common customization is to create a group for a test environment to test upgrades to the hosted application before rolling them into production. Included is an example used for a customer in Europe that has different startup scripts for different languages, allowing their users to select the language that they are most fluent in.
In this example, we have the Default Group plus two others that have been created to catch specific devices. These groups are the default group, a group for the local administrator PC and a group for the warehouse workers in different locations.
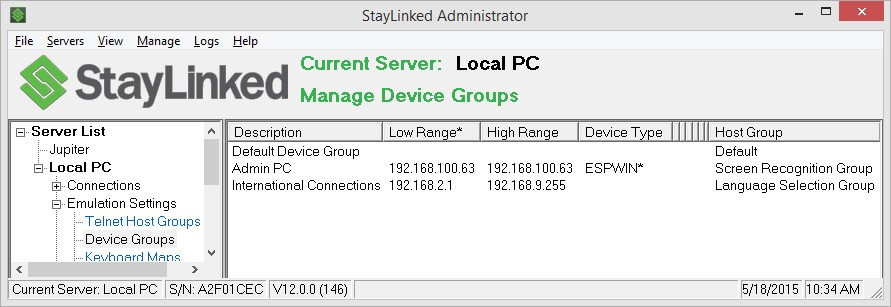
- Any device connectioning from a network address between 192.168.2.1 and 192.168.9.255 would fall into the International Connections group.
- Only the Administrator PC, with a network address of 192.168.100.63 and a device type starting with ESPWIN would fall into the Admin PC group.
- All other devices would fall into the default group. The default group cannot be deleted or limited, since it is designed to be a catch-all for devices that do not fit into custom groups.
Once a device has been placed in a device group, it will be directed to the telnet host group. Users will never be presented a list that contains only one choice. Telnet host groups with only one entry will automatically connect users to that telnet host.
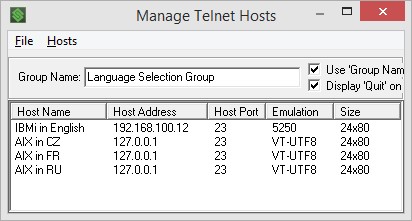
In this example, users falling into the Language Selection Group will be given a choice of four servers to connect to. The AIX server entries are all the same physical server pointed to the local loopback, but each is configured with a different startup script that launches the application in a different language.
Similar configurations might be made to connect users to a different environment for full screen or small screen devices, shipping or receiving menu systems, or any other application group. If these configuration choices do not simplify things for your users, then they can be left at the default configuration.
Monitor, Share and Take Control
There are three options in the connections list that have similar results, but different uses; Monitor, Share and Take Control. Selecting monitor session will ask the Server for an echo of the last screen updates that were sent to the Client. In some cases, these packets will not contain enough information to paint the screen information and will sit on ‘updating’. In these cases, or at time when you want to be able to interact with the session, you can run the Share Session. Shared sessions go through their own handshake with the Server and appears in the Administrator Connections list. All interactive sessions consume a license seat. Take Control will take the session away from a Client and bring it to you at the Administrator. Session transfer can be used to give the session back to a device once the device appears in the connections list. This new session will be ended during the transfer when receiving the old session.
Message Sources
When a question comes up, one of the first steps is to determine where the screen contents came from. Messages may be generated by the device operating system, the StayLinked Client, the StayLinked Server, and/or the hosted application. One easy way to confirm where a message is coming from is by using a session monitor or sharing the session from the connections list. If a message appears in the shared session, then it is likely to be telnet screen information painted by the telnet server. Messages appearing in Windows dialogue boxes would not appear in the session and are likely from a process on the device. StayLinked messages will start with eSP00 if they come from the Server or would be one of the messages listed in the section above entitled StayLinked Messages.
In some cases, the error message may not be completely visible in the device screen (see section 2.4 above). In these cases, you can use full screen sharing to see the entire emulation screen. A full screen share is done by holding down the left control key on the PC keyboard while right clicking on a device in the connections list. When this is done, the session will have an extra dialogue that the session is showing the full screen and does not represent the same space displayed by the device.
Gathering Log Files
StayLinked includes the option to gather explicit transaction details for any session. These features are not enabled by default. They must be turned on in the Server Settings section of the Administrator. On that same dialogue is an option for StayLinked Encryption. Using the default encryption of ‘Level 1’ will encrypt the handler and socket log files, making them unusable. These logs files are stored on the StayLinked Server within the …\Logs subdirectory. The three different log files include:
Session – This is a log of the telnet session traffic. It records the StayLinked submissions to the telnet server and information about the responses from the telnet server. This log shows all input events but does not show presentation events from the telnet host.
Handler – This file contains details about the ‘handling’ of the session by the StayLinked Server. Details such as the device group, telnet host, keyboard mapping and presentation updates can be found in this file. This log shows most input events but does not show the data included in large scan transactions.
Socket – This is the record of network transactions between the StayLinked Client and StayLinked Server. The socket log can be helpful in determining the contents of individual network transactions.
There is also a client log. This file is the Client view of all transactions and should always be gathered last. Retrieving this file uses the StayLinked Reliable Protocol, which is recorded in the other log files as Client-Server transactions. Gathering this log may cause the loss of important information in the other log files.
When gathering log files is required, you can enable a keyboard mapping for a ‘logging snapshot’ in the keyboard map for this device. This feature creates a snapshot of the three logs listed above, storing them in the Server’s logs directory.
Other Administrator Features
These are just a few of the features available from the connections list. Sending messages, disconnecting, rebooting, sending files, pushing client settings, receiving files and other features are available. The Administrator User’s Guide describes all of the menu options available for each version of the Administrator. Some menu items may be improved or renamed, so it’s always best to review the Administrator User Guide version that matches the version of your installed software. Newer Administrators can be used to manage older Servers but be sure to check that the versions match if options selected in the Administrator are not working as expected.
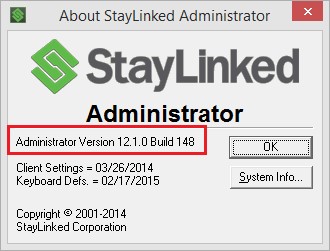
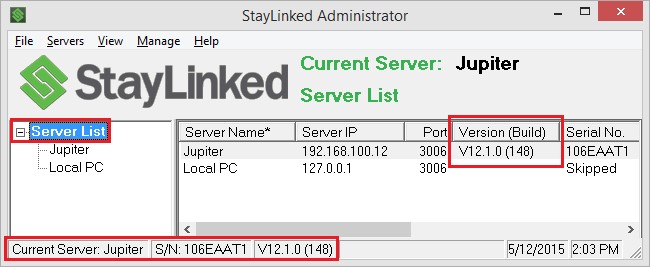
Server versions are displayed in the Administrator’s list of Servers as well as on the information bar along the bottom of the Administrator. Administrator versions are displayed under the Help > About menu option along the top of the Administrator window.
Share the post "UX – Administrator Users and Help Desk"