The following recommendations may be helpful during your implementation of SmartTE.
Creating a Sandbox
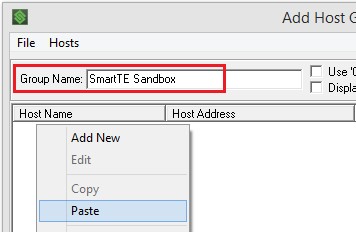
If you’re already using StayLinked and want to test your settings before users are impacted by the changes, you may want to create a sandbox. The first step would be to create a copy of your desired telnet host entry. Then create a new telnet host group and copy your entry into the new group.
Once you have your sandbox host group, you can create or copy a device group and point it to your ‘sandbox’ host group. This allows you to limit the Clients that can access this testing environment. Once these are in place, you can begin making changes to your sandbox host entry without affecting devices in production.
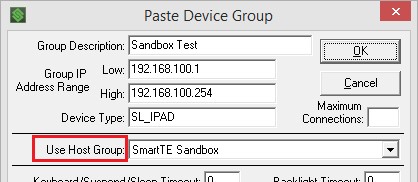
Once you have your sandbox host group, you can create or copy a device group and point it to your ‘sandbox’ host group. This allows you to limit the Clients that can access this testing environment. Once these are in place, you can begin making changes to your sandbox host entry without affecting devices in production.
Moving changes from this sandbox into production would simply require copying the sandbox host entry and placing it in your production host group, while removing the previously existing entry. Devices starting new session would be directed to the same group but would see the changes you’ve created in your host entry.
Tracking Common Elements
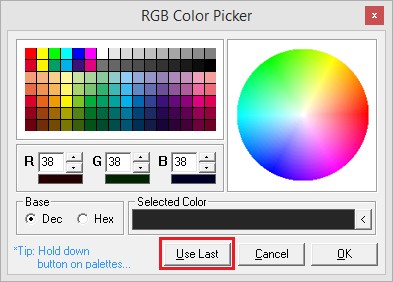
During the configuration of various screens, it may be important to keep a list of image file names or colors. These values can be entered in several different locations and have a short list can prevent the need to switch between previous screens to find the values that will be used again. The color picking feature display on StayLinked reformatting dialogues includes a “Use Last” option to automatically re-use the last color value selected in a StayLinked Administrator dialogue.
Image File Path
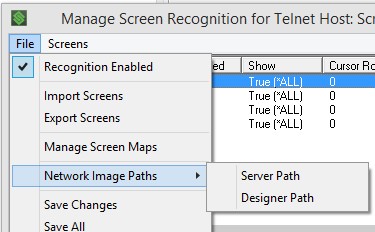
If you plan on delivering images to your users, it’s important to stage the image files in a location that can reach client devices. Using a shared network path or URL can also allow the Administrator to display the images in preview modes. Setting the image path is done at the screen recognition management menu. These options would be accessed from the Emulation Settings > Telnet Host Groups > Edit your desired host entry > Select the Manage > Screen Recognition menu across the top > the select the File > Network Image Paths option as displayed in the image here. If you’re configuring a background image for dynamically created screens, you would enter the entire network or internet path where the image is specified.
Summary
Screen Recognition and Reformatting features have been available as part of StayLinked for several years. The addition of SmartTE has added a wide range of possible options to any emulation environment. SmartTE includes new graphical features, but standard reformatting is an option for any StayLinked client.
With the wide range of emulation hosts and application design, the possibilities are nearly endless. Contact your StayLinked reseller if you have any questions or would like assistance implementing these features.
Share the post "Implementing Dynamic SmartTE – Appendix"