Overview
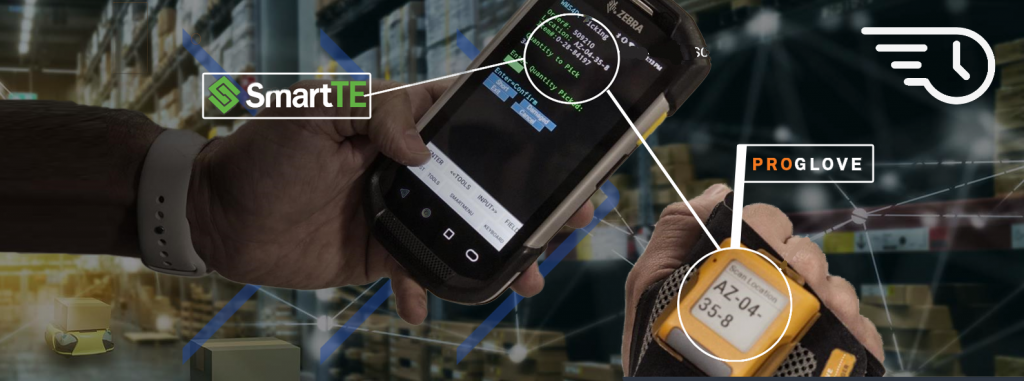
ProGlove Mark Display Main Benefits:
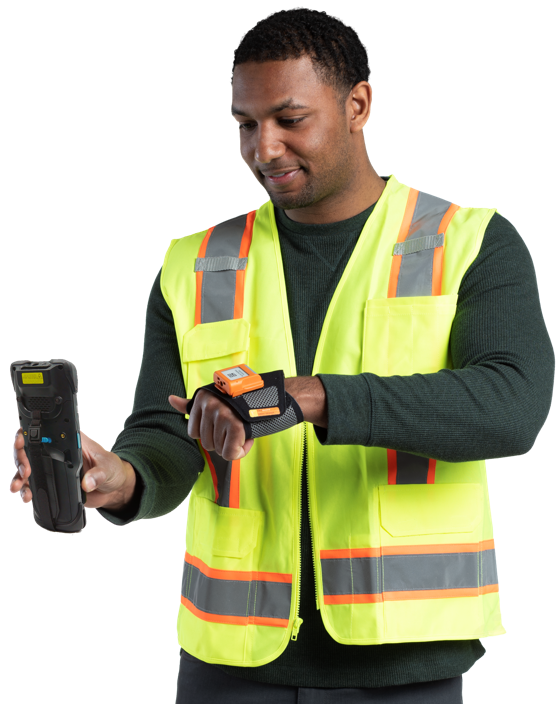
- Workers can log in and perform complex tasks with a holstered Primary device to then perform 99% of their activity handsfree with the ProGlove at much higher productivity levels.
- Can deploy into an existing workflow very quickly and easily.
- No changes required to the existing workflow.
- Any exceptions encountered within the workflow that cannot be handled with a double trigger press can still be dealt with on the holstered primary device.
- Workers easily adopt this solution due to its intuitive nature.
Prerequisites
- Participants should have some experience with the screen recognition features of the StayLinked Administrator. Information on this can be found on the knowledge base here.
- Participants should have some experience capturing variables. Information on this can be found on the knowledge base here.
- The latest Evolve Agent release with license.
- The latest Server release with license.
- The latest Administrator with license.
- The latest SmartTE Android client with license.
- The latest INSIGHT Mobile application from ProGlove.
SmartTip! Contact your local StayLinked Sales Engineer for any demo licenses required.
Step 1: Initial Setup
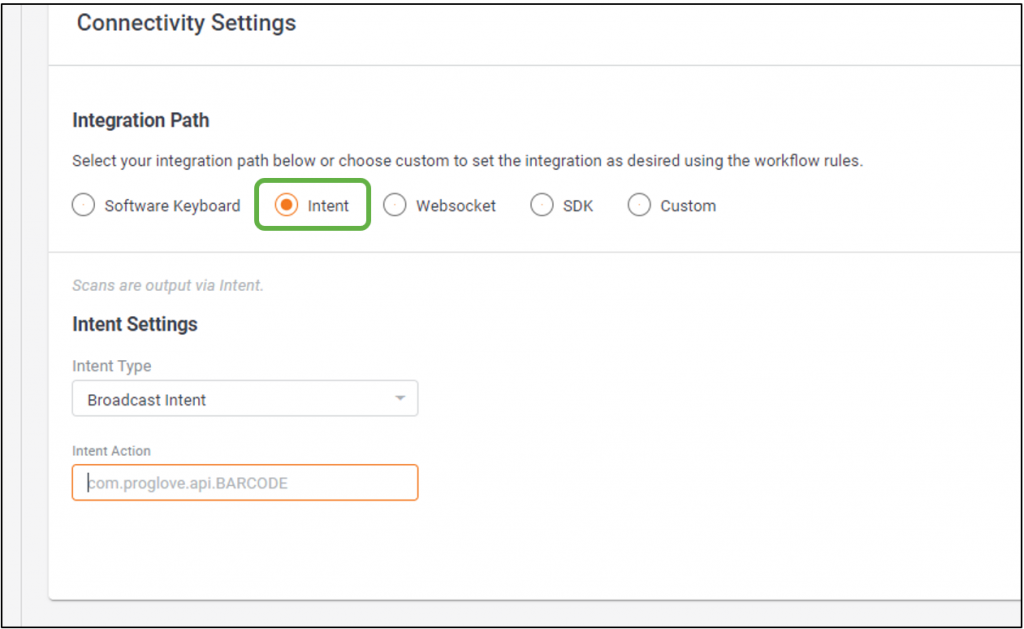
- Ensure the ProGlove Mark Display is configured to use broadcast intents. This is done on ProGlove’s Insight web page.
- Ensure the latest INSIGHT Mobile application from ProGlove is installed on your Primary device of choice. For this exercise, we are using a Zebra MC9300.
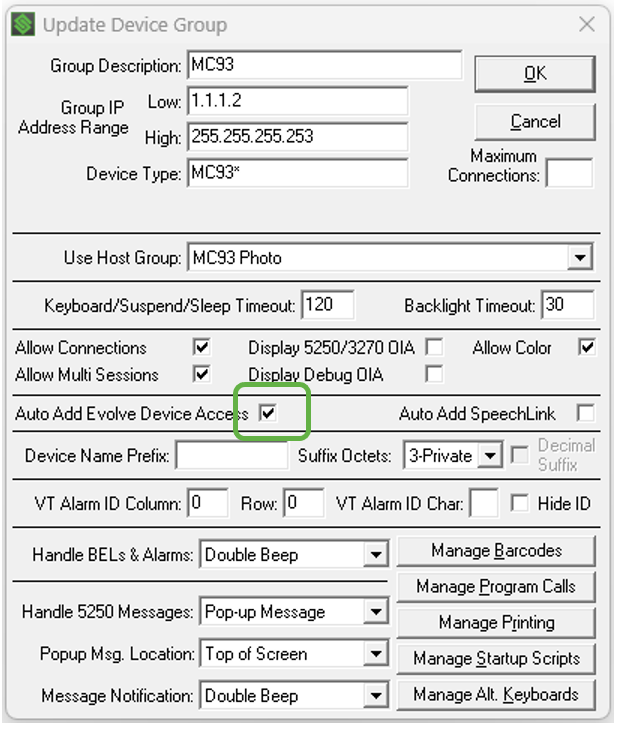
- In the Administrator, for devices that are intended to be paired with the ProGlove device, ensure that the box is checked for “Auto Add Evolve Device Access”. For this exercise, our Primary device is “MC93*”.
- In the StayLinked Administrator under "Client Configuration" > "Client Settings", right click in the white area. Search on “Wedge”.
- Choose “Wedge Scanner Type” from the list and set to “Cognex(iOS)/ProGlove(Android)”.
- Set the Device Type to match what the workers will use as a Primary device for the ProGlove. In this example we are using “MC93*”.
- Ensure to check the box for “Enabled” and press “OK” when completed.

- Your client settings should now look something like this:

Step 2: Pairing the ProGlove with the Primary Device
- First, we need to choose where within the workflow it makes sense to pair the ProGlove to the Primary mobile device that the workers are using.
- Pairing can be done at any point in the workflow. We can have the worker pair the devices at the start of their Telnet session, on specific screens at the beginning of any applicable workflows, make pairing available on every screen in case of disconnect, or combinations of all of these.
- For this exercise, we will enable pairing on session start.
- See Appendix A for information on pairing on specific screens.
- See Appendix B for information on creating onscreen pairing buttons.
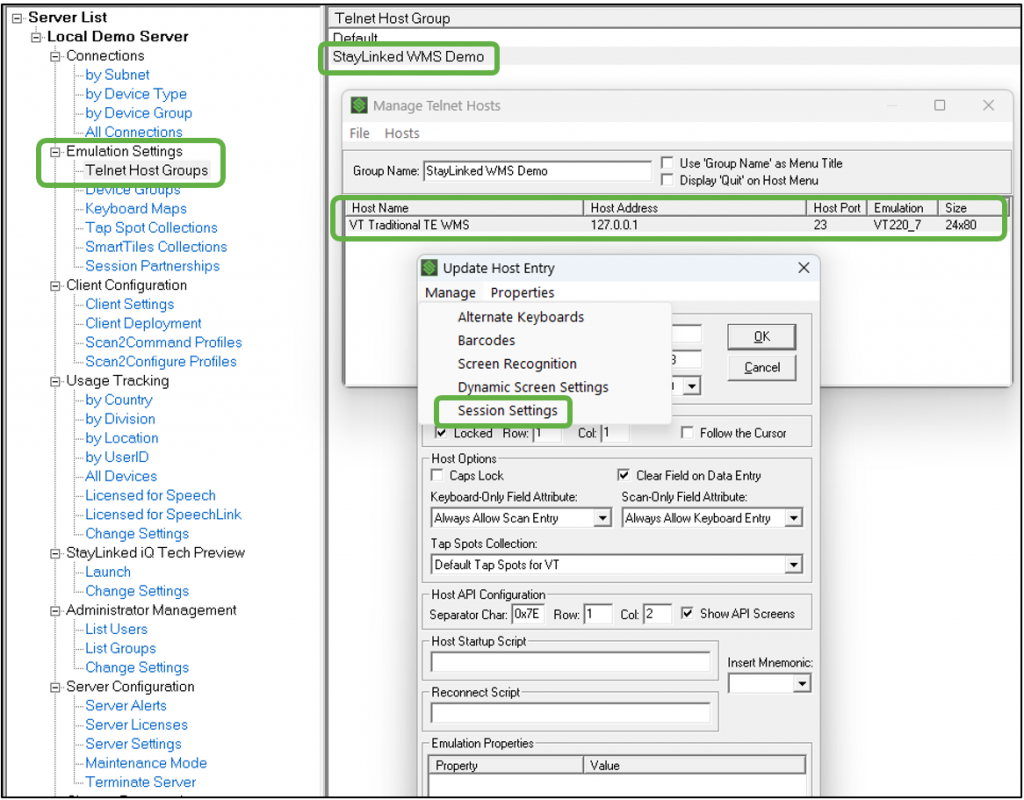
- In the Administrator under “Emulation Settings”, choose “Telnet Host Groups”.
- In the “Telnet Host Group” window, double click on your host group. In this example we are using “StayLinked WMS Demo”.
- In the “Manage Telnet Hosts” window, double click on your host. In this example we are using “VT Traditional TE WMS”.
- In the “Update Host Entry” window, click “Manage” from the top menu and select “Session Settings”.
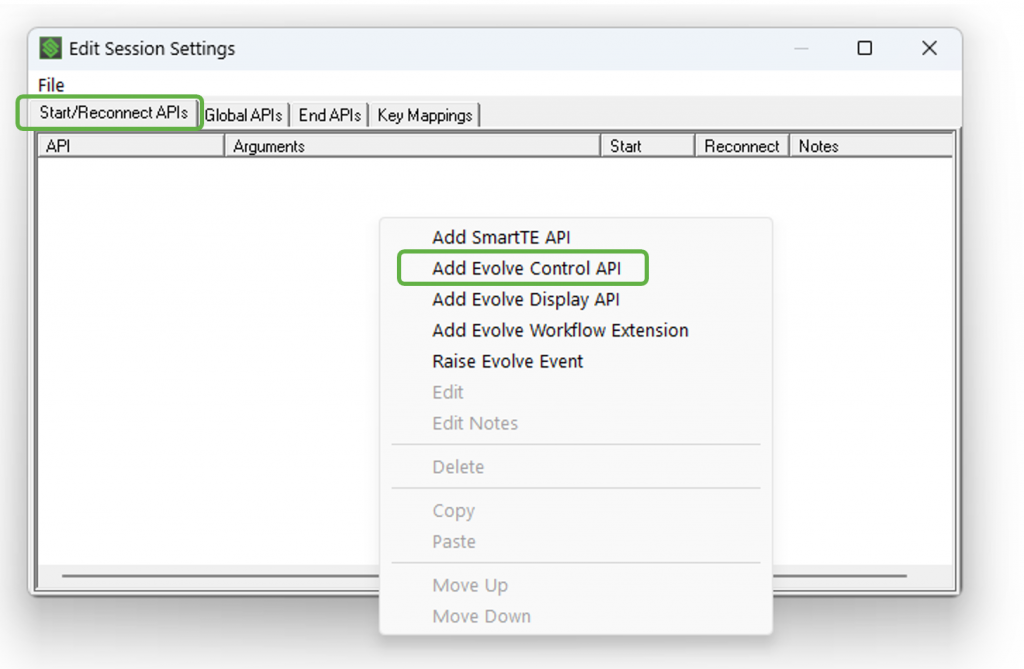
- In the “Edit Session Settings” window, in the “Start/Reconnect APIs” tab, right click in the white area and select “Add Evolve Control API”.
- In the “Add Evolve Session API” menu, select “Control ProGlove Mark Display”.
- Enter your “Device Type” as it appears on the SmartTE splash screen.
- In this example we are using “MC93A_52”.

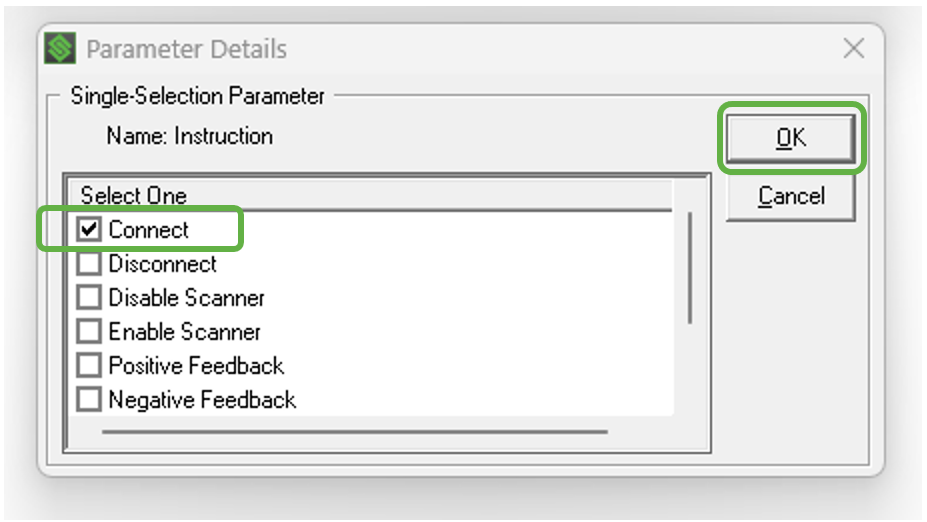
- In the “Parameter Details” menu, check the box for “Connect”.
- Press “OK”.
Now we can test the pairing setup:
- Terminate any existing sessions for the Primary device in the Administrator.
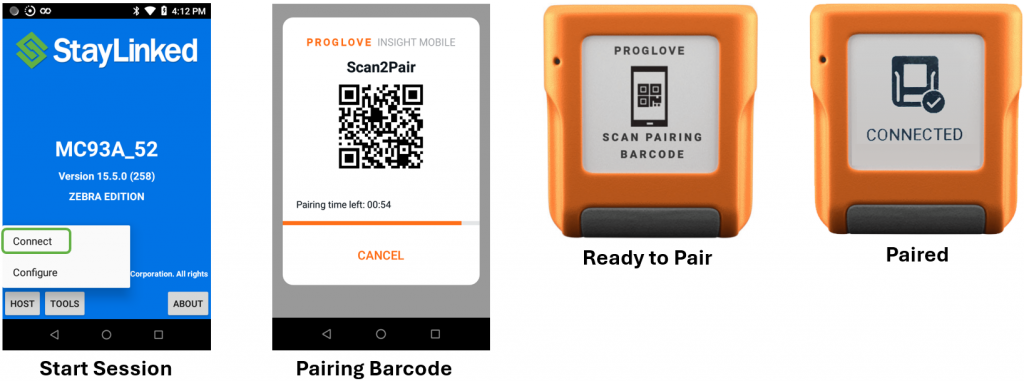
- As soon as we click “Connect” on the Primary device, the ProGlove “Scan2Pair” screen should appear.
- Power on the ProGlove device. “SCAN PAIRING BARCODE” should appear on the display.
- Scan the barcode on the Primary device with the ProGlove device within 60 seconds.
- The ProGlove device should now display “CONNECTED”.
Step 3: Producing Screens for the ProGlove Mark Display
- The next step is to display appropriate instructions for the worker on the ProGlove device when screens we specify are recognized.
- In our example, the first screen in the picking workflow with instructions for the worker is shown below.
- “WMS3B: Picking” and “Go To Location” are unique to this screen and will act as our recognition strings.
- Using the Screen Recognition features of the Administrator, define recognition strings for a screen in your WMS.

For VT emulation only:
- Sometimes within the VT emulation data stream, the static screen information arrives first with dynamic information (I.E. order number, item number, location) coming in as payload later. In order to ensure all of the static and dynamic information is captured to display on the ProGlove device, these steps are recommended in this circumstance with VT emulation.
- Still within the “Recognition Strings” window, we want to identify variables we will use on the ProGlove device.
- In our example this would be the order number “123456” and the location “A0120”.
- Capture the variable in the same way you captured the recognition strings.
- Do NOT press “OK” and remain on the “Add Recognition String” window.
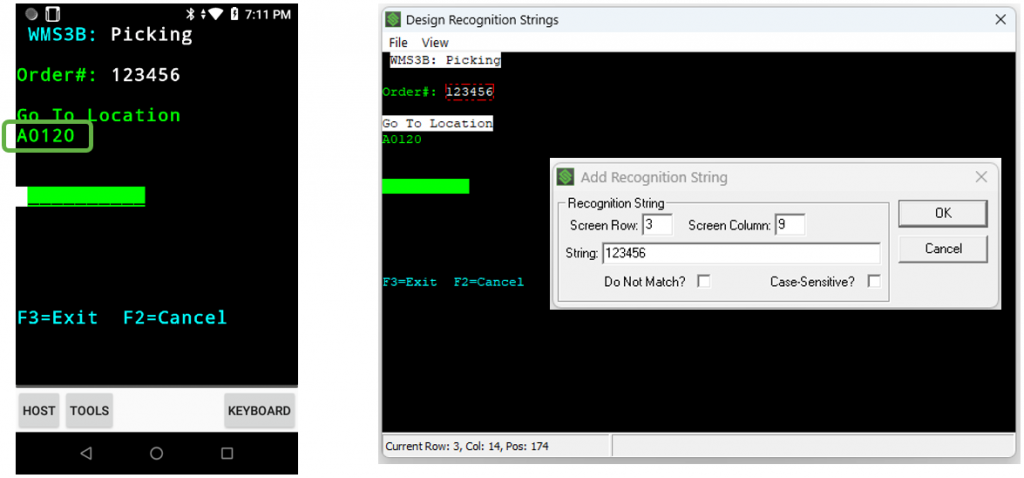
- Still within the “Add Recognition String” window, replace the string with “blank(#)”, with “#” indicating the length of the string.
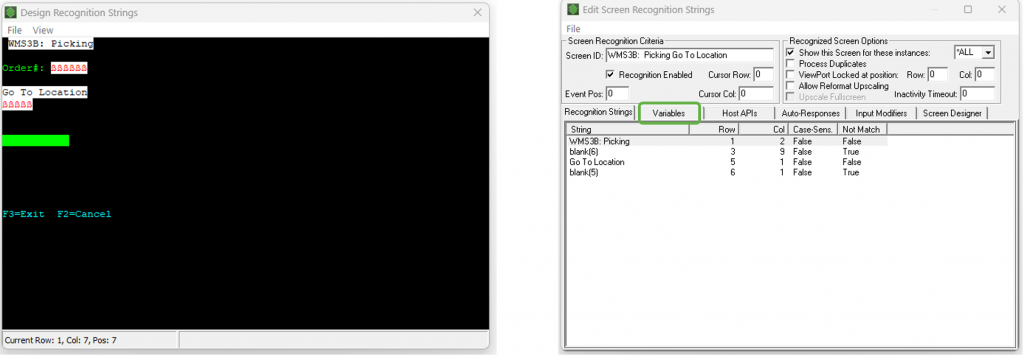
- Check the box for “Do Not Match”.
- Press OK and repeat for any other variables.

- In our example the end result is shown below.
- This is the end of the VT emulation-only settings.
- Close the “Design Recognition Strings” window and click on the “Variables” tab.
- Right click in the white area and choose “Design Screen Variables”.
- Capture the variables as you normally would. In this example they are the same as the ones we defined as “blank” in the “Recognition Strings” tab for VT emulation.
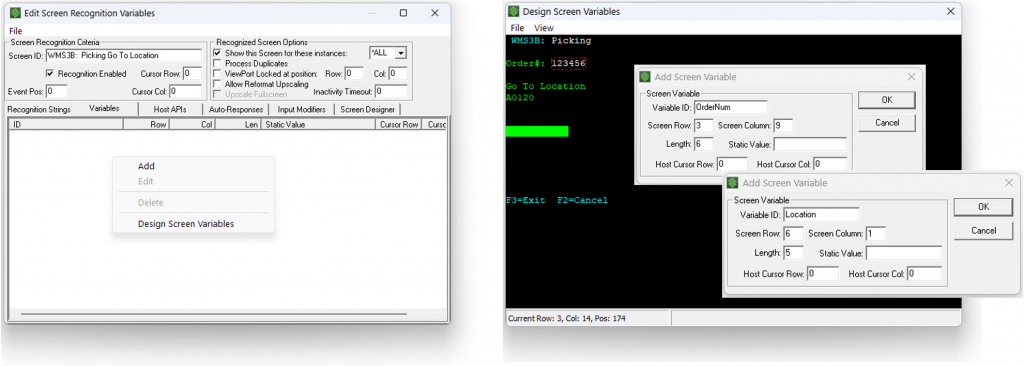
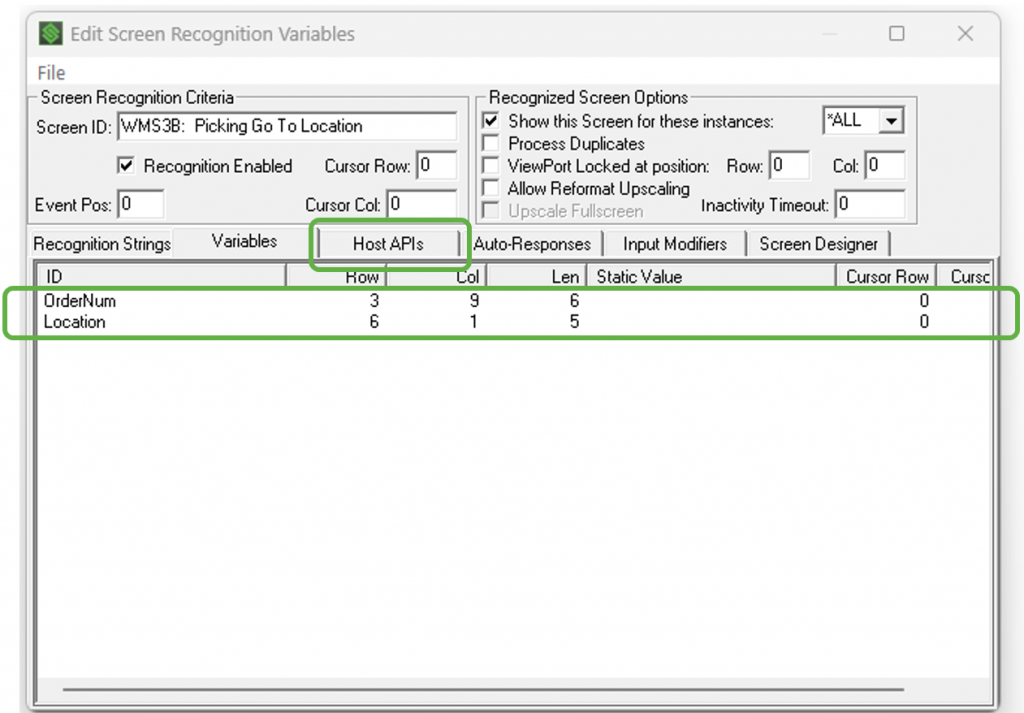
- Variables you have defined will now appear in the white area.
- In our example, the end result is shown below with “OrderNum” and “Location” defined as variables.
- Now press the “Host APIs” tab.
- Right click in the white area and choose “Add Evolve Display API” from the pop-up menu.
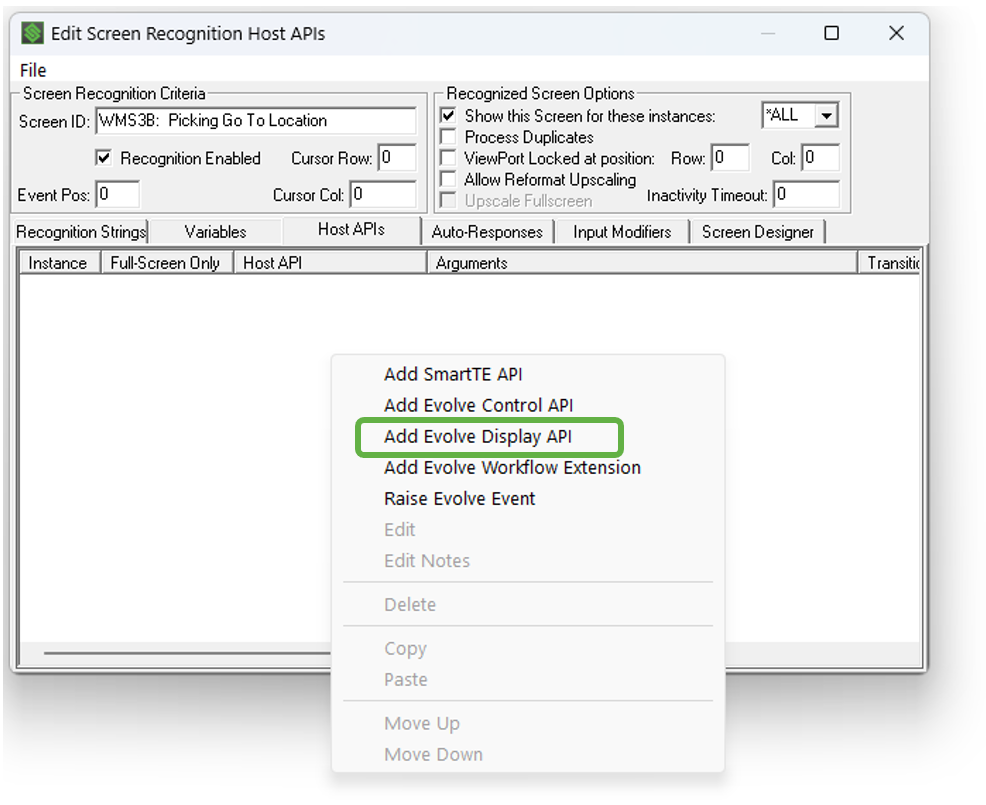
- A number of options are presented in the “Action” pull-down menu for Evolve Display APIs.
- In this example, we want to display 2 titles (Order Number & Location ) and 2 texts (123456, A0120).
- Choose the “Display Message” action option that is most appropriate.
- For this example, we will use “Display Message using 2 Titles and 2 Texts”.
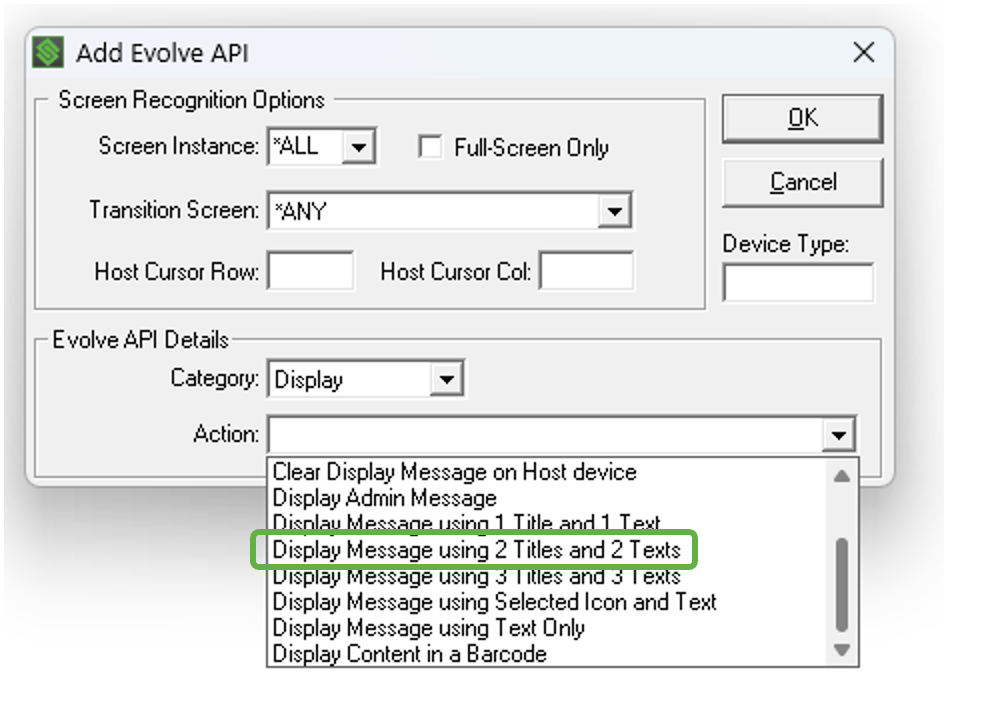
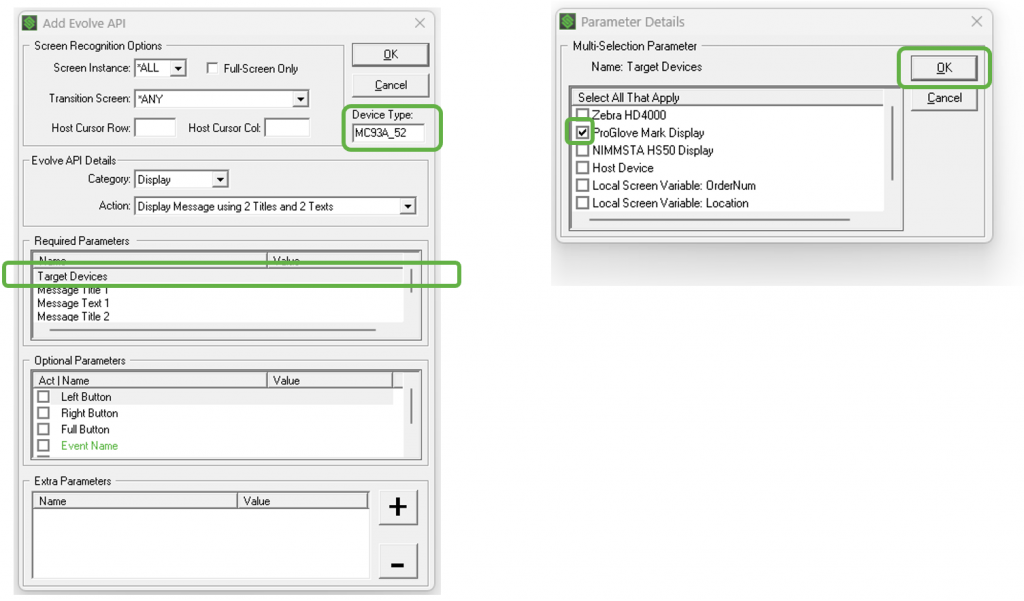
- Ensure the Device Type is filled in. Remember this identifies the Primary device that will be paired to the ProGlove device.
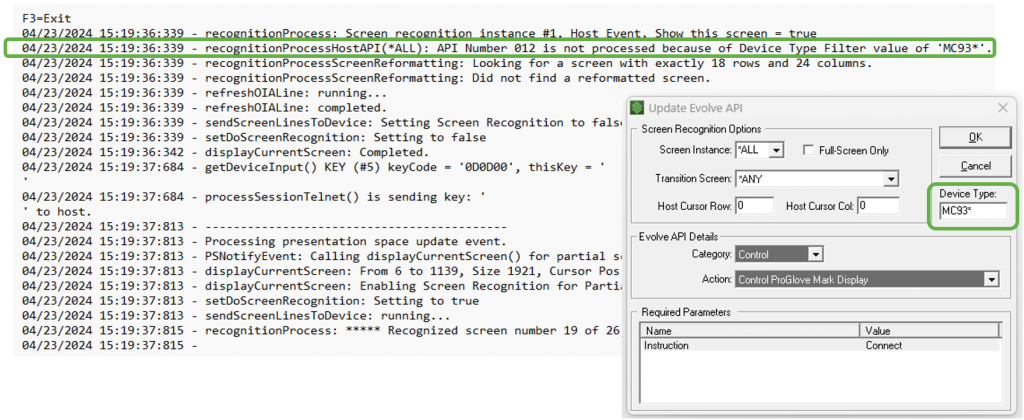
- Reminder, it cannot include a wildcard.
- We must now fill in the “Required Parameters” section for this Evolve API.
- Double click on “Target Devices”.
- Check “ProGlove Mark Display” and click “OK”.
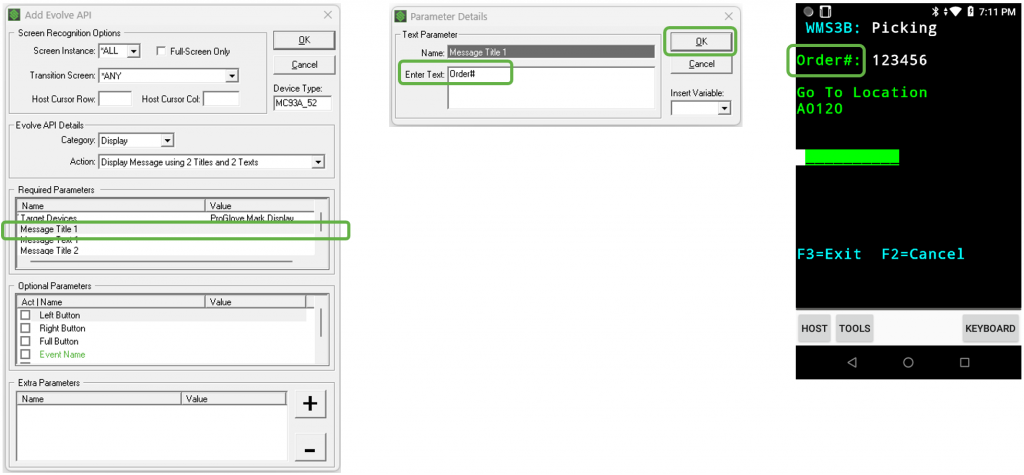
- Double click on “Message Title 1”.
- For Message Title 1, in this example, we have entered “Order#”.
- Press OK in the “Parameter Details” form when complete.
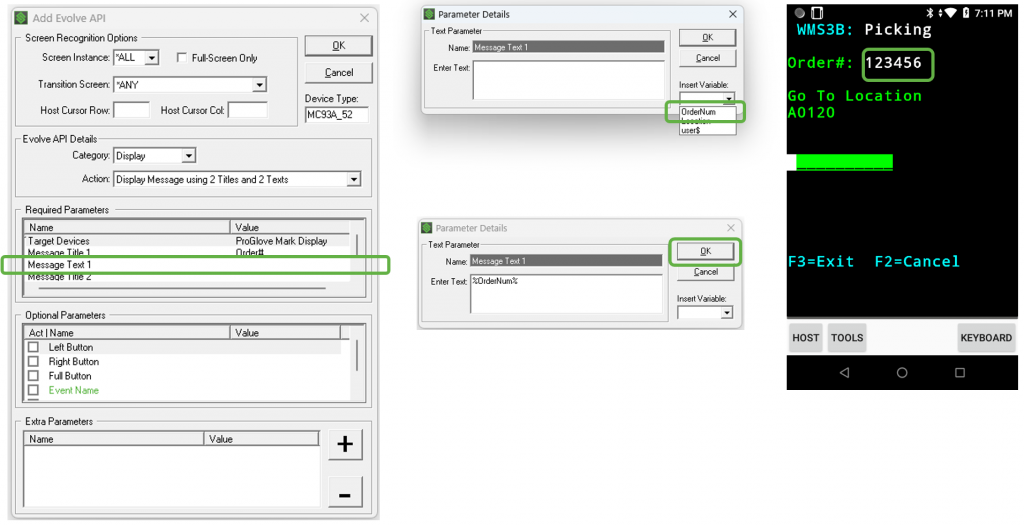
- Double click on “Message Text 1” in the “Required Parameters” section.
- Press the down arrow for “Insert Variable” and choose “OrderNum” from the list.
- “%OrderNum% appears within the “Enter Text” field.
- Press “OK” in the “Parameter Details” menu.
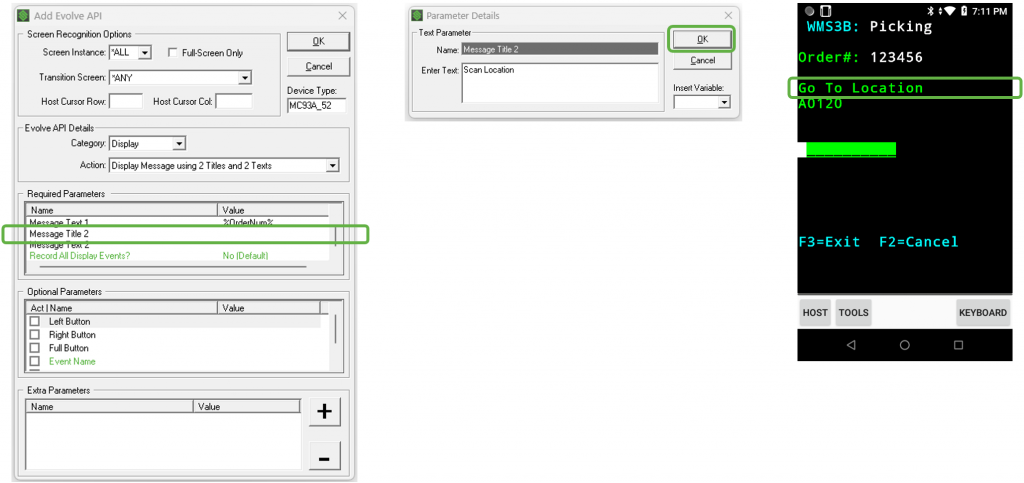
- Scroll down in the “Required Parameters” menu and double click on “Message Title 2”.
- For Message Title 2, in this example, we have entered “Scan Location”.
- Press OK in the “Parameter Details” form when complete.
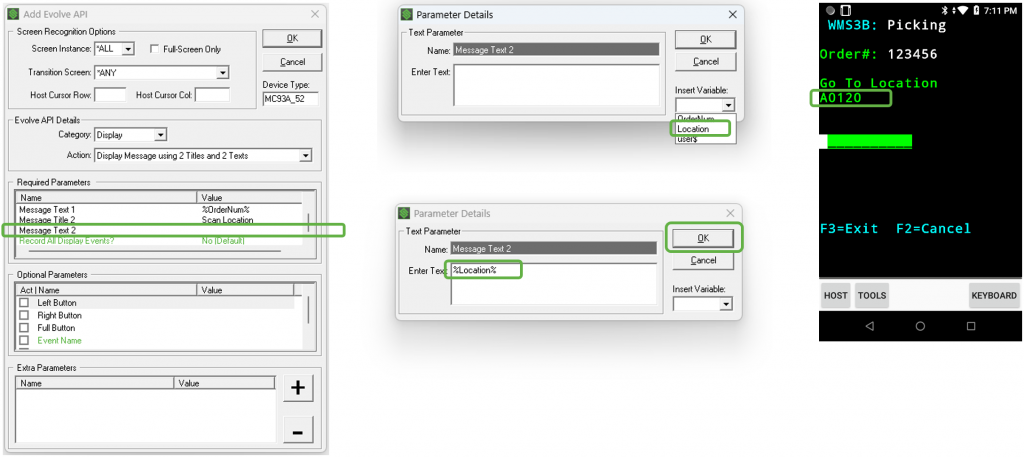
- Double click on “Message Text 2” in the “Required Parameters” section.
- Press the down arrow for “Insert Variable” and choose “Location” from the list.
- “%Location%” appears within the “Enter Text” field.
- Press “OK” in the “Parameter Details” menu.
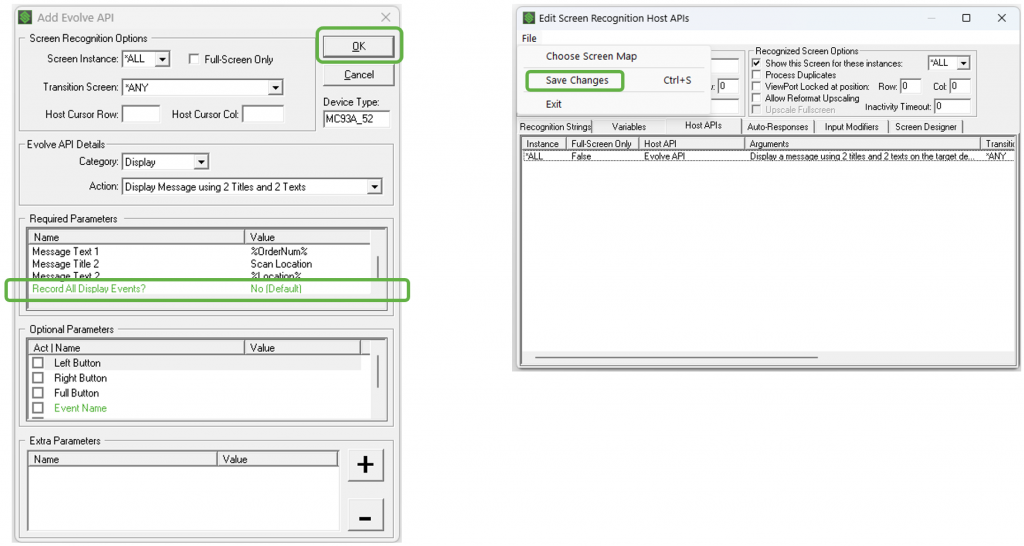
- One parameter remains in the “Required Parameters” section called “Record All Display Events”, colored green.
- For this example, we will leave this in its default mode “No”.
- All of the green settings in the Evolve APIs leverage an Evolve Server (unreleased), requiring an Evolve Server License. Please contact your local StayLinked Sales Engineer for more information.
- Press OK and Save Changes on your way out.
Now we can test our first defined screen for the ProGlove device.
- Terminate any live sessions on the Primary device. In this example, the MC93A_52.
- Start a new session on the Primary device and pair the ProGlove device.
- Navigate to the screen we just defined to call the Evolve Display API.
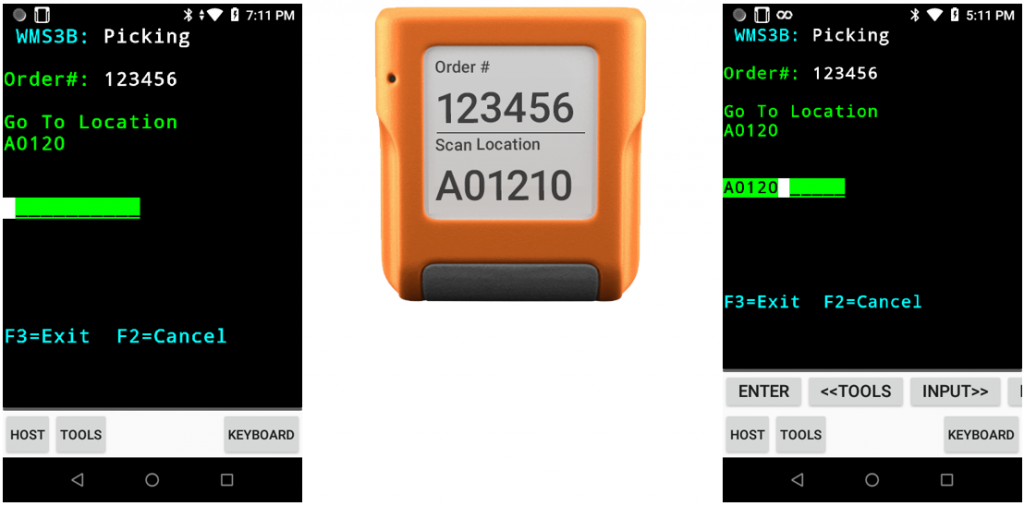
- We should see our newly defined screen appear on the ProGlove device.
- In our example, the screens on both the Primary device and the ProGlove device appear as below.
- Scan a barcode using the ProGlove device and the scanned data appears where the cursor is on the screen of the Primary device.
Appendix A: Disconnecting ProGlove on Session End
- It is recommended to disconnect the ProGlove Mark Display at the end of each session by calling an API for this function.
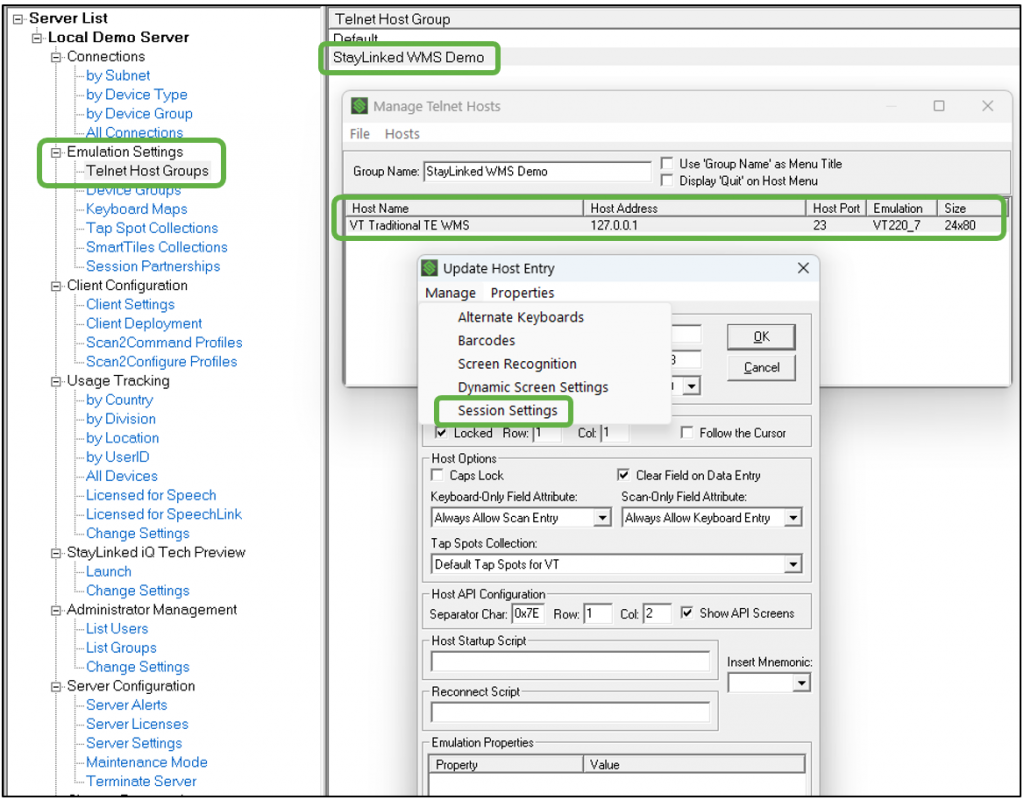
- In the Administrator under “Emulation Settings”, choose “Telnet Host Groups”.
- In the “Telnet Host Group” window, double click on your host group. In this example we are using “StayLinked WMS Demo”.
- In the “Manage Telnet Hosts” window, double click on your host. In this example we are using “VT Traditional TE WMS”.
- In the “Update Host Entry” window, click “Manage” from the top menu and select “Session Settings”.
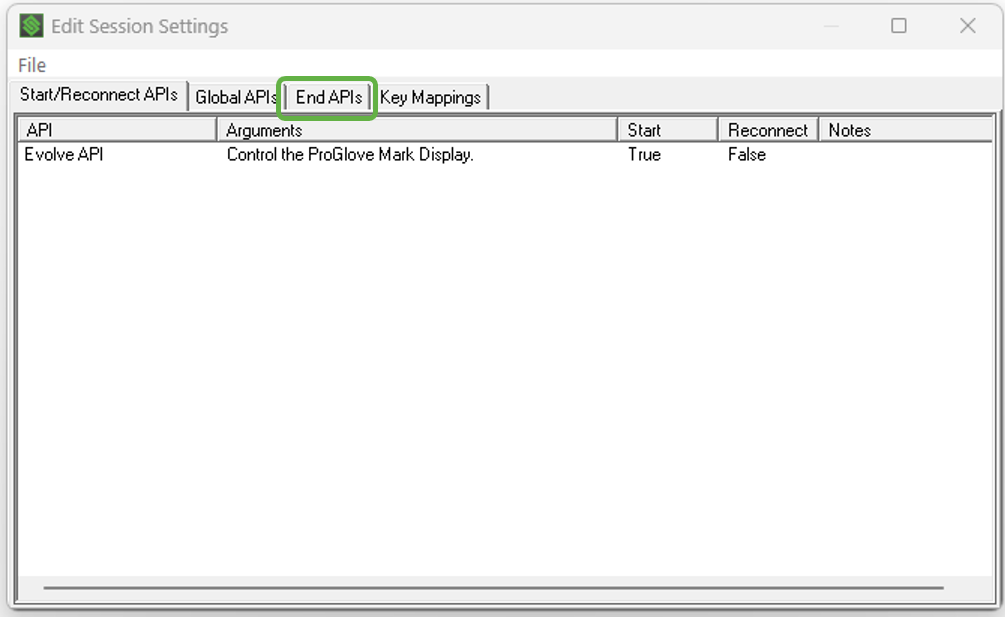
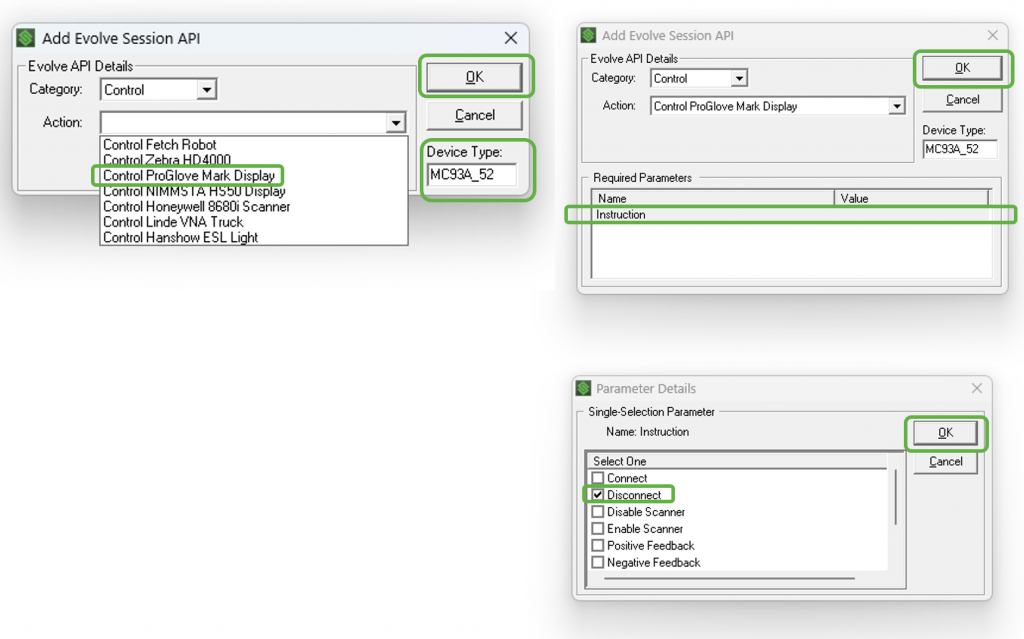
- In the “Edit Session Settings” window, in the “Start/Reconnect APIs” tab, we can see our previous Evolve API call to connect the ProGlove.
- Click on the “End APIs” tab.
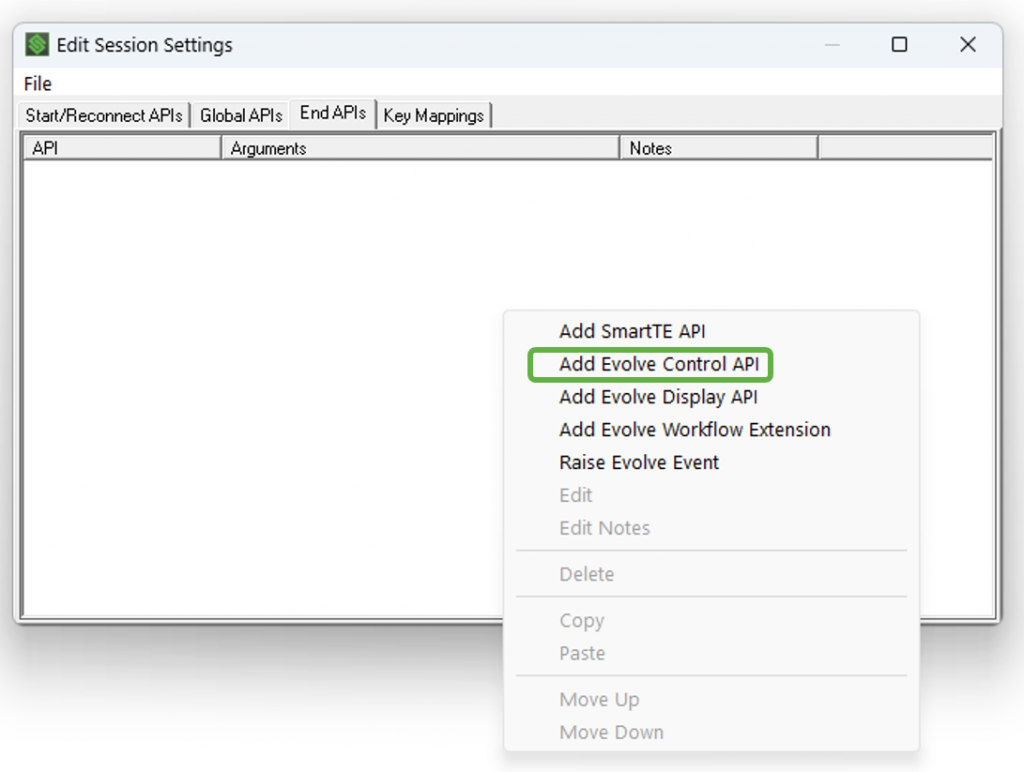
- Right click in the white area and click “Add Evolve Control API” from the pop-up menu.
- In the “Add Evolve Session API” menu, fill in the “Device Type”.
- For this example, we are using MC93A_52.
- From the “Action:” pull-down menu, select “Control ProGlove Mark Display”.
- A “Required Parameters” menu will appear. Double click on “Instruction”. •In the “Parameter Details” menu, check the box for “Disconnect”.
- Press OK and save all changes as you back all the way out in the Administrator.
SmartTip! Global APIs cannot use wildcards in the “Device Type” name.
Now we can test the ProGlove disconnection after the session ends.
- Terminate any live sessions on the Primary device.
- Start a new session on the Primary device and pair the ProGlove device.
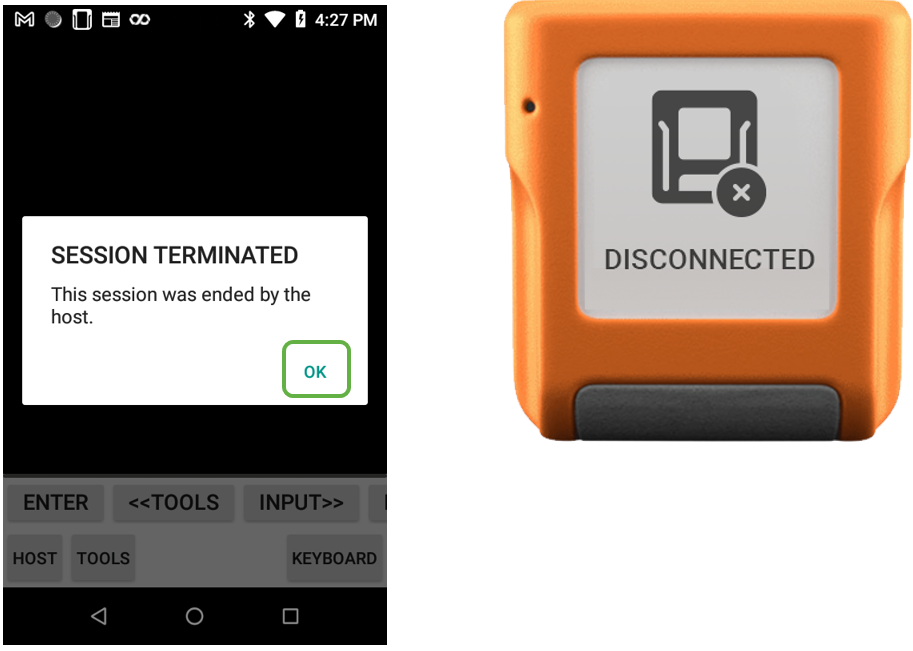
- Disconnect your session.
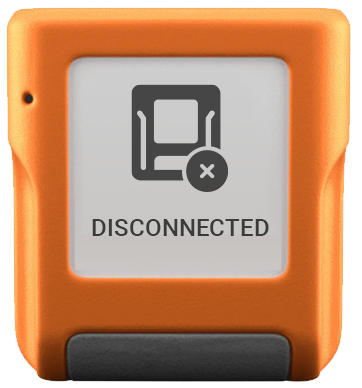
- Once you press “OK” on the “SESSION TERMINATED” pop-up message, the ProGlove device will display the “DISCONNECTED SCREEN” as shown below.
Appendix B: Pairing and Disconnecting ProGlove on a Specific Screen
For this example, using the Screen Recognition features of the Administrator, we have configured the system to recognize the first screen within our Picking Workflow by the screen’s number “WMS3A”.
- Define a similar screen within your WMS and click on the “Host API” tab.
- Right click in the white area and choose “Add Evolve Control API” from the pop-up menu.
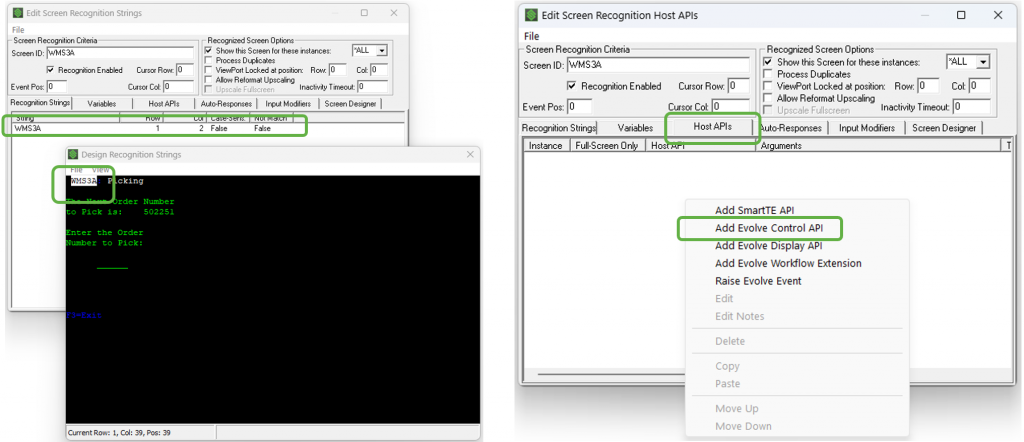
- Fill in the device type without using wildcard characters. In this example we are using “MC93A_52”.
- In the “Evolve API Details” section, select “Control ProGlove Mark Display” from the “Action” pull-down menu.
- The “Required Parameters” section will appear. Double click “Instruction” in this section.
- The “Parameter Details” menu will appear. Check the box for “Connect”.
- Press “OK” once and stay on the “Add Evolve API” menu.

- In our WMS example, workers enter the “Picking” workflow from the “RF Menu” screen (WMS0A).
- The “Picking” workflow is made up of a number of screens. Many of these are shown below.
- As the worker picks, they will repeatedly return to “WMS3A”, the first screen in the “Picking” workflow.
- Currently, our ProGlove pairing screen is triggered by the “WMS3A” screen. We need to avoid the “Scan2Pair” screen appearing each time the “WMS3A” screen appears within the workflow.
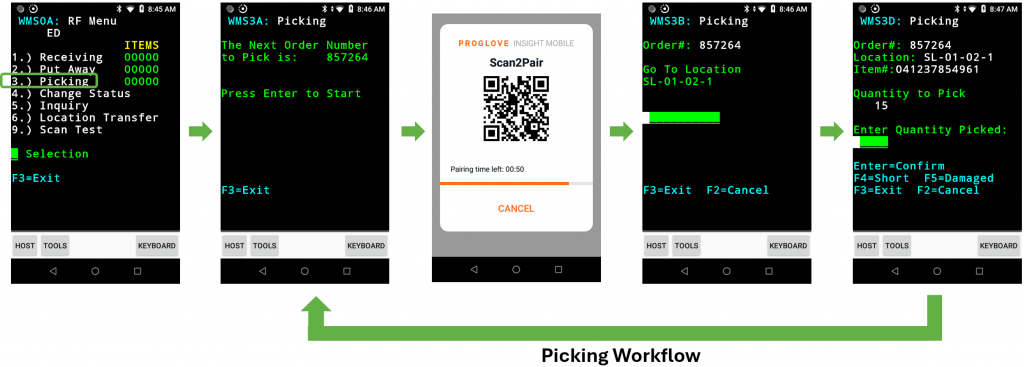
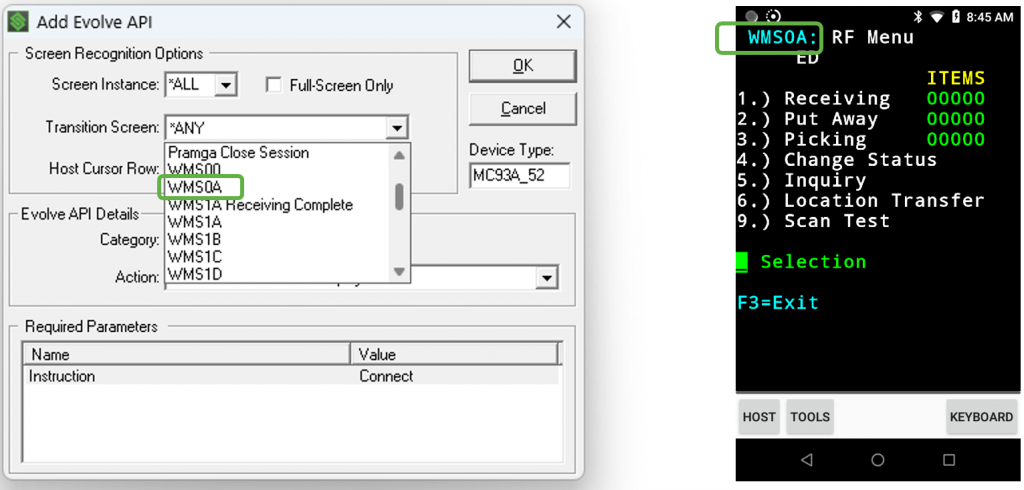
- We can configure the ProGlove pairing screen to only appear when the worker enters the “Picking” workflow when transitioning from the RF Menu screen (WMS0A).
- Still in the “Add Evolve API” menu, choose the targeted screen from the “Transition Screen” pull-down menu. For this example, we are choosing “WMS0A”.
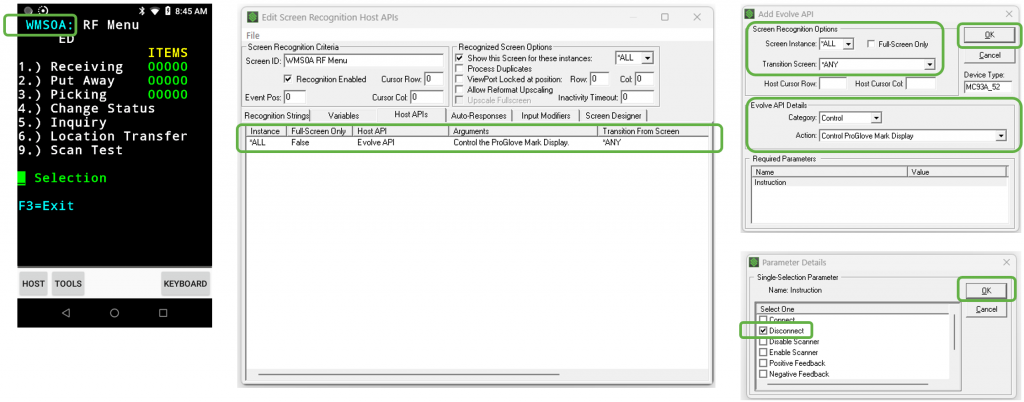
- It is recommended to maintain control of the connection status between the ProGlove device and the Primary device. We should disconnect the ProGlove device upon leaving a workflow, like “Picking” in this example.
- In this WMS example, all of the workflows (Picking, Receiving, etc) return back to the main menu. Users can reach this RF Menu screen either by finishing a workflow or exiting at any point. Therefore, the easiest way to ensure the ProGlove is disconnected is to configure it to disconnect each time this RF Menu appears.
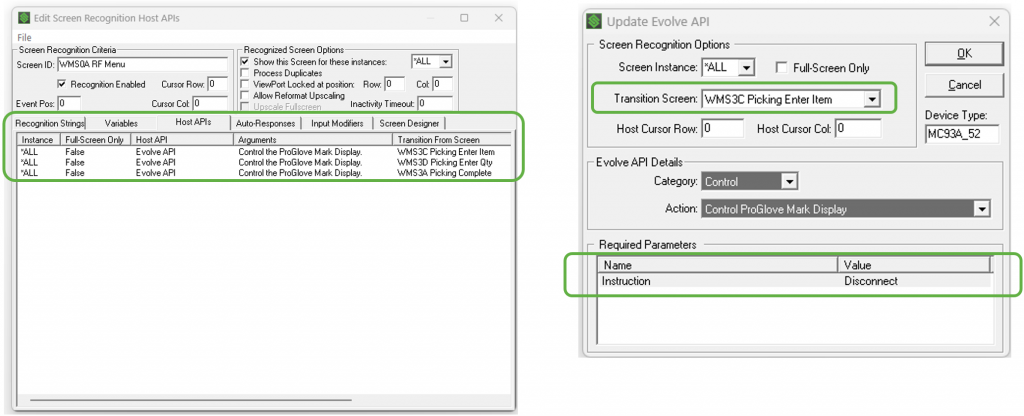
SmartTip! If the ProGlove device is only used within a specific workflow, we can configure the disconnection on the main menu screen when transitioning from any of the “Picking” workflow screens in this example shown below.
Appendix C: Pairing ProGlove with a Button
- The ProGlove Mark Display may disconnect from the Primary device due to any number of reasons (configured idle time, radio range or connection issue, etc).
- It is recommended to provide workers with the ability to reconnect the ProGlove and Primary device if this occurs.
Step 1: Define the API call that will enable the ProGlove connection.
- In “Telnet Host Groups”, double click on the relevant host group, then double click on the relevant host. In this example, the host group is called “StayLinked WMS Demo” and the host is “VT Traditional TE WMS”.
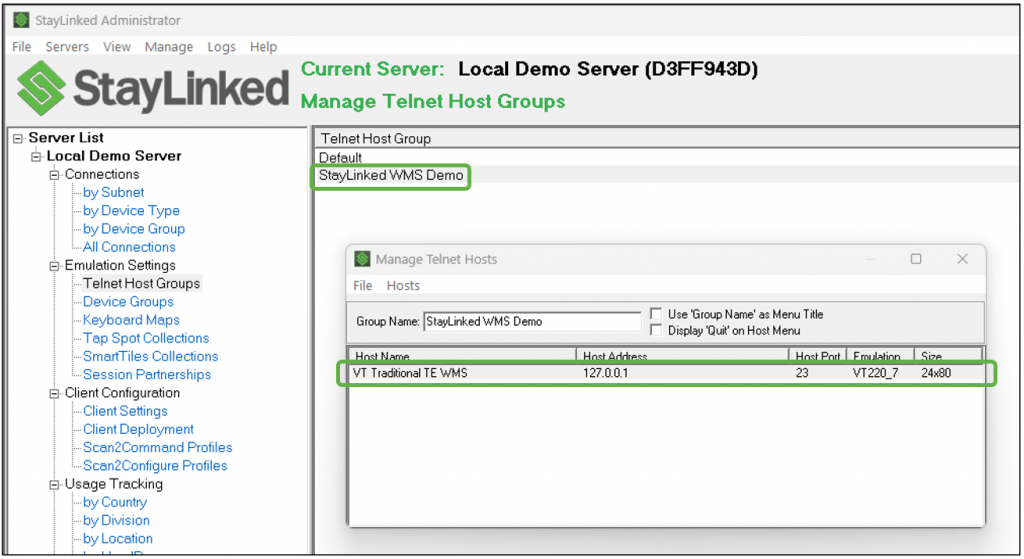
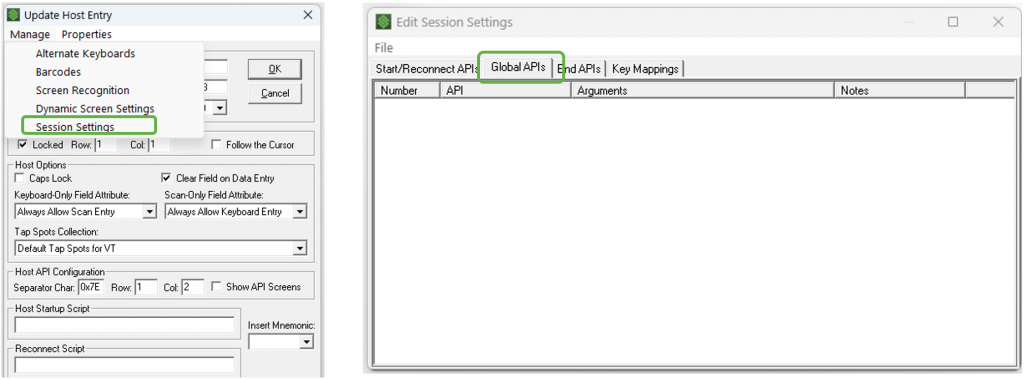
- Click “Manage” and choose “Session Settings” from the pulldown menu.
- In the “Edit Session Settings” window, choose the Global APIs tab. Any APIs that are already defined will appear in this window with their associated number. We will be assigning a number for the global API we will define for Image Capture, so it is important to avoid a duplicate number to another one in this list.
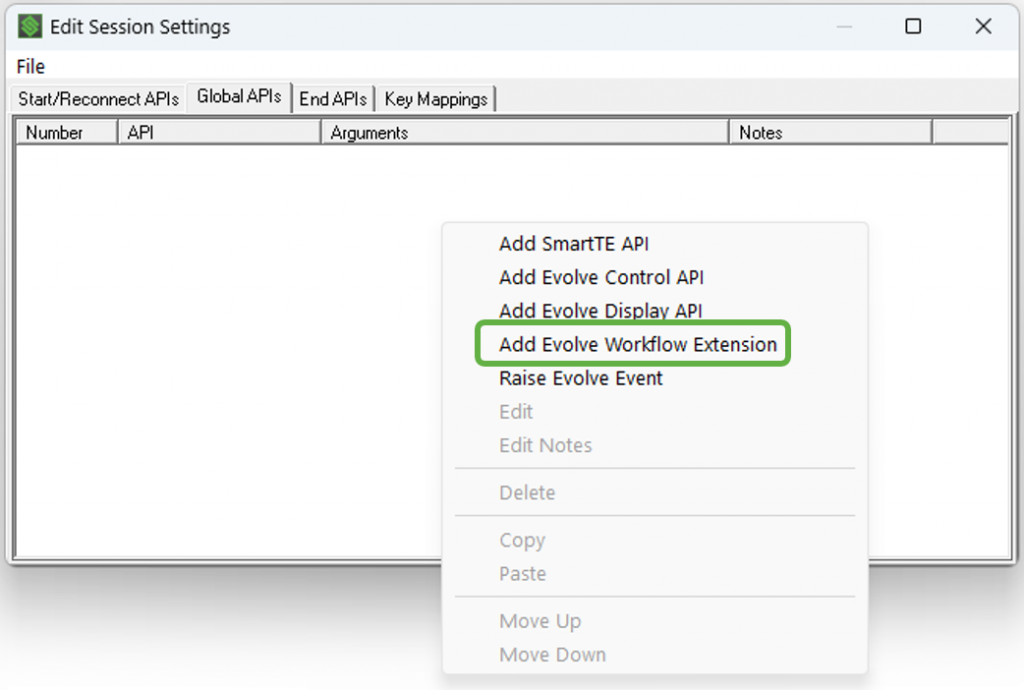
- Right click in the white area and select “Add Evolve Workflow Extension”.
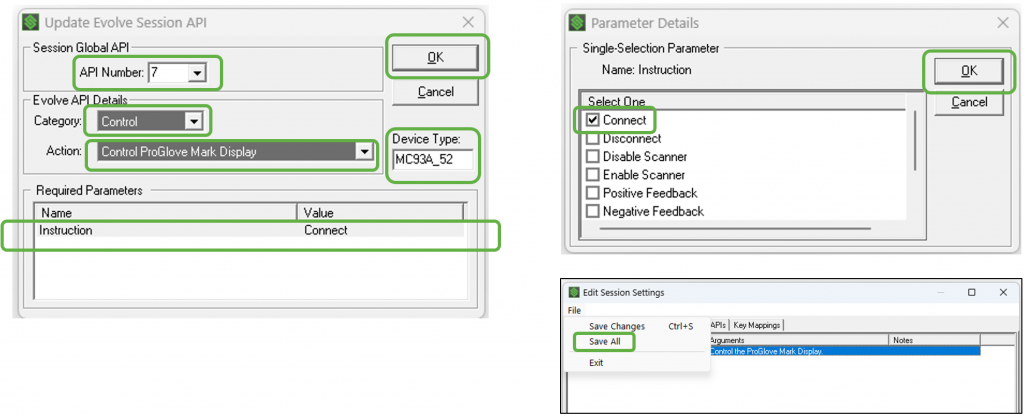
- Assign a number for this Global API. For this exercise, we have chosen “7”.
- Choose “Control” for the Category and “Control ProGlove Mark Display” for the Action.
- In “Required Parameters”, Double click on “Instruction”.
- Check the box for “Connect” and press “OK”.
- Ensure Device Type is configured. We have used “MC93A_52 for this exercise.
- Click “OK” and “Save all” on your way out and the Global API for Image Capture is defined.
Step 2: Create SmartTile collection for the Pair ProGlove button
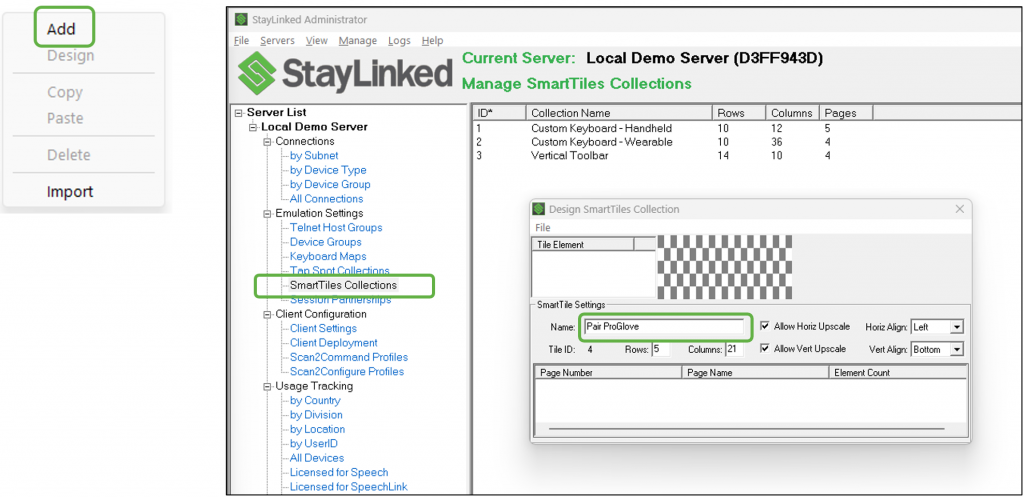
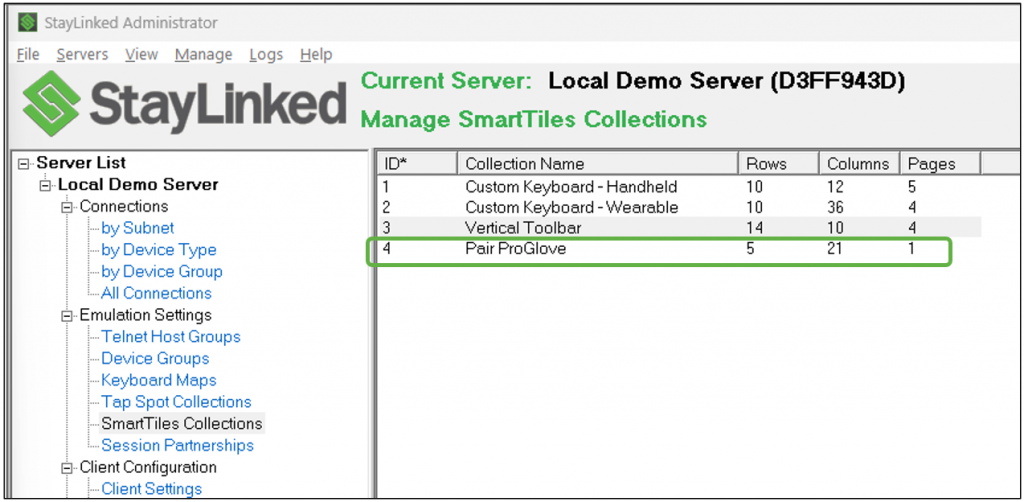
- In the Administrator in “SmartTiles Collections”, right click in the white area and select “Add”.
- Enter a name for the collection. For this exercise we have entered “Pair ProGlove”.
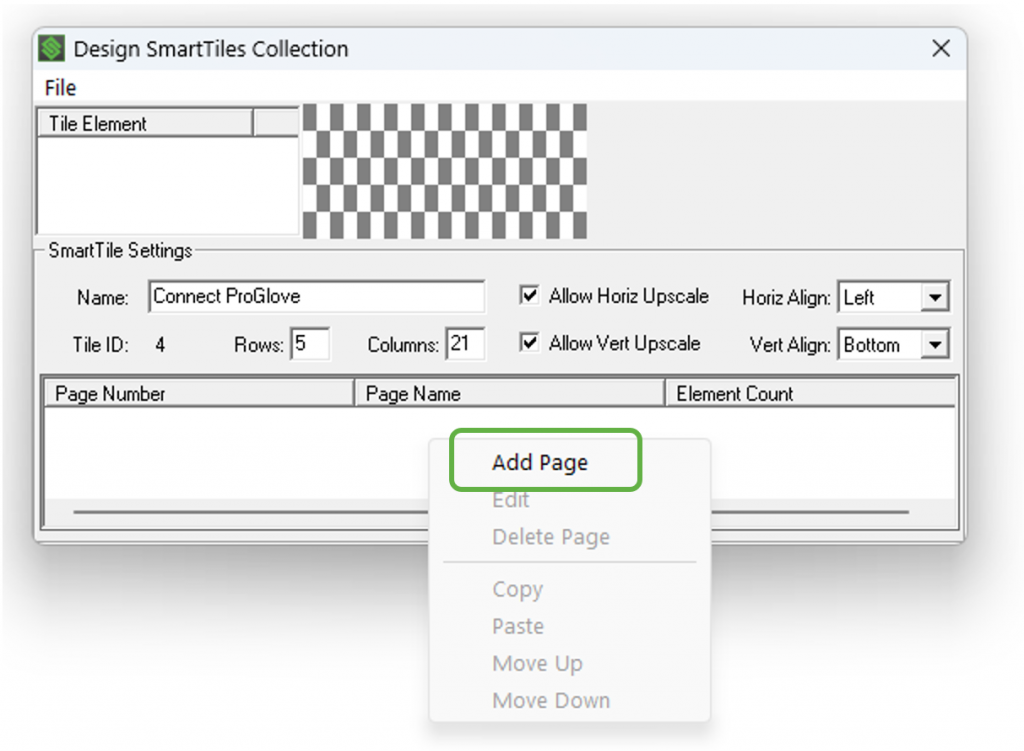
- •Right click white area and select “add page”.
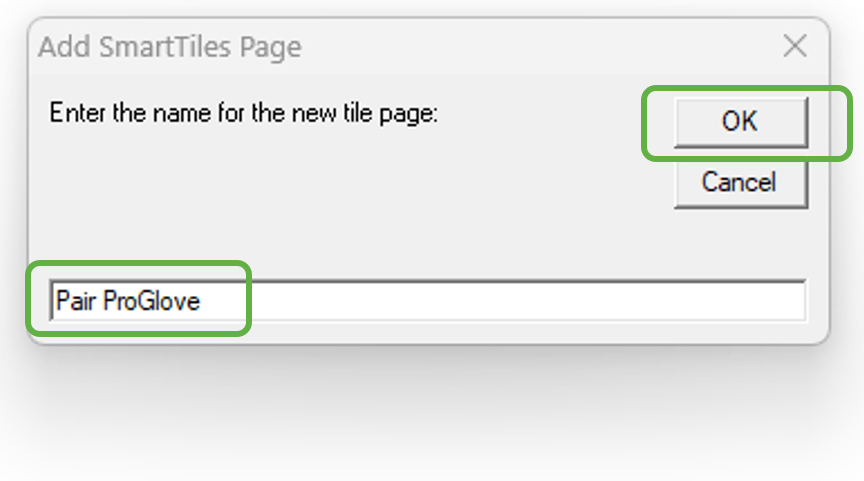
- Enter a name for the page. For this exercise we have entered “Pair ProGlove”.
- Press “OK”.
- Our page name now appears in the list as Page Number “1”.
- Right click in the checkered area, then click “Button”.
- The “Add Tile Button” menu will appear.
- In the “Caption” field, add “[uni EEE8]”. This is the Unicode in Font Awesome for the "PROGLOVE" icon. Alternately, you can enter a text command, like “PAIR”.
- For this exercise, we have set the size to Height: 3, Width: 6.
- Set the colors to your preference.
- In the “Script” field, add [*global7]. Press “OK”.
- Now when the worker taps the “ProGlove icon it will trigger Global API 7 which launches the Camera UI.
SmartTip! Once we test this we will likely need to come back and adjust settings for the button’s position and/or size.

- Once the button appears in the checkered area, click and drag it to reposition as necessary. For this exercise using the StayLinked inhouse WMS demo we have moved it to the far right, bottom corner.
- Click on “File” and select “Save Changes” from the drop down menu.
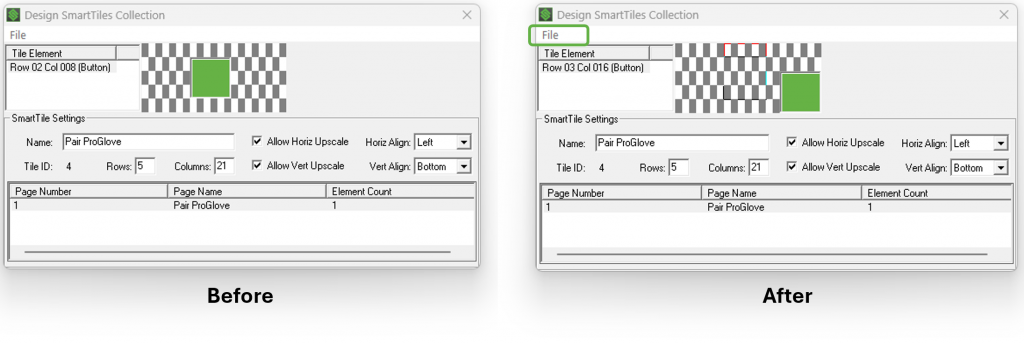
- The new SmartTile collection appears now in the list.
- Take note of its number. In this example it is Collection #4 with a single page.
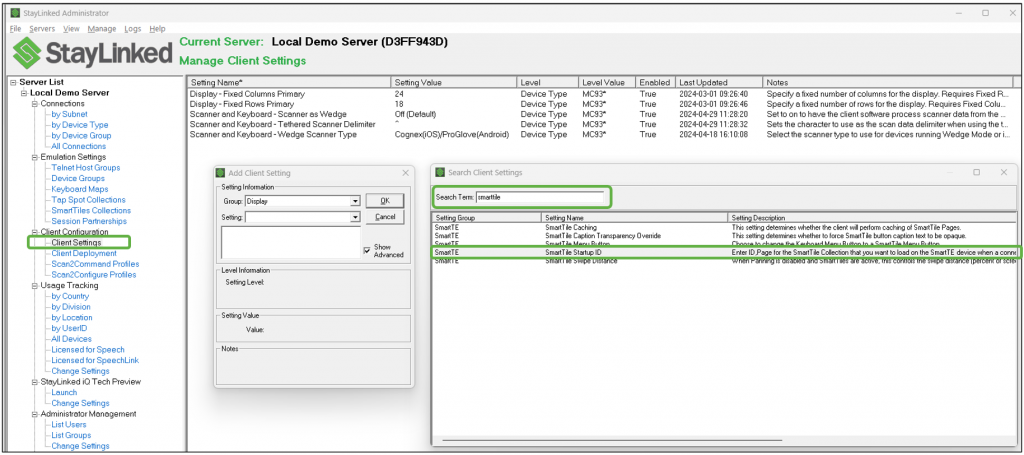
- In “Client Settings” right click in the white area and choose “Search” from the menu.
- Enter “smarttile” into the “Search Term” entry field and press Enter.
- Double click on “SmartTile Startup ID”.
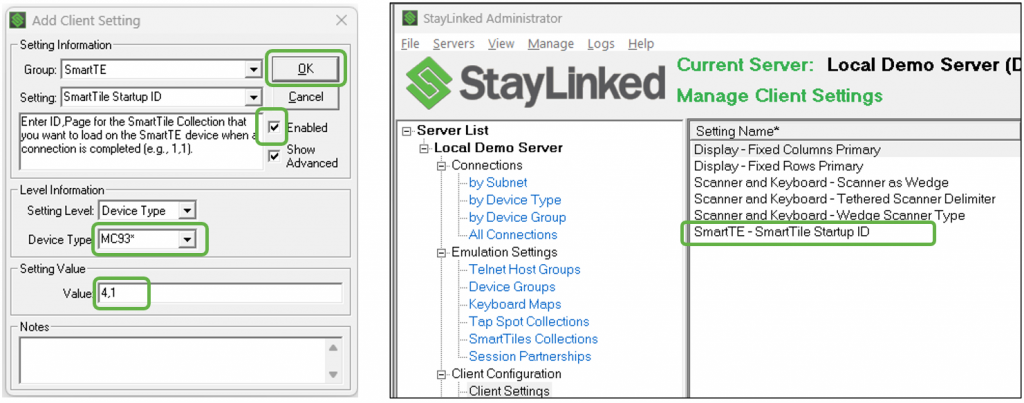
- Set the device type accordingly. In this example we have used the MC93 wildcard.
- Enter the SmartTile collection number and the page number with the "PROGLOVE" button on it separated by a comma. In this example, it is SmartTile collection #4, page #1.
- Check “Enabled” to enable the setting.
- Click “OK”.
- Our new SmartTile collection appears in the “Client Settings” list.
Step 3: Test and Adjust
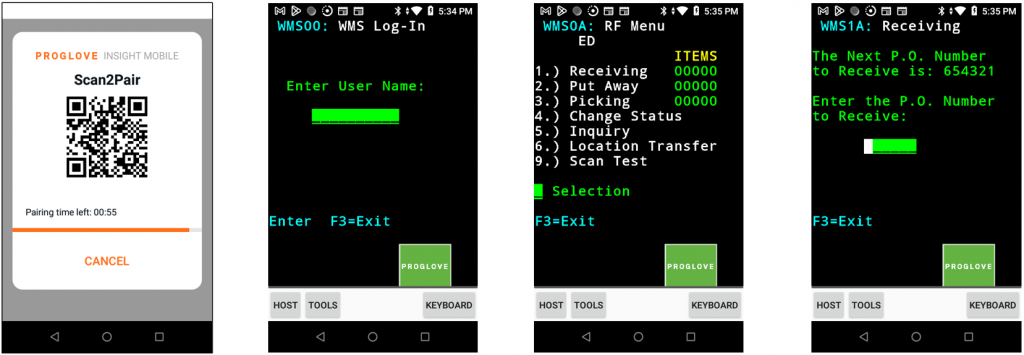
- Terminate any active sessions and log into a new session on the Primary device.
- The SmartTile Client Setting we defined displays the "PROGLOVE" button once the session begins.
- Test the "PROGLOVE" button to ensure it launches the Scan2Pair screen.
- Run through a variety of screens in the WMS to ensure the button isn’t interfering with other information and adjust as necessary in the SmartTile collection definition.
- Leverage Screen Recognition and add pages to the SmartTile collection if the button requires different locations on specific screens.
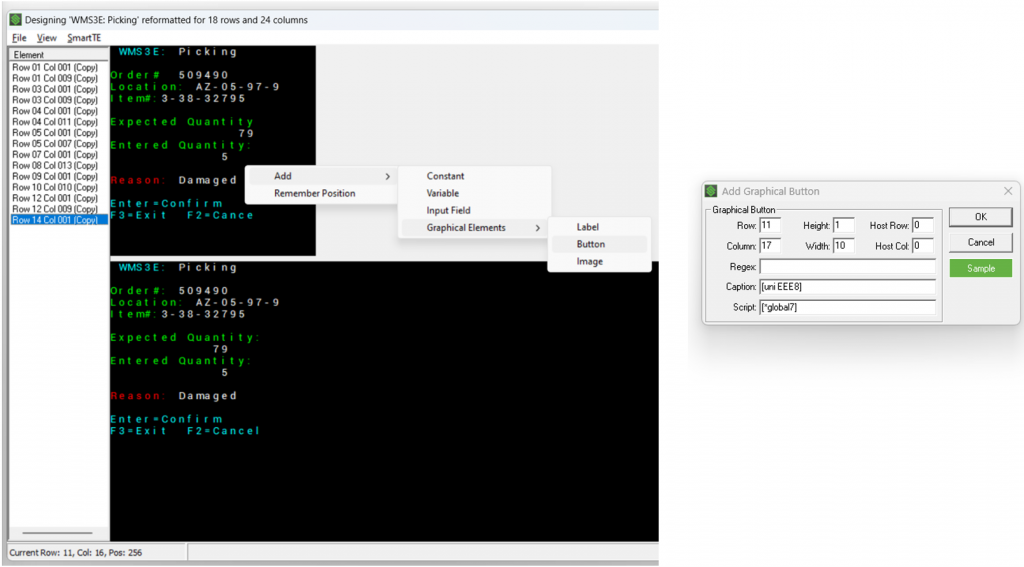
SmartTip! Using a Reformatted Screen is another approach to including a ProGlove button.
- Copy the original screen elements into a designer screen.
- Add a “Button” as a “Graphical Element”.
- Define the graphical element in the same manner as the SmartTile button to call the API.
- More information on using Reformatted Screens can be found on the knowledge base here.
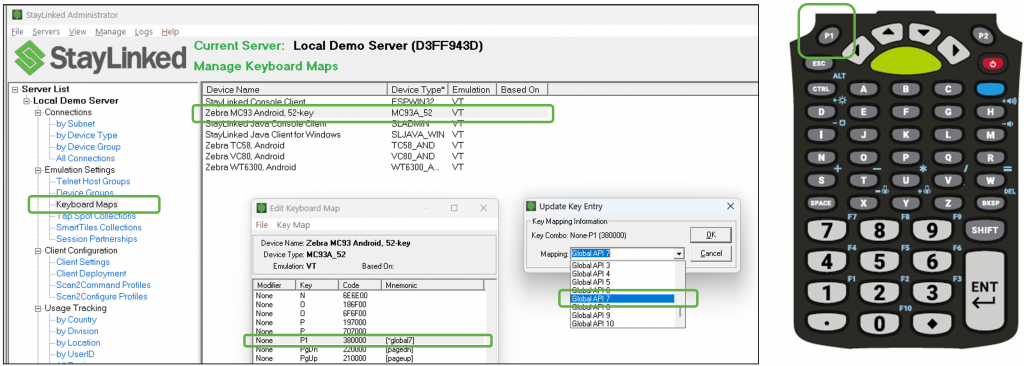
SmartTip! Using a Programmable Button on the Primary device to Pair the ProGlove device.
- Many enterprise mobile computing manufacturers will support dedicated physical keys that are programmable for special functions like this one.
- Using the Zebra MC9300 with 52 key keyboard as an example, the two keys on the top corners of the keyboard (P1 and P2) are programmable.
- Leverage the “Keyboard Maps” features in “Emulation Settings” to assign a Global API to the key as shown below.
Appendix D: Defining the Double Click Trigger
- Many WMS systems require the worker to press “ENTER” in various places within different workflows. In order to speed up the worker, we do not want them to have to press the ENTER key on the Primary device each time.
- The ProGlove Mark Display can be programmed to generate an “ENTER” by pressing the trigger twice.
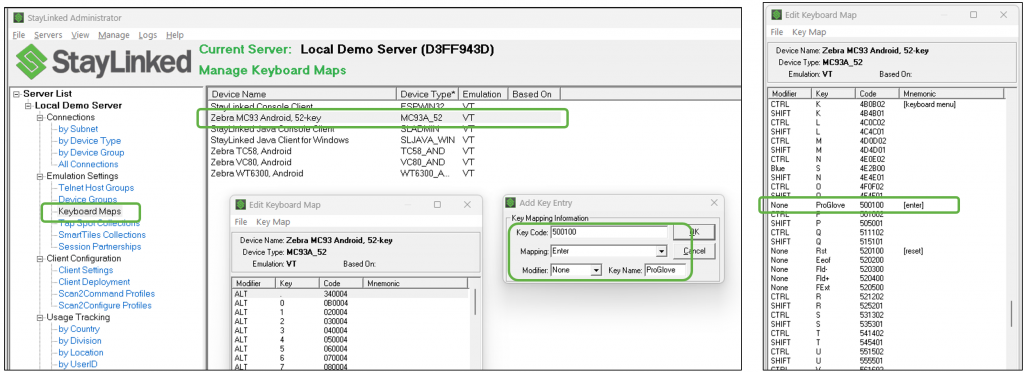
- We will need to add an entry into the keyboard map of the Primary device to accomplish this.
- The ProGlove Mark Display generates a keycode of 500100 when the trigger is pressed twice in succession.
- We will now set up the system to convert the 500100 keycode to the desired key, e.g. [enter] or [hex 0D].
- In “Emulation Settings > Keyboard Maps”, select a Primary device that will be used with the ProGlove device.
- In the “Edit Keyboard Map” window right click in the white are and choose “Add”.
- In the “Add Key Entry” window enter “500100” into the Key Code field.
- Choose “Enter” from the “Mapping” pull-down menu.
- Set the Modifier to “None” and fill in “Key Name”. We have used “ProGlove”.
- Press “OK”. This key now appears in the Keyboard Map for the Primary device.
- Press “File” and “Save Changes”.
Appendix E: ProGlove Feature Support
This listing provides information on ProGlove features supported by StayLinked and features not supported at this time. In-depth information on these features can be found via the ProGlove partner portal. If you would like to request support for an unsupported feature, please contact your local StayLinked Sales Engineer.
Supported Features:
Display
- ProGlove uses a template approach to display information. StayLinked maps data from the Evolve Display API layouts (e.g. 1 title, 1 text) onto ProGlove’s templates (e.g. PG1).
- The complete list of ProGlove templates is defined on their documentation site (https://developers.proglove.com/insight-mobile/android/latest/ScreenTemplates.html).
- The ProGlove templates map onto Evolve Display layouts as follows:

Worker Feedback
- Supported via Evolve Control API.
Button
- The Button feature allows us to capture the trigger double-click and make it available (as keycode 500100) for re-mapping, in the Keyboard Map and Screen Recognition, to any appropriate function. See Appendix D of this tutorial for more information on how to enable it with StayLinked.
Button-blocking
- The button-blocking feature enables disabling of the scan-triggering process. This makes it impossible for a worker to scan any barcodes until the block is resolved. Within StayLinked Evolve, the feature is a control API called ‘Enable Scanner’ and ‘Disable Scanner’. The scanner can be unblocked again using the ‘Enable Scanner’ API or by pressing the scan button twice in quick succession.
Unsupported Features (at this time):
Duration
- When data is displayed with Evolve Display API's, the text will remain on the display until more data is sent. ProGlove supports displaying a message on the display for a configurable period of time (called Duration) after which the display will revert back to the previous displayed text.
Photo, Proximity, Queuing, Profiles
- Please contact your local StayLinked Sales Engineer if an unsupported feature is required.
Appendix F: Troubleshooting
- If a Control API call for doesn’t seem to be working, check the session log. This line in the Session Log indicates the Device Filter value is causing the API not to be processed. Remember that Display API’s currently do not support device wildcards.
SmartTip! The "|" character (pipe) is unsupported on the ProGlove Mark Display
Share the post "Deploying The ProGlove Mark Display"
