This article has been created to provide an introduction to the screen recognition features available within StayLinked. As a thin-client solution, StayLinked is ideal for adjustments and enhancements to many emulation environments. These advanced features provide a flexible mechanism by which the StayLinked Server can recognize screens, collect information from those recognized screens, take actions when screens are recognized and even reformat the recognized screen.
Feature Examples
Following are some simple examples of Screen Recognition and Reformatting capabilities:
- When a ‘Logon’ screen is recognized the first time, an auto-response will automatically log on to the host without displaying the ‘Logon’ screen to the user. If the ‘Logon’ screen is recognized a second time, the StayLinked Session will be automatically terminated.
- When the 5250 Sign-On Screen is recognized, grab the ‘Device Description’ from the screen and update the ‘Device Name’ column in the StayLinked Administrator ‘Connections List‘ to help identify devices.
- When a screen is recognized displaying a specific error message at a specific location, grab the error message from the screen, shut down the scanner laser, beep 4 times and pop-up the error message on the device screen.
- When specific picking screens are recognized, grab values from those screens and send appropriate ‘Text to Speech’ instructions to voice-enabled devices.
- When a 5250 Sign-On Screen is recognized, reformat that screen to fit on a device that is displaying only 21 columns and 16 rows, and provide just the ‘User’ and ‘Password’ input fields, hiding the other un-needed input fields.
- When the application main menu is recognized, grab the User Name from that screen and update the ‘User ID’ column in the StayLinked Administrator ‘Connections List‘ to help identify users.
- When a specific screen is recognized, change the way scanner input is handled and add a special prefix to the barcode data only for this particular data collection screen.
- When a specific screen is recognized, change the way keyboard input is handled and force upper-case characters for all input for this particular data collection screen.
Screen Recognition Prerequisites
The following prerequisites must be satisfied before Screen Recognition will operate:
- The StayLinked Server and Administrator running at least version 10.0.0 Build 140. This article pertains to the features included in the product version displayed in the page header of the document.
- A Terminal Emulation (TE) License must be installed on StayLinked Server.
- A Screen Recognition License must be installed on StayLinked Servers older than v12.1.
- The end-user application must present application screens in a structured and consistent manner.
- The features described in this article can significantly increase the hardware requirements of the StayLinked Server process on your server platform. Monitoring of processor and JVM memory requirements should be performed during implementation of advanced StayLinked features.
How Screen Recognition and Screen Reformatting Works
For Telnet Host Entries that have recognition screens defined and have screen recognition enabled, the Screen Recognition and Screen Reformatting functions will be performed each time the application screens are presented to the telnet client.
Application Screen Presentation Events
When an end-user host application displays a new screen, or updates some part of the screen, or moves the cursor on the screen, this causes the Telnet Server to send ‘screen update’ instructions to the Telnet Client. In the StayLinked Telnet Client, these ‘screen update’ instructions are evaluated and converted into a specific type of ‘Application Screen Presentation Event’. There are four kinds of these screen presentation events and only two of these will cause screen recognition and reformatting to be processed by the server.
FULL-SCREEN UPDATE – When the Telnet Server sends ‘screen update’ instructions to the Telnet Client which cause the entire telnet screen to be repainted, then a FULL-SCREEN UPDATE event is triggered. All full-screen update events will cause the StayLinked Server to perform screen recognition processing.
PARTIAL-SCREEN UPDATE – When the Telnet Server sends ‘screen update’ instructions to the Telnet Client which causes only a portion of the telnet screen to be repainted, then a PARTIAL-SCREEN UPDATE event is triggered. All partial-screen update events will cause the StayLinked Server to perform screen recognition processing.
SINGLE-CHARACTER UPDATE – When the Telnet Server sends ‘screen update’ instructions to the Telnet Client which causes only a single character of the telnet screen to be repainted, then a SINGLE-CHARACTER UPDATE event is triggered. All single-character update events are ignored and no screen recognition processing will occur as a result of this type of event.
CURSOR-MOVEMENT UPDATE – When the Telnet Server sends ‘screen update’ instructions to the Telnet Client which causes only the cursor to be moved to a new location, then a CURSOR-MOVEMENT UPDATE event is triggered. All cursor-movement update events are ignored and no screen recognition processing will occur as a result of this type of event.
Structure and Consistency in Application Screens
These features depend on the ability to consistently describe the layout of a specific screen. The description of a specific screen is composed of a collection of ‘Recognition Strings’ that describe screen text that may or may not appear in a specific location of the screen. It is crucial for accurate and reliable screen recognition that these application screens are presented in a structured and consistent manner, where the screen will be recognized each and every time it is displayed. Some host platforms and emulation types lend themselves to consistent and structured screen display events. The 5250 (AS/400-iSeries-i5 platform) and 3270 (Mainframe platform) emulation types implement ‘record format’-based screen designs that lend themselves to displaying application screens in a consistent manner. The VT100/220 (Windows and Unix platforms) emulation types implement stream-based screen rendering that is free-format in design and is not inherently consistent in presentation of application screens. Due to these implementation differences, VT emulation screens can be more challenging to implement screen recognition.
An example of a structured and consistent application screen is the 5250 sign on screen:
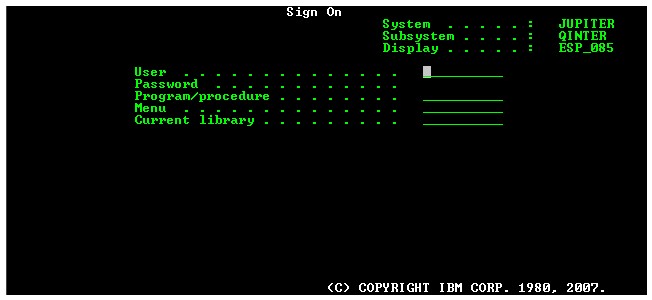
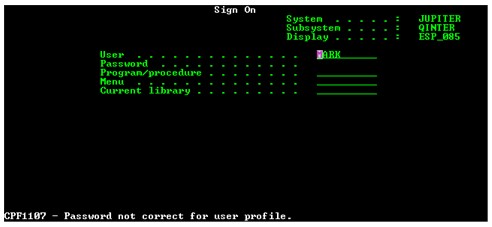
This screen can be recognized because there are many screen text elements that can be used to describe this screen, and those text elements will only be displayed in specific locations. Even if the user provides invalid authentication information, the screen remains consistent with only the addition of an error message displayed on row 24, like this:
On the other hand, here is an example if a loosely structured application screen that is used to log on to an HP/UX Unix machine, where a scrolling, command-line style is implemented:
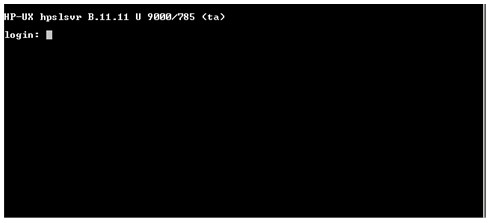
In this case, there are fewer screen text elements to be used for recognition, and in the case of a invalid log on attempt, the screen layout changes and is not consistently formatted as shown here:
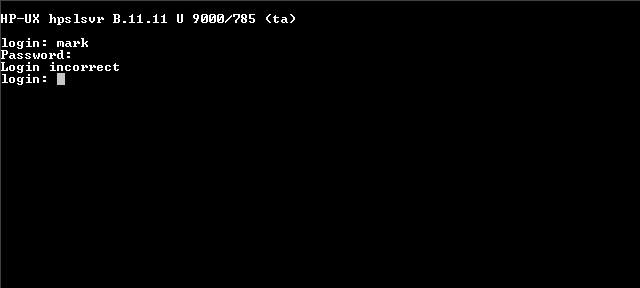
This particular screen can be used for a “one-time recognition” event with an auto-response to perform an automated logon but would not be easily usable for screen reformatting where a very consistent screen presentation is required for screen reformatting to be successful.
Be aware that the application determines how these screens are presented. It is important for accurate and reliable screen recognition and reformatting that these application screens are presented in a structured and consistent manner.
Screen Recognition Order of Operations
When an application screen presentation event occurs, the following actions will be processed in this specific order:
STEP 1) SCREEN RECOGNITION – The presented screen will be evaluated to determine if it matches any of the screens that have been defined to be recognized for this Telnet Host Entry. The recognition screen is identified by one or more ‘Recognition Strings’ that describe screen text that may or may not appear at a specific location on the current screen. Each ‘Recognition String’ element is described by a Screen Row, a Screen Column and the String text. There is an option to specify whether the Screen text must match or must not match. There is an option to specify whether the Screen text matching is case-sensitive. In addition to one or more ‘Recognition Strings’, an optional cursor location can be defined that will be evaluated to determine whether the screen matches or not. If all of the ‘Recognition Strings’ and any specified cursor location are determined to match the current presentation event, processing will continue with Step 2, otherwise the screen presentation event is handled as a standard telnet screen and will be presented to the user on the device “as-is”.
STEP 2) SCREEN VARIABLES – Once the screen is determined to be a match, the server will determine if any ‘Screen Variables’ have been defined for this screen and will collect the values for the variables. These ‘Screen Variables’ provide the ability to capture data from the recognized screen for use in Host APIs, Auto-Responses or Screen Reformatting for this or other recognized screens. Each ‘Screen Variable’ element is described by a unique ID, a Screen Row, a Screen Column and a Length to describe where to retrieve the variable from the recognized screen. A screen variable can have ‘local scope’ and the value will be available for use only in the current recognized screen. A screen variable can also have ‘global scope’ and the value will be available for use in any recognized screen. Additionally, screen variables can be created with ‘static’ values which are pre-defined and will not be scraped from the current screen.
STEP 3) HOST APIs – After processing and collecting values for any screen variables, the server will process any ‘Host APIs’ that are defined for this screen. The ‘Host APIs’ provide a mechanism by which the client behavior can be controlled on the device, or other actions can be taken. The Host APIs can perform many functions including common tasks like sending audible beeps to the device, disabling the scanner laser on the device, display a message dialog on the device, instruct the device to perform Text-to-Speech or Speech-Recognition voice functions, update the StayLinked Connections List with information about the device, the user, or other values, and many other functions. The Host APIs can be configured to be processed for a specific instance of the recognized screen, using instance values like *ALL, *EVEN, *ODD, 1 or >1 to describe when to perform the Host API for this recognized screen. There is an option to specify that the Host API only be performed if the presentation space event is a ‘Full Screen’ event and another option to specify that the Host API only be performed if the application is transitioning from a specific recognized screen to this recognized screen. Screen variable values that were collected in STEP 2 can also be used as Host API arguments. For example, a variable collected from the 5250 Device Name (WSID) on the AS/400 Sign On Screen can be used by a Host API to update the ‘Device Name’ column in the ‘Connections List’ displayed in the StayLinked Administrator.
STEP 4) AUTO-RESPONSES – After processing Host APIs, the server will process any ‘Auto-Responses’ that are defined for this screen. The ‘Auto-Responses’ provide a mechanism by which a response script can be entered into the recognized screen. The Auto-Responses can be used to perform many common tasks like automatically logging on to the telnet server, automatically dismissing message screens, pre-loading some fields on the recognized screen and just about anything else that can be imagined. The Auto-Responses can be configured to be processed for a specific instance of the recognized screen, using instance values like *ALL, *EVEN, *ODD, 1 or >1 to describe when to run the response script for this recognized screen. There is an option to specify that the response script only be processed if the presentation space event is a ‘Full Screen’ event and another option can specify that the response script only be processed if the application is transitioning from a specific recognized screen to this recognized screen. Screen variable values that were collected in STEP 2 can also be used as response script elements. For example, a screen variable used to collect an ‘Order Number’ value from a previously recognized screen can be used to preload the ‘Order Number’ field in the current recognized screen.
STEP 5) INPUT MODIFIERS – For any screen that is displayed to the user, one or more Input Modifiers may be defined. These input modifiers can be used to change keyboard, scanner or voice input to meet any special requirements imposed by a specific screen. You may specify what type of input is allowed, ‘Keyboard Only’, ‘Scanner Only’ or ‘Voice Only’. You may modify the ‘Case’ of character input to this screen, forcing ‘Upper Case’ or ‘Lower Case’ or ‘Original Case’. You can define screen-specific key remapping, for example you can convert a [tab] to be an [enter]. And you may add a special scan prefix, scan suffix and apply regular expressions to any barcode that is scanned into the recognized screen.
STEP 6) SCREEN REFORMATTING – After processing Auto-Responses, the server will process any ‘Screen Reformatting’ that has been defined based on the displayable columns and rows for the current device. For example, if the device is currently configured to display 21 columns and 16 rows, and if there is a reformatted screen that has been designed for 21 columns and 16 rows, then the reformatted screen will be displayed on the device instead of the host application screen. When a reformatted screen is designed, a host “screen map” can be used that references the application screen layout. Using this “screen map” a new reformatted version of the screen can be designed to fit on the device display. The new reformatted screen can contain various elements, like ‘constant text’ that was not displayed on the original host screen, ‘variables’ that were collected from the host screen, ‘copy blocks’ of text that are copied from the host screen, and ‘input fields’ that are linked to existing input fields on the host screen. The Screen Reformatting feature is a powerful way to use existing ‘full-screen’ host applications on ‘small-screen’ devices without having to create new screens within the original host application or change the original host application logic.
Special Mnemonics
Integrated throughout StayLinked is the ability to map keys, create scripts and provide input to the telnet host via mnemonics. These values appear in square bracket characters that contain the keyword or combination. Some of these values are specific to individual areas within StayLinked. For example, the [enter] mnemonic would work in any StayLinked input as a carriage return plus a line feed. Another example, the [radio_stats] mnemonic represents a client-only feature that opens the client window to show current radio information. Screen recognition and reformatting has several custom mnemonics that only operate in the recognition and reformatting dialogues. Most of these mnemonics are fairly self-explanatory as their tags suggest their intended use.
[encrypt #,%%] – This mnemonic is used to cause scripted text to be encrypted in the configuration files. There are two arguments provided to this mnemonic, the first is a unique sequence number and the second is the text to be encrypted. An example would be the use of a 5250 logon sequence in a ‘Startup Script’. In this case, your script for logon could be entered like this: [encrypt 1,myuserid][fldext][encrypt 2,mypassword][enter] The text enclosed in the [encrypt #,%%] mnemonic will be stored in the configuration files in an encrypted format and will no longer be displayed in clear text in the Administrator user interface.
[cursor row#, col#] – This mnemonic is used to move the current telnet cursor location to a specific row and column. This scripting mnemonic is used for both VOICE input processing and for Screen Reformatting input processing.
[inputloc row#, col#] – This mnemonic is used to the next user input to be targeted to a specific row and column. This scripting mnemonic is used for Screen Reformatting input processing.
[defer_recognition] – This mnemonic would be added to any event in which you want to prevent recognition from repeating.
[force_recognition] – This mnemonic would be used when the current input or presentation event should trigger a (re)recognition immediately, regardless of the presentation of the emulation screen.
[force_reformat] – This mnemonic would be used when reformatting should be enforced to ensure that partial screen updates do not prevent the reformatting of the screen to your users.
[regexgroup #] – This allows the use of stored regex groups from a previous regular expression capture in future screens. Setting # to 0 will clear the stored regex group values. [regexgroup next] is a feature added in server v16.2 allowing the SmartTE Server to provide the next sequential Regex Group for Auto-Response processing rather than attempting to use specifically numbered [regexgroup ##] mnemonics
[wait] – This script mnemonic is used for VT emulation to cause the processing to wait for the next telnet screen presentation event to occur before continuing with further script processing.
[send] – This script mnemonic is used for VT emulation to force the current script segment to be sent to the host immediately.
This list includes mnemonics that are only valid in screen recognition and reformatting. There is a large list of valid mnemonics available in the keyboard maps section of the Administrator. There is also more information on mnemonics and their usage in the StayLinked Administrator User Guide and special mnemonics appendix.
Capturing Screen Maps
One of the most important steps in recognition and reformatting is the use of screen maps. Screen maps are a snapshot of the host screen. These maps can then be used in the design tool to set recognition strings, capture variables and create the side-by-side view of a reformatting screen from the original screen to the new design. Capturing a screen map is done from the Administrator’s connections list by right clicking on a session with the current screen and selecting View > Export Screen Map, or by setting a keyboard map entry to the mnemonic [screen_map]. It can be important to organize the naming of screen maps based on use or order of appearance, so name prefixes (q.v. 01.signon) that sort your screen maps may be helpful over time. Screen maps that are used in any recognition events cannot be deleted as long as a reference exists.
Share the post "Screen Recognition Overview"