Overview
Evolve Display Plugins provide an easy mechanism to display information in a consistent way on multiple different mobile device form factors, including Android devices running SmartTE/Evolve and various wearables and peripherals. These API’s provide a collection of pre-defined screen templates with on-screen buttons and keyboards. The 4 categories of available templates are Message, Keypad, Menu and Barcode.

Advantages
- Templates automatically scale to the display size, eliminating the need to design custom screens for devices of different display sizes and formats.
- Especially useful for smaller screens that can be difficult to display data and keyboards on.
- Easy messaging mechanism to mobile workers.
- Fastest method to display a modernized screen without designing custom versions for each screen.
- Display a pairing barcode for devices that do not support NFC (tap to pair).
- Add scrollable menus with no coding required.
Prerequisites
- Participants should have some experience with the screen recognition features of the StayLinked Administrator. Information on this can be found on the knowledge base here.
- Participants should have some experience capturing variables. Information on this can be found on the knowledge base here.
- The latest Evolve Agent release. Evolve device access licensing is required. Contact your local StayLinked representative for a demo license if required.
- The latest Server release.
- The latest Administrator release.
- The latest SmartTE Android client release.
- Note: Display Templates are supported only on Android devices.
Step 1: Applying a Keypad Template
In this tutorial, we will walk through the steps required to enable a sample from each of the four Display Template categories and demonstrate their appearance on a small wearable Android device (Zebra WS50) and a WVGA Android device (Zebra TC8300).
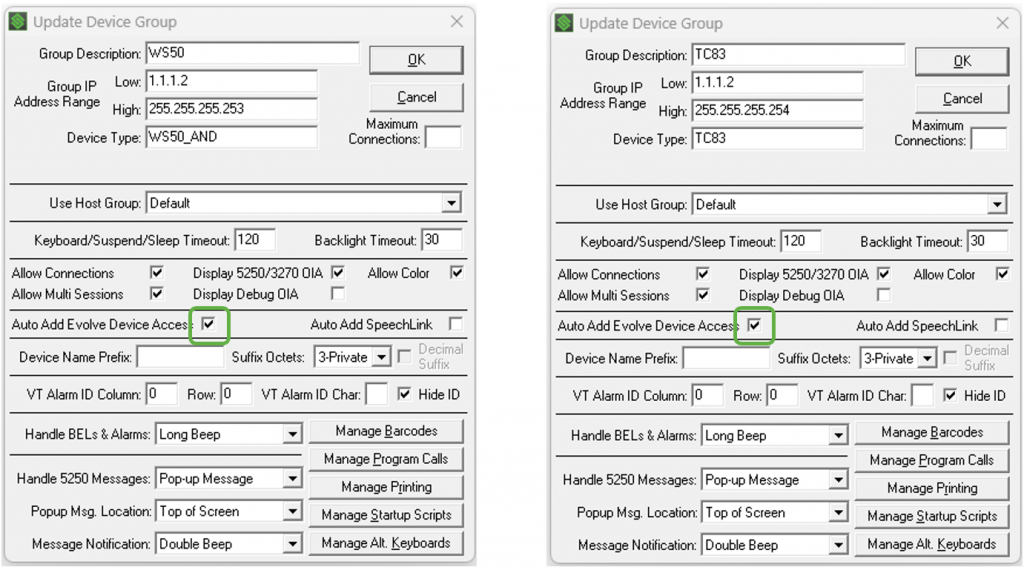
- In the Administrator under “Device Groups”, ensure the box is checked for “Auto Add Evolve Device Access” for each test device.
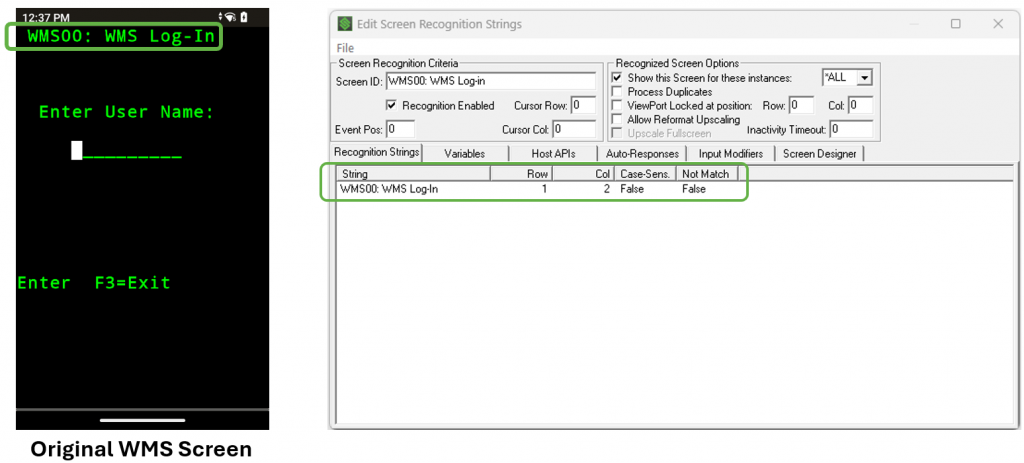
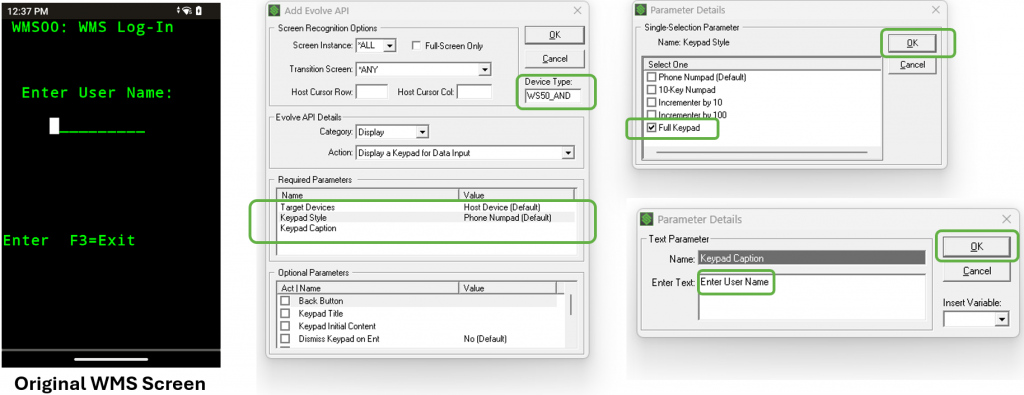
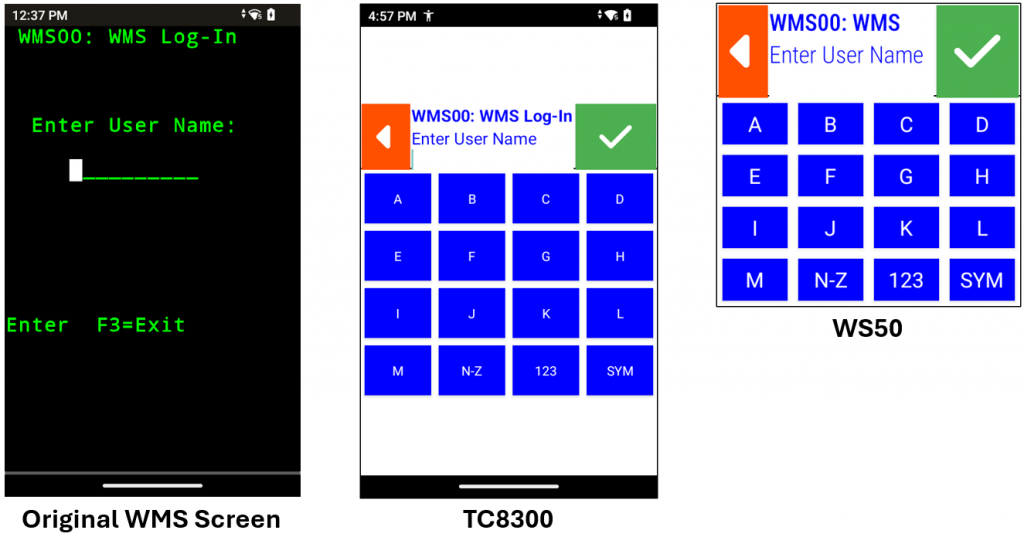
Our goal is to display appropriate instructions for the worker on the mobile device when screens we specify are recognized. In this example, the first screen the worker sees is the login screen. “WMS00: WMS Log-In” is unique to this screen and will act as our recognition string.
- Using the Screen Recognition features of the Administrator, define recognition strings for a screen in your WMS.
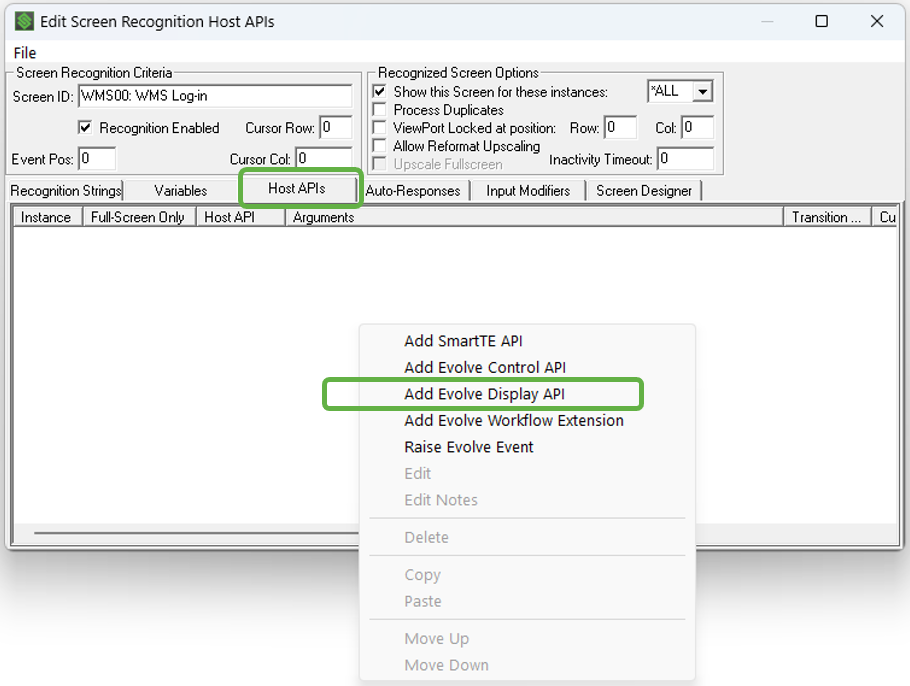
- In the “Host APIs” tab, right click in the white area and select “Add Evolve Display API”.
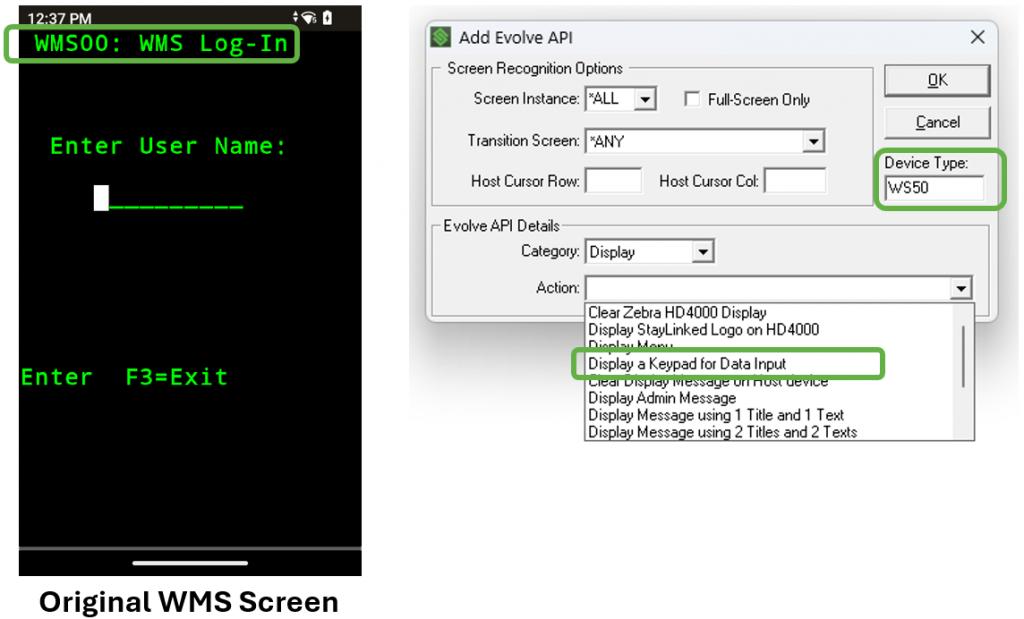
- Input the device type. In this case we have entered WS50. We will duplicate this Display API call for our TC8300.
- In the “Evolve API Details” section, leave the Category at its default (Display).
- In the “Action” pull-down menu, select “Display a Keypad for Data Input”.
- Required and Optional Parameter menus will now appear in the menu. In “Required Parameters”, we will leave the Target Devices at the default of “Host Device”.
- Still in “Required Parameters”, double click on “Keypad Style”.
- A Parameter Details screen will appear.
- For this example (WMS Log-In), we will select “Full Keypad” among the Keyboard Styles available.
- Press “OK”.
- Still in “Required Parameters”, double click “Keypad Caption”.
- For this example, we have entered “Enter User Name”, matching our original WMS Screen.
- Press “OK”.
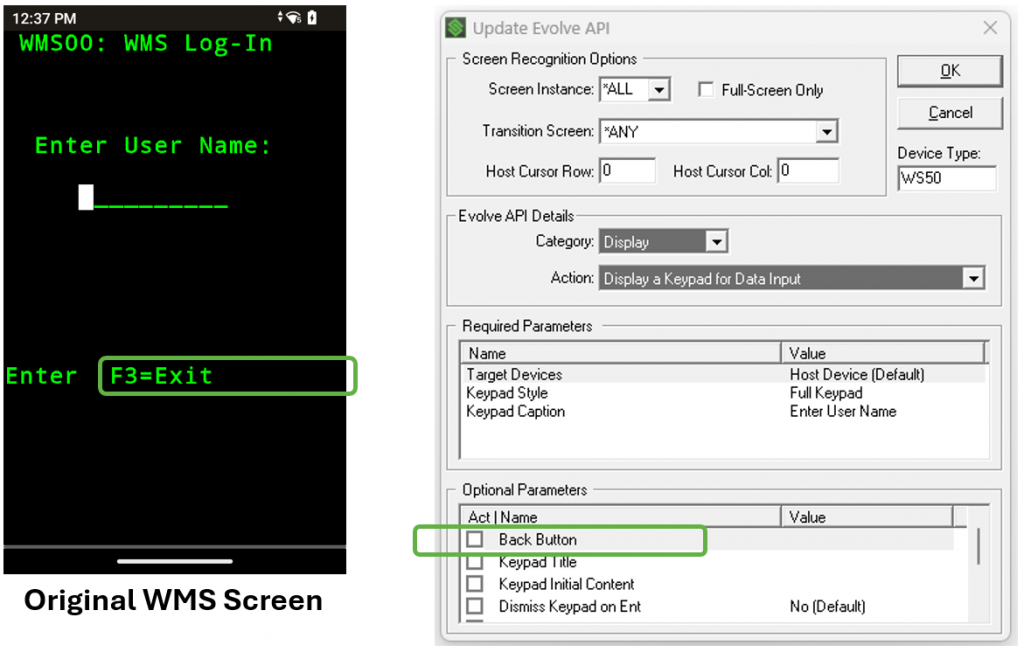
- Our original WMS screen includes a way for the user to exit login (F3=Exit). In “Optional Parameters”, double click “Back Button” from the menu.
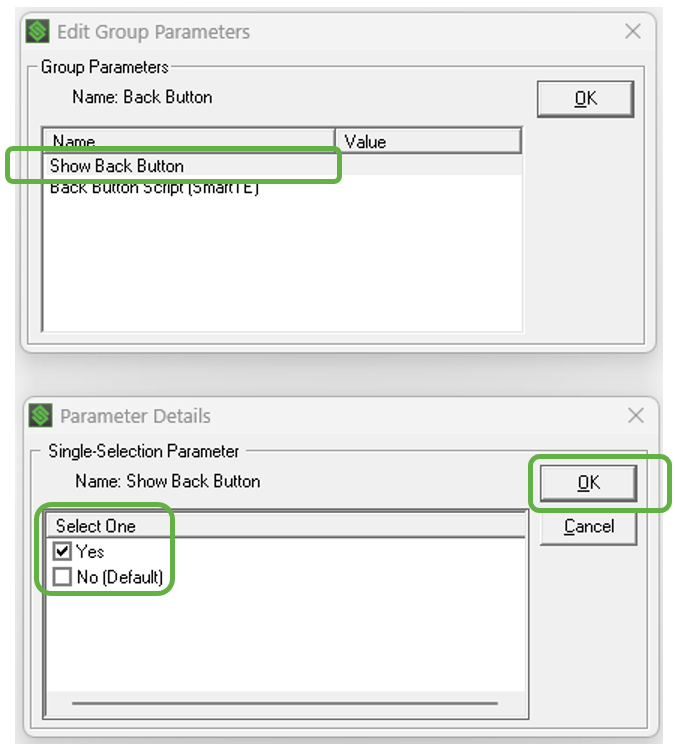
- Double click “Show Back Button”.
- In the next menu, check the box for “Yes”.
- Press OK once.
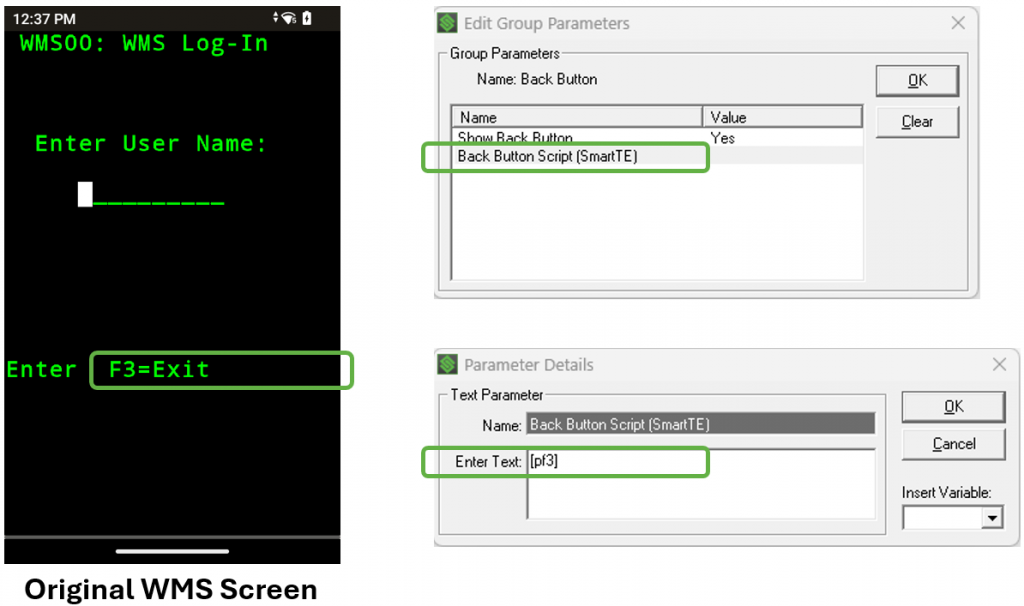
- Now double click “Back Button Script (SmartTE)” from the menu.
- In our WMS example, the worker presses “F3” to exit. Therefore, in the “Enter Text” window, we will enter the mnemonic of “[pf3]”.
- In “Optional Parameters”, check the box for “Back Button” to enable the parameter.
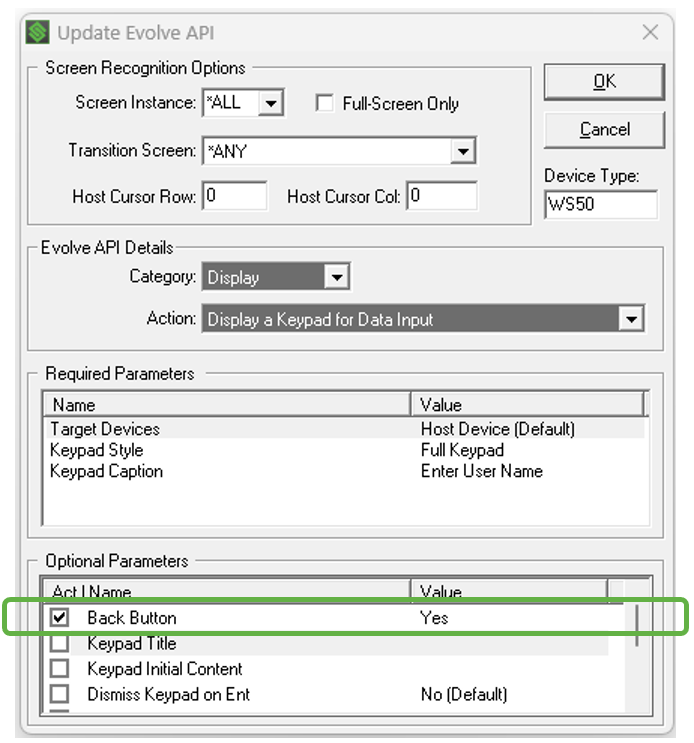
- Our original WMS example screen includes a title at the top of the Log-In screen that we wish to maintain. In Optional Parameters, double click “Keypad Title”.
- Enter a title for the screen in the “Enter Text” window. We have entered “WMS00: WMS Log-In” to match our original WMS screen.
- Press “OK” once.
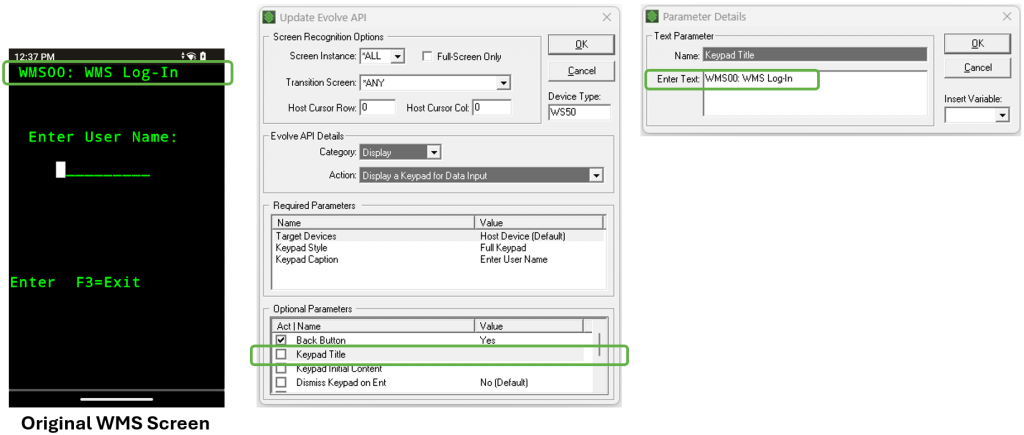
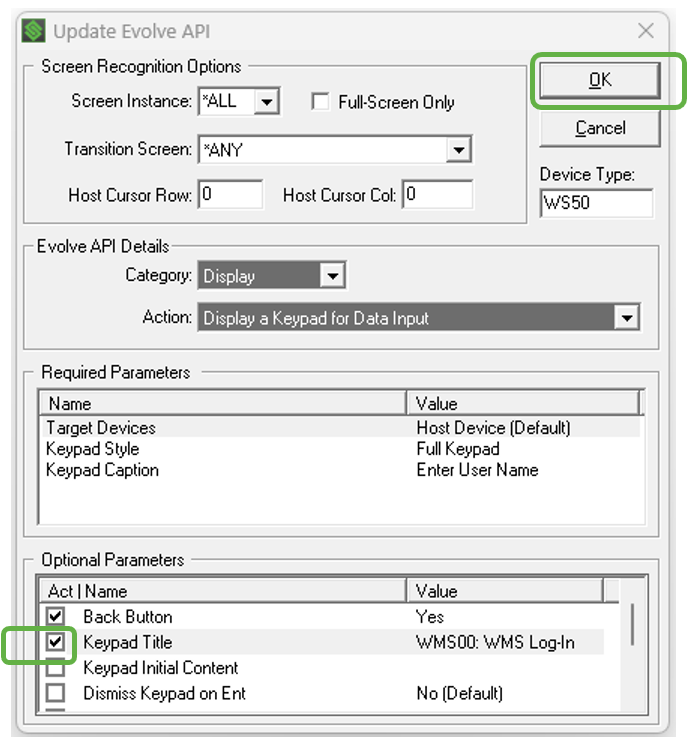
- In “Optional Parameters”, check the box for “Keypad Title” to enable the parameter.
- Press “OK”.
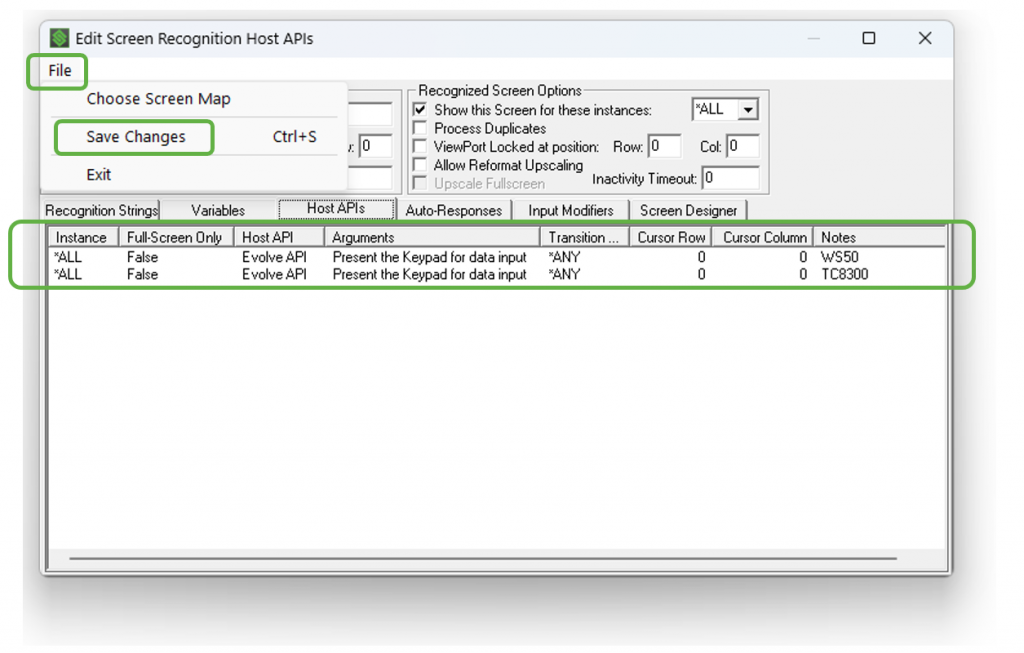
- Our Evolve API instruction now appears in the Host APIs tab.
- For this example, we have duplicated the same API instruction for the TC8300.
- Now press “File” and “Save Changes”.
SmartTip! Right click on the API instruction in the white area to add a Note as shown below.
- In “All Connections”, terminate the session for the target device and start a new session.
- Navigate to the screen that should trigger the Keypad Template.
- The results are shown below for the target devices in our example.
- Other Keyboard Template styles and options are covered in Appendix A in this tutorial.
SmartTip! The Keypads will scale automatically; making them very flexible and easy to deploy across different device form factors, regardless of the display size or resolution.
Step 2: Applying a Message Template
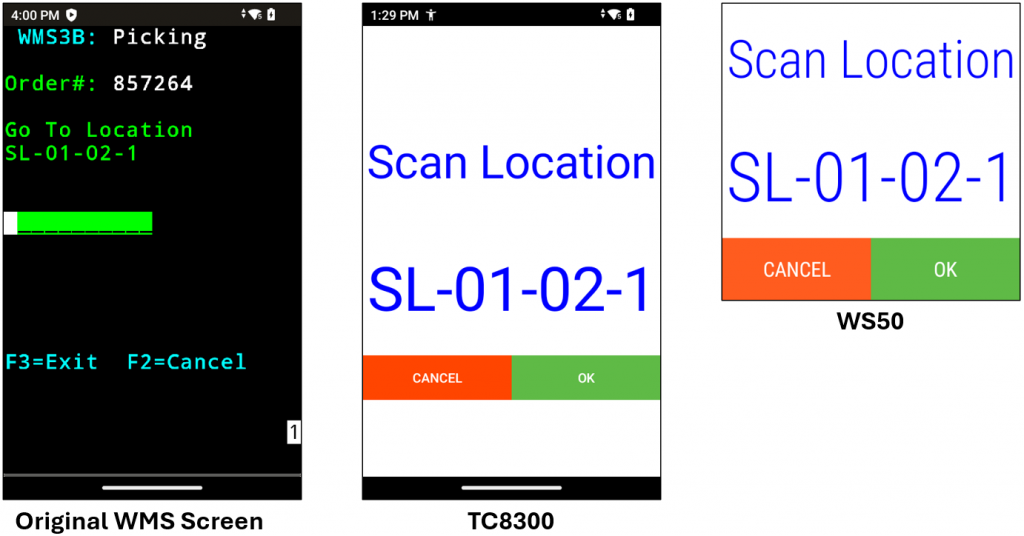
We will now demonstrate how to configure a Message Template using one of the screens from the Picking workflow in our demonstration WMS. “WMS3B: Picking” is unique to this screen and will act as our recognition string.
- Using the Screen Recognition features of the Administrator, define recognition strings for a screen in your WMS.
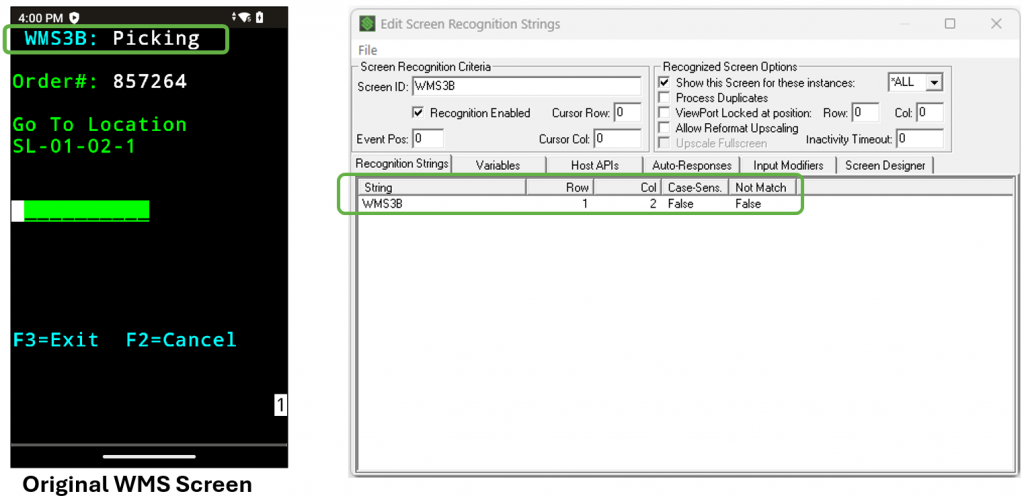
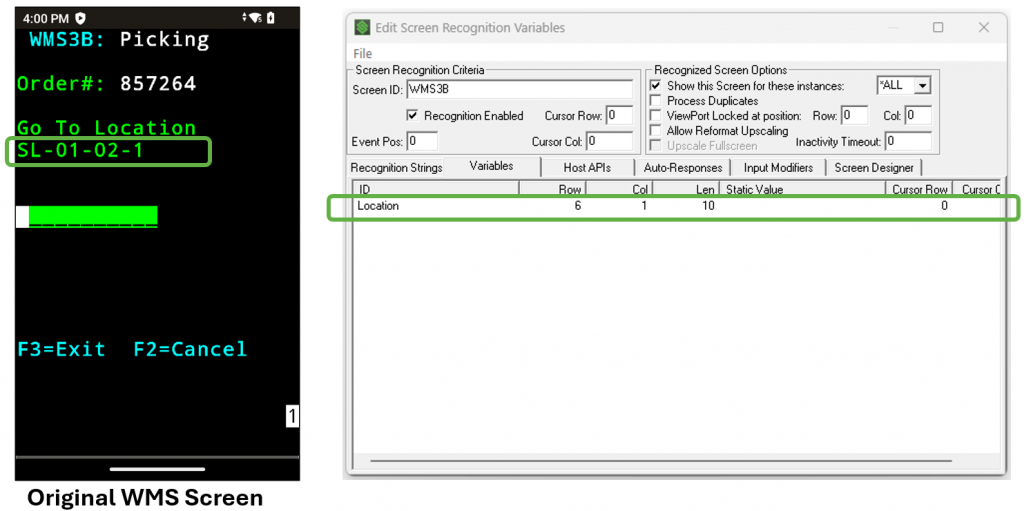
We want to instruct the worker to move to the location indicated in the warehouse and scan it when they arrive. We have used the “Capture and Set Variables” feature of “Screen Recognition” in the Administrator to capture and define our variable for Location and called it “OrderNum”. Information on Capturing and Setting Variables can be found on the Knowledge Base here.
- Capture a variable in your WMS in the same fashion.
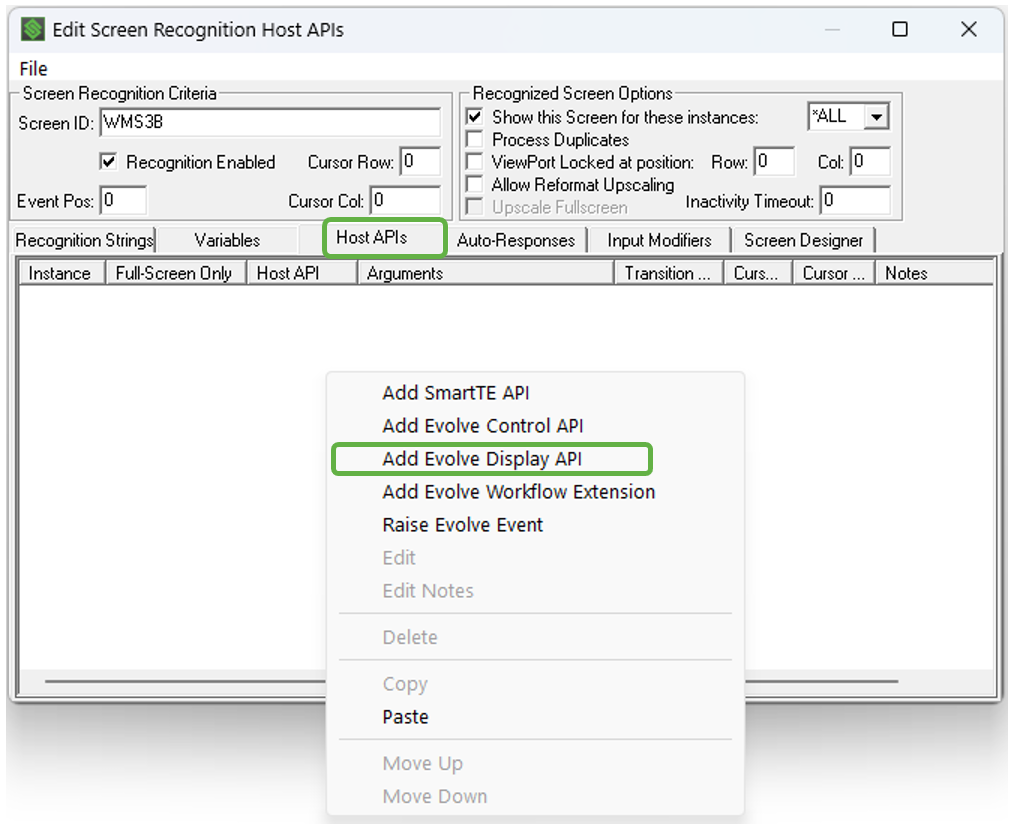
- In the “Host APIs” tab, right click in the white area and select “Add Evolve Display API”.
- Input the device type. In this case we have entered WS50. We will duplicate this Display API call for our TC8300.
- In the “Evolve API Details” section, leave the Category at its default (Display).
- In the “Action” pull-down menu, select “Display Message using 1 Title and 1 Text”.
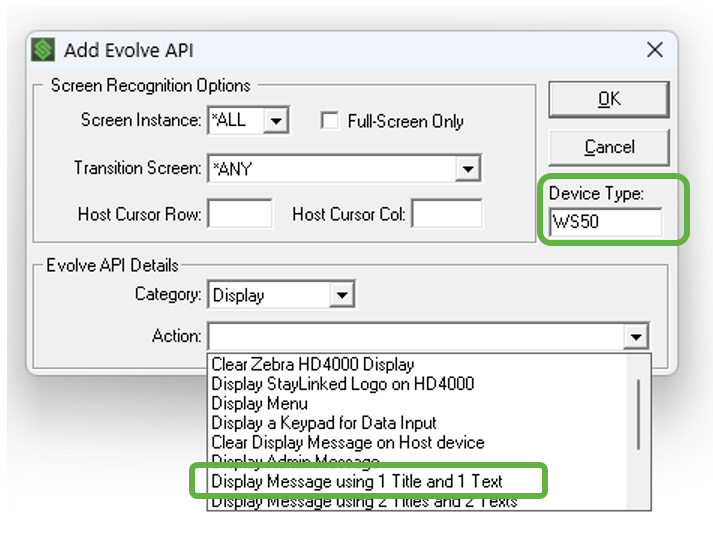
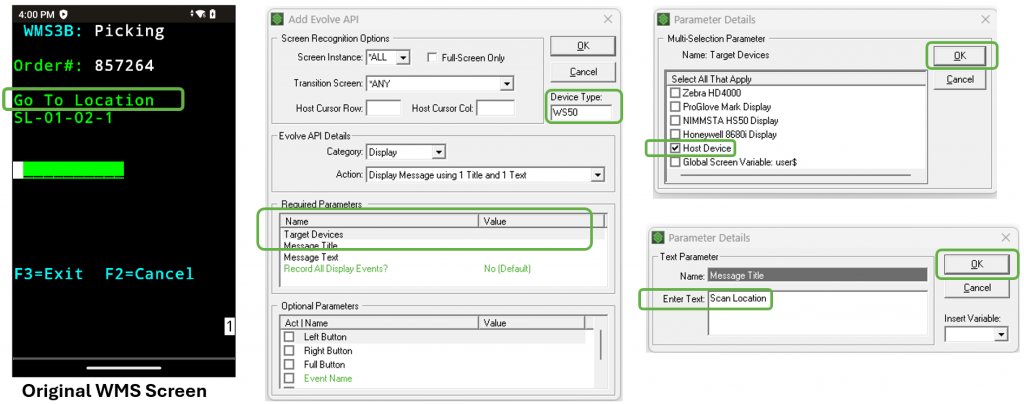
- Required and Optional Parameter menus will now appear in the menu. In “Required Parameters”, double click on “Target Devices”.
- Check the box for “Host Device” in the pop-up menu and press “OK”.
- Still in “Required Parameters”, double click on “Message Title”.
- A Parameter Details screen will appear.
- Enter a title for this message to the worker. For this example, we have entered “Scan Location”.
- Press “OK”.
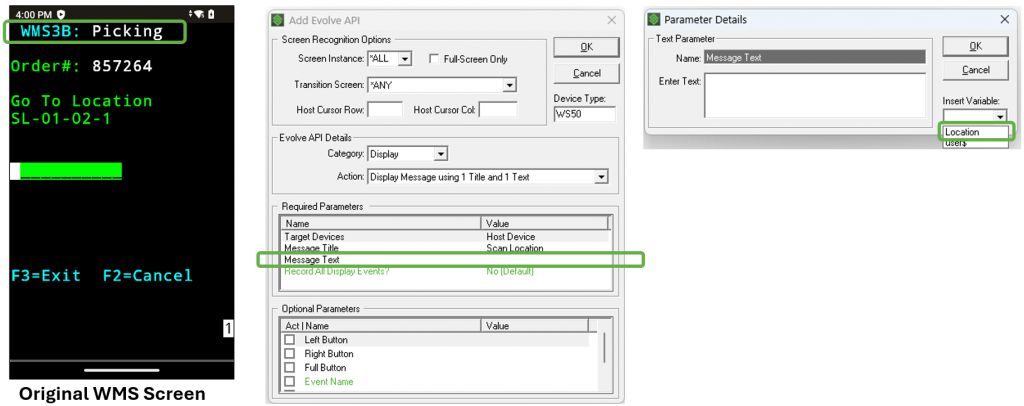
- Still in “Required Parameters”, double click “Message Text”.
- From the “Insert Variable” pull-down menu, select the variable you captured. We have chosen “Location”.
- Press “OK”.
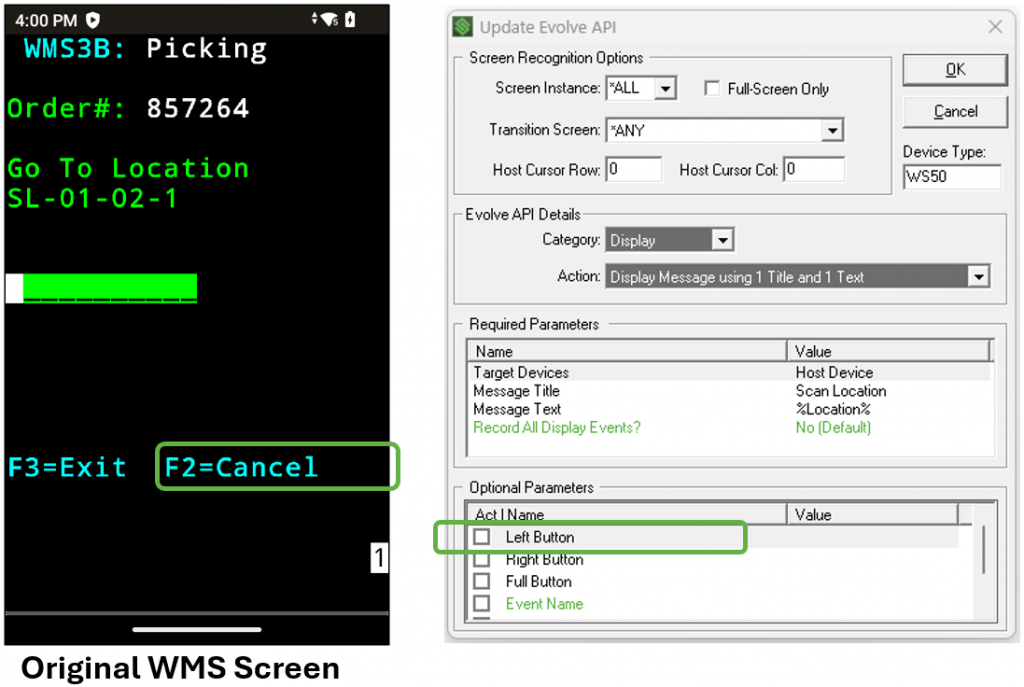
Our original WMS screen includes a way for the user to cancel the pick (F2=Cancel). We want to provide the worker the same ability.
- In “Optional Parameters”, double click “Left Button” from the menu.
- Double click on “Button Caption” from the pop-up menu.
- Fill in text for a caption. We have entered “CANCEL”.
- Press “OK”.

- Double click on “Button Script (SmartTE)”.
- Fill in text for the script. In our WMS, “F2=CANCEL”. Therefore, we entered the mnemonic of [pf2] to generate an “F2” when the button is pressed.
- Press “OK”.

- Double click on “Button Text Color”.
- Fill in the “Enter Text” field with the Hex value of your chosen color. We have chosen White with a Hex value of “ffffff”.
- Press “OK”.

- Double click on “Button Background Color”.
- Fill in the “Enter Text” field with the Hex value of your chosen color. We have chosen bright red with a Hex value of “ff4500”.
- Press “OK”.

- The final configuration for our Left Button is shown below.
- Press “OK”.
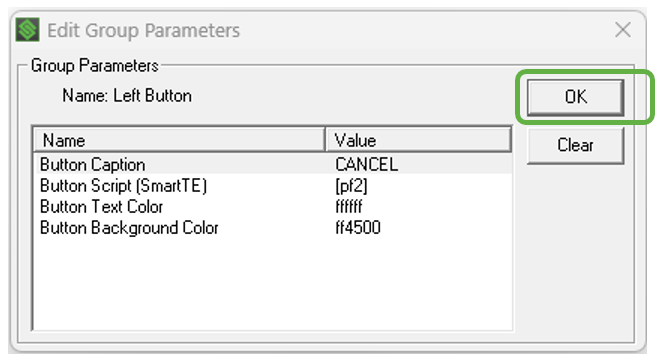
- Check the box for “Left Button” to enable the parameter.
- Double click on “Right Button” and define it using the same procedure as the Left Button. Our Right Button configuration is shown below.
- Press “OK”.
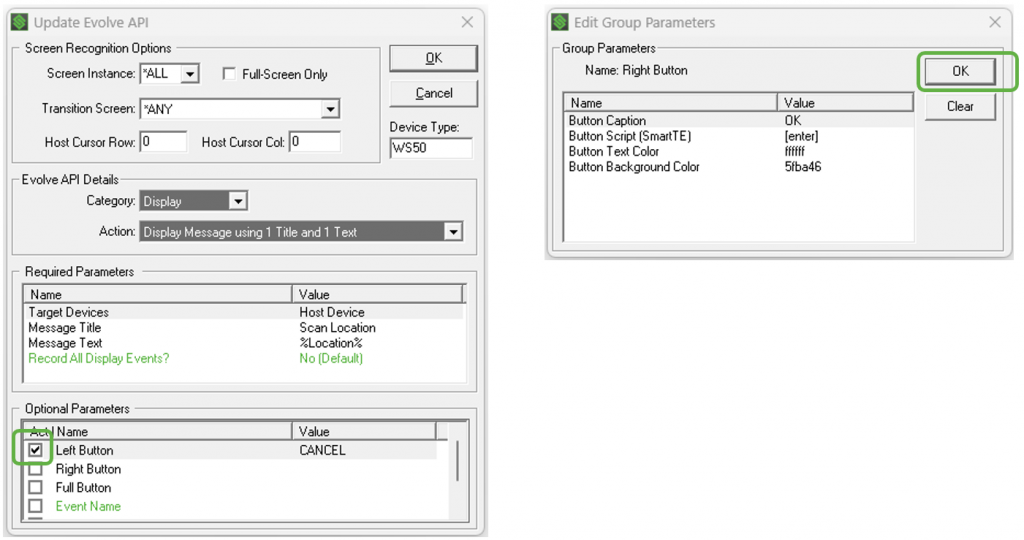
- Check the box for “Right Button” to enable the parameter.
- Press “OK”.
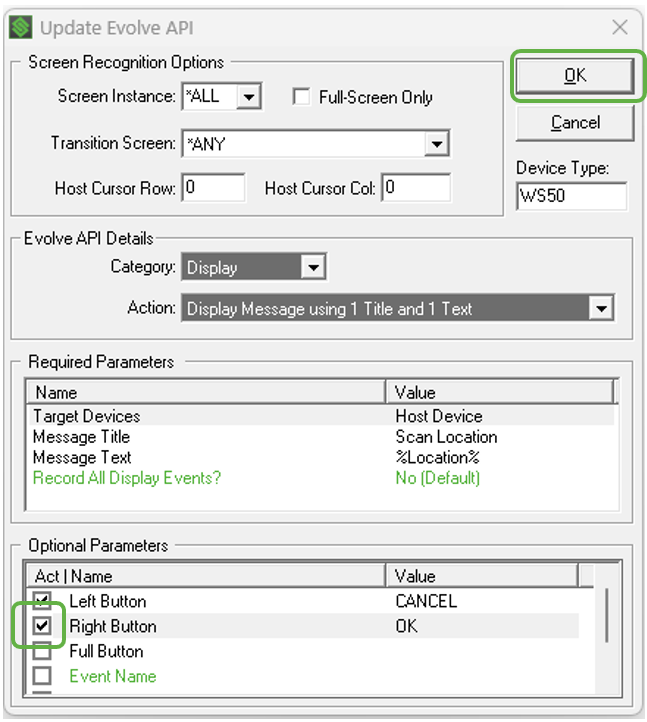
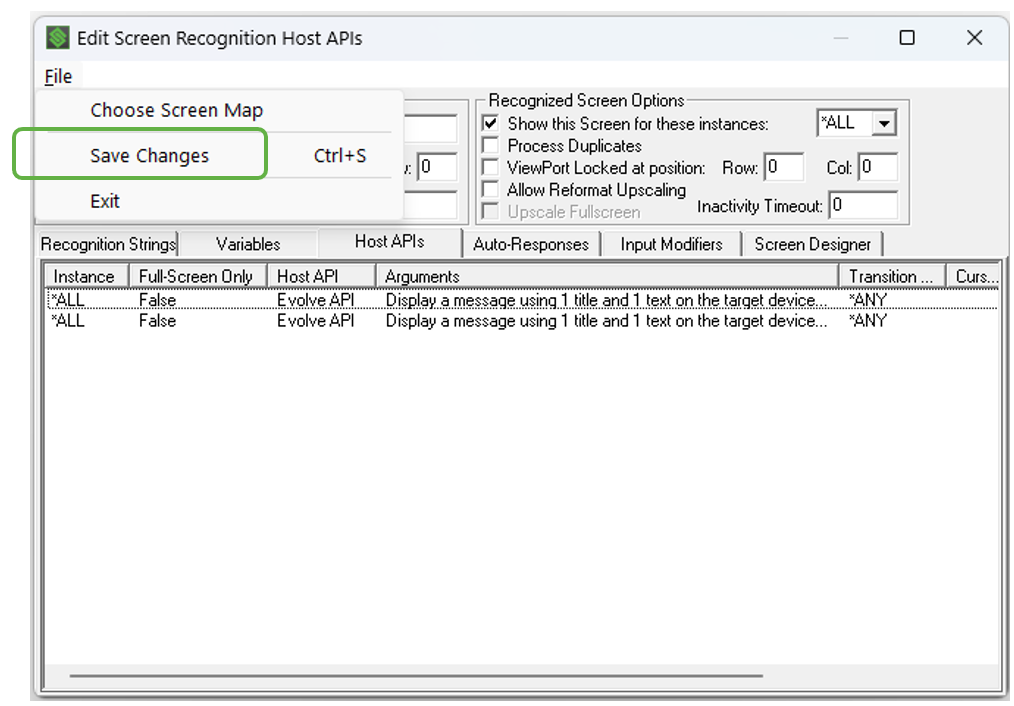
- Our Evolve API instruction now appears in the Host APIs tab.
- For this example, we have duplicated the same API instruction for the TC8300.
- Now select “File” and “Save Changes”.
- In “All Connections”, terminate the session for the target device and start a new session.
- Navigate to the screen that should trigger the Message Template.
- The results are shown below for the target devices in our example.
- Other Message Template styles and options are covered in Appendix C in this tutorial.
SmartTip! The Message Templates will scale automatically; making them very flexible and easy to deploy across different device form factors, regardless of the display size or resolution.
Step 3: Applying a Menu Template
The SmartMenu in SmartTE is a great way of presenting a scrollable menu of dynamic buttons. However, when Display Templates are used to present the workflow, we will see some screen flicker when the software switches from Evolve to SmartTE to display the SmartMenu. The solution to this is the Evolve Display Menu API. SmartTE will wrap up the SmartMenu contents for Evolve to display among the other Display Templates for a more fluid user experience.
In order to use this feature, you must have a Dynamic Tap Spot collection defined and enabled for the target workflows in the WMS. More information on tap spots can be found here.
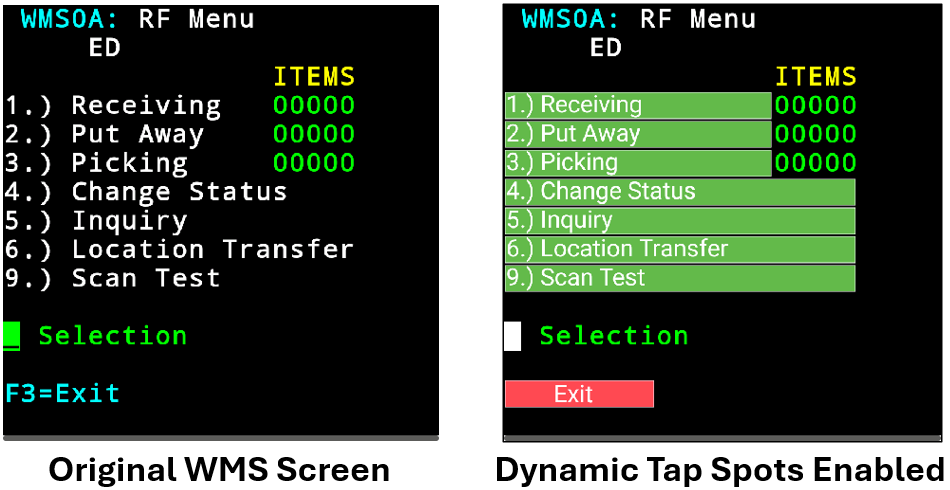
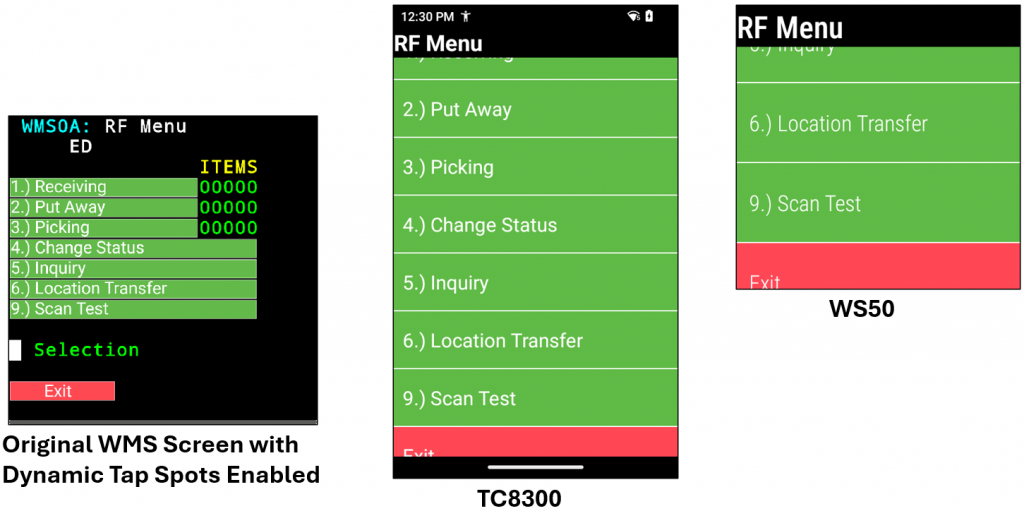
In this example with our WMS demo, we want to turn the “RF Menu” screen into a scrollable menu.
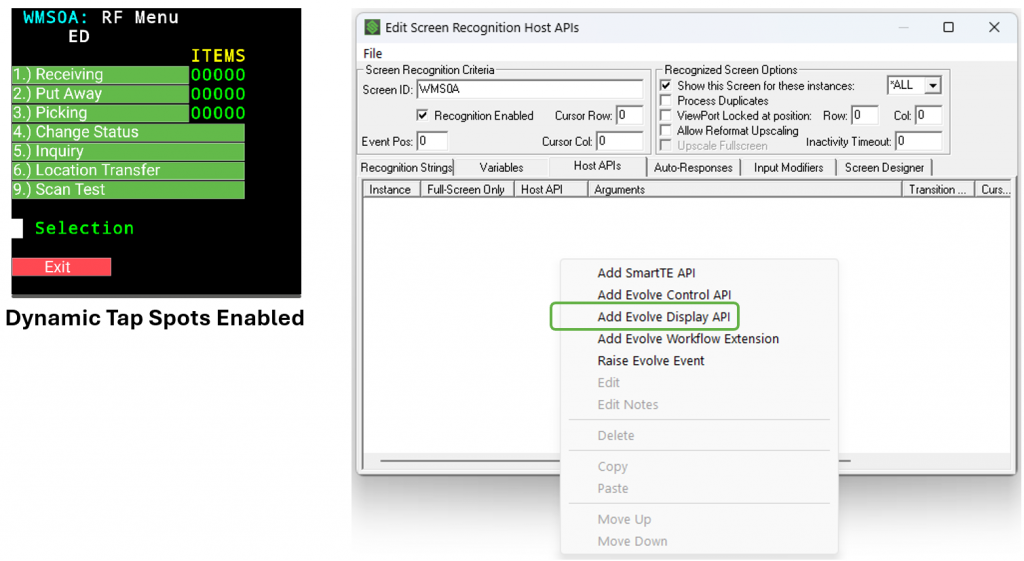
- Navigate to the target screen in screen recognition and right click in the white area.
- Select “Add Evolve Display API” from the pop-up menu.
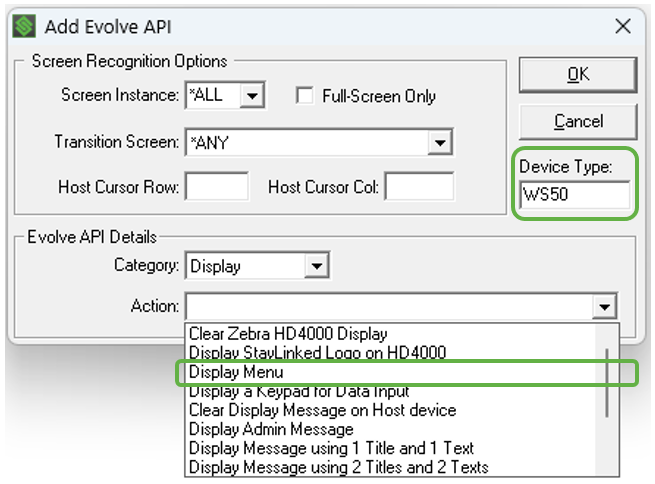
- Configure the device type. In this case, we have set it to “WS50”.
- In the “Action” pull-down menu, select “Display Menu”.
- “Optional Parameters” will appear at the bottom of the menu. Double click on “Title Text”.
- In the pop-up “Parameter Details” menu, enter a title for the Menu. We have entered “RF Menu”.
- Press “OK”.
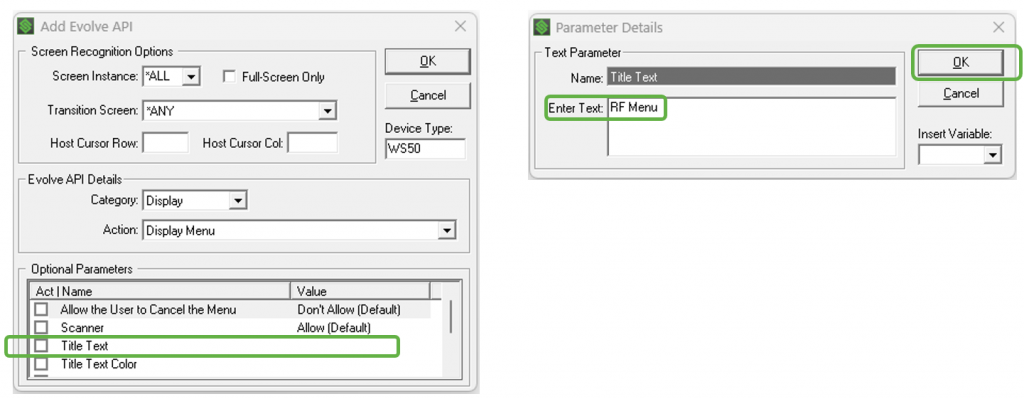
- Check the box for Title Text to enable the Parameter.
- Double click “Title Text Color”.
- In the “Parameter Details” pop-up menu, enter a Hex value for the text color. We have entered the value for white (ffffff).
- Press “OK”.
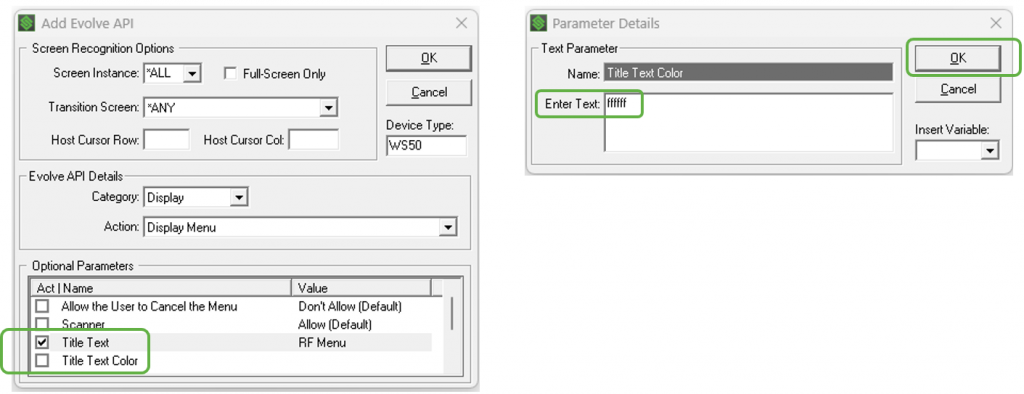
- Check the box for “Title Text Color” to enable the parameter.
- Double click “Title Background Color”.
- In the “Parameter Details” pop-up menu, enter the Hex value for the Title background color. We have entered the value for Black (000000).
- Press “OK”.
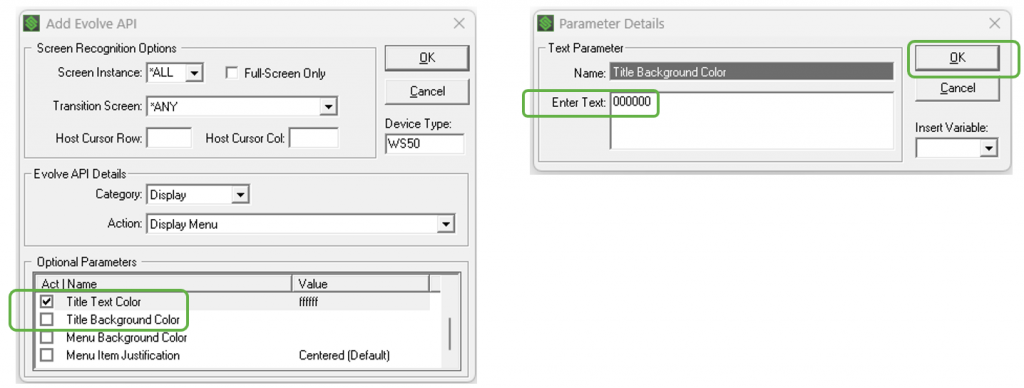
- Check the box for “Title Background Color” to enable the parameter.
- Double click “Menu Background Color”.
- In the “Parameter Details” pop-up menu, enter the Hex value for the Menu background color. We have entered the value for StayLinked Green (5fba46).
- Press “OK”.
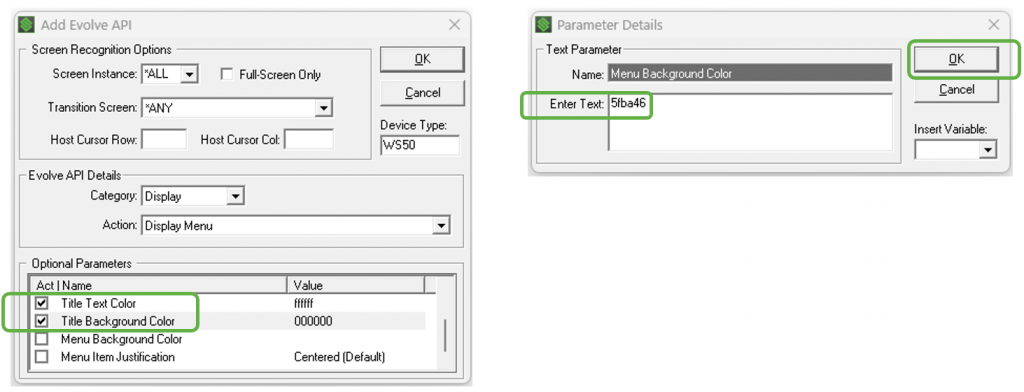
- Check the box for “Menu Background Color” to enable the parameter.
- Double click “Menu Item Justification”.
- In the “Parameter Details” pop-up menu, check a box for justification. We have chosen Left justification.
- Press “OK”.
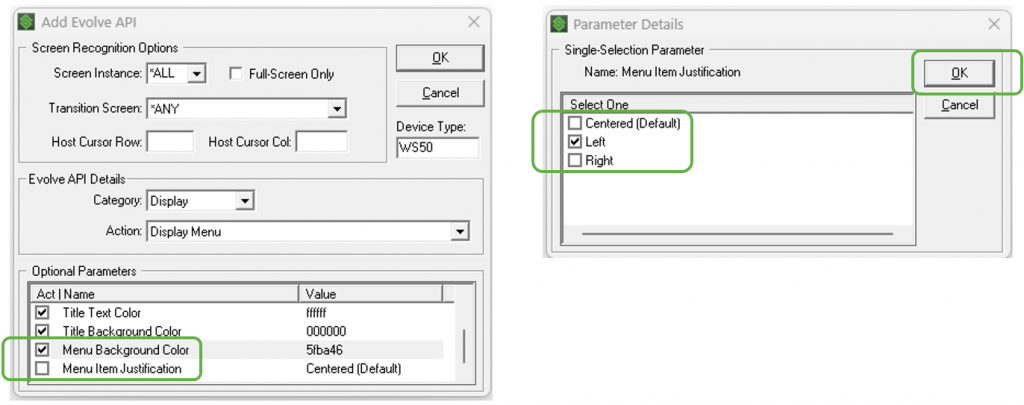
- Check the box for “Menu Item Justification” to enable the parameter.
- Press “OK”.
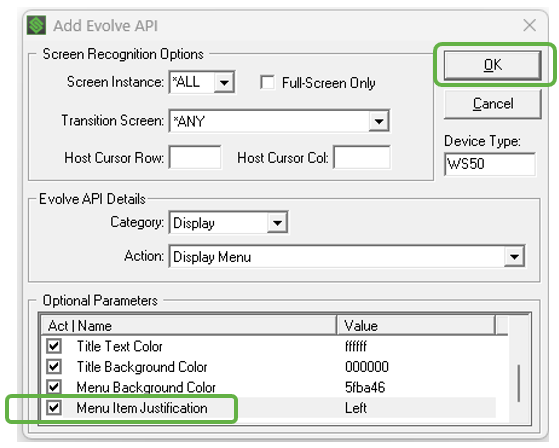
- Our Evolve API instruction now appears in the Host APIs tab.
- For this example, we have duplicated the same API instruction for the TC8300.
- Now select “File” and “Save Changes”.
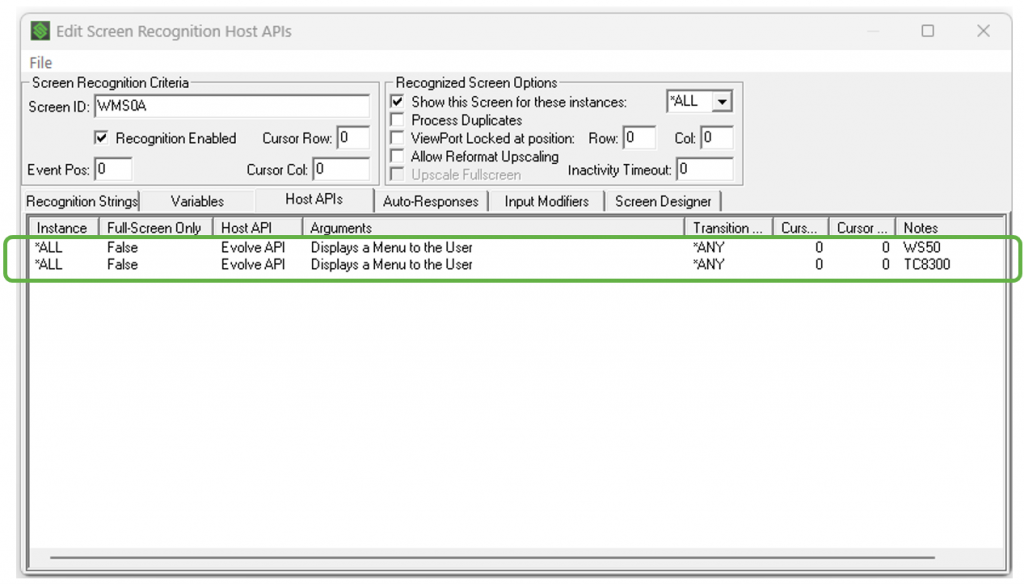
- In “All Connections”, terminate the session for the target device and start a new session.
- Navigate to the screen that should trigger the scrollable menu.
- The results are shown below for the target devices in our example.
- Other Menu Template options are covered in Appendix E in this tutorial.
SmartTip! The Menu Templates will scale automatically; making them very flexible and easy to deploy across different device form factors, regardless of the display size or resolution.
Appendix A: Keypad Template Styles
The following Keypad styles are available to suit the type of data entry required in the workflow:
Phone Numpad (Default)
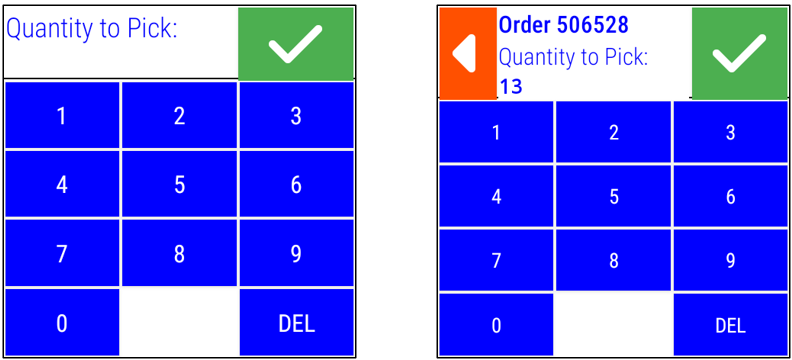
- Data entered on this screen followed by the Green Check button will be passed to the SmartTE session.
10-Key Numpad
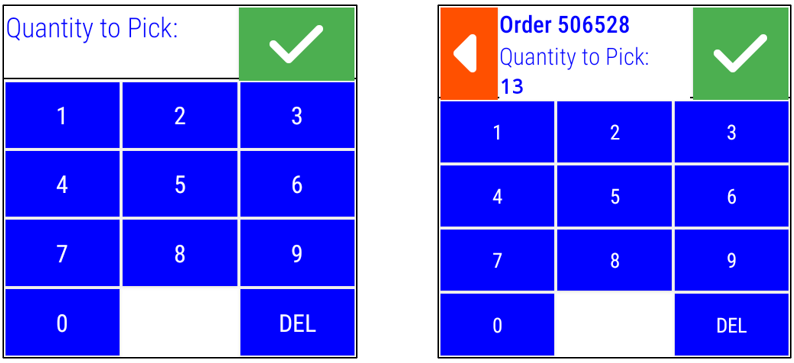
- Shows the numbers from 9 at the top down to 0 at the bottom.
Incrementor By 10

- Once a value is entered by the user, or if the field is pre-filled with Initial Content (See Appendix B: Keypad Template Optional Parameters) the worker can increment or decrement the count by 1 or 10.
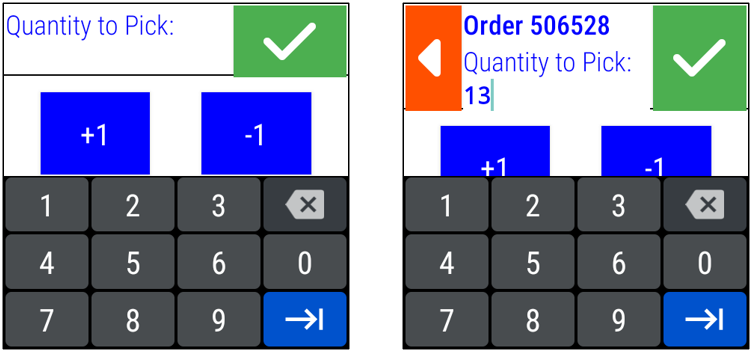
- A numeric keypad will appear when the worker presses in the white space of the entry field.
- Once the worker enters a value, pressing the blue “Arrow” button removes the numeric keypad, displays the entered value in the entry field, and leaves the cursor in that position.
- The worker can also press the “Green Check” while the numeric keypad is displayed, which will pass the entered value to SmartTE.
- When a value is in the entry field, the worker can increment or decrement the value by 1 or 10 and press the “Green Check” to confirm the amount, sending that value to SmartTE.
Incrementor By 100
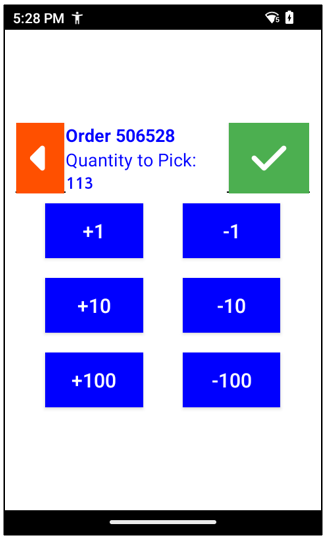
- Functions the same as the Incrementor by 10 with the addition of a third row of keys (-100, +100).
Full Keypad
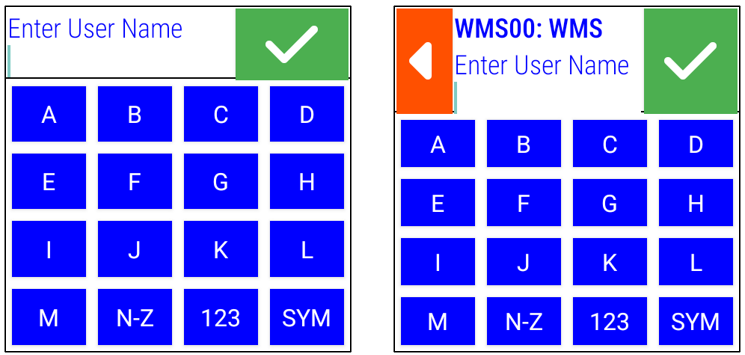
- Allows alpha, numeric, and symbols to be entered by the worker.
- When the worker presses the Green Check, the entered character are passed to SmartTE.
- Designed specifically for very small screen devices to deliver the best balance between speed, accuracy and screen real estate.
Appendix B: Keypad Template Optional Parameters
Optional Parameters
All keypad styles support the same list of Optional Parameters. Each parameter is enabled by checking the box before it.
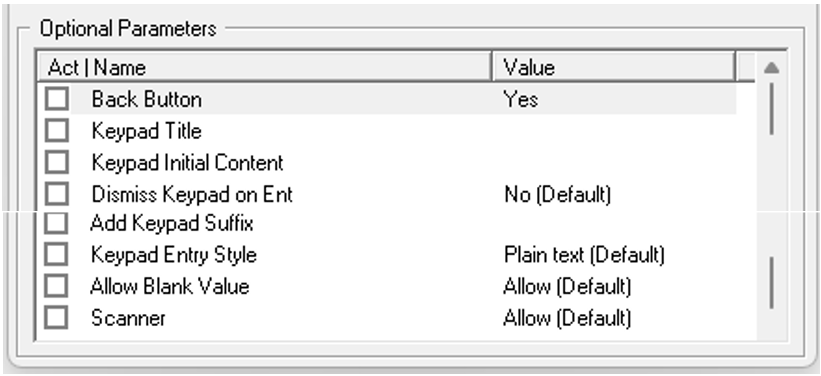
Back Button:

- Choose “Yes” or “No” to add the back button.
- Appears on the top left as a red back-arrow.
- A script can be specified to run when the button is pressed. This script will be run by SmartTE and will be the input used to navigate through the application (I.E. “[pf3]”).
- The Script can also include a variable
Keypad Title:
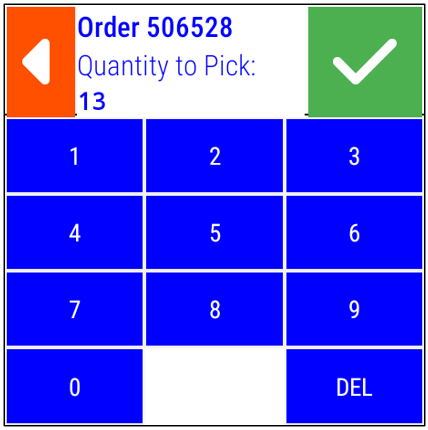
- In our example, the Title is “Order 506528”.
- Choose “Yes” or “No” to add a Title.
- Appears in bold at the top of the keypad.
SmartTip! Including a Keypad Title will reduce the key sizes to make room.
Keypad Initial Content:
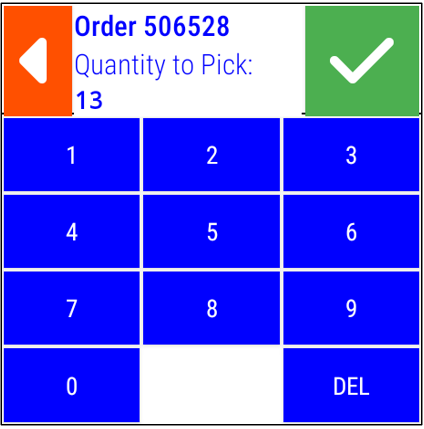
- Choose “Yes” or “No” to include initial content.
- The content can be a static value or a variable (I.E. pick quantity).
- Appears in bold at the top of the keypad in the entry field.
- This data will be pre-displayed in the data entry field when the screen is loaded. This is useful for a worker to confirm a quantity quickly by pressing the green check mark. In our example, if the worker cannot find 13 items, they can delete the field and input the quantity they were able to pick.
Dismiss Keypad on Enter
- This feature allows a worker to press a physical key (mapped to Enter) to Confirm (as if pressing the Green Check Mark).
- Choose “Yes” or “No” to dismiss the keypad if the worker presses a physical Enter key.
- This parameter is set to “No” by default.
Add Keypad Suffix
- When the Green Check is pressed, Evolve will send back the value entered to SmartTE. If this parameter is specified, it will also append this value as a suffix.
- This value can also be a variable.
Keypad Entry Style
- Data Entry is set to “Plain Text” by default; which means what is entered is echoed in the entry field. Set this to “Password” to only see asterisks.
Allow Blank Value
- By default, when the Green Check Mark is pressed, a worker can exit the screen with a blank value in the entry field. Change this parameter to “Don’t Allow” to force the worker to enter a value.
Scanner
- By default, a worker can scan data into the keypad entry field. Change this to “Don’t Allow” to force the user to key in the value.
Appendix C: Message Template Styles
Display Message Using 1 Title 1 Text

- Title can be static value or variable (static value used in example above).
- Text can be static value or variable (variable used in example above).
- 2 Buttons are optional (See Optional Parameters).
- If no buttons are configured, a “DISMISS” button will appear by default, allowing the worker to dismiss the screen. •Record all Display Events? – Requires Evolve Server License – BETA – Please contact your local StayLinked Systems Engineer for more information.

- There are no limits on the number of characters for the Message Text. The fonts will automatically scale down and center justify as text is added (shown above). Mobile devices will differ on the number of characters supported based on their form factor and display resolution. You will need to test the different target devices for this feature to ensure all of the characters in Message will fit and are readable; and adjust as necessary.
Display Message Using 2 Titles 2 Texts

- Title can be static value or variable (static values used in example above).
- Text can be static value or variable (variables used in example above).
- Up to 2 Buttons are optional (See Optional Parameters).
- If no buttons are configured, a “DISMISS” button will appear by default, allowing the worker to dismiss the screen.
- Record all Display Events? – Requires Evolve Server License – BETA – Please contact your local StayLinked Systems Engineer for more information.
Display Message Using 3 Titles 3 Texts

- Title can be static value or variable (static values used in example above).
- Text can be static value or variable (variables used in example above).
- Up to 2 Buttons are optional (See Optional Parameters).
- If no buttons are configured, a “DISMISS” button will appear by default, allowing the worker to dismiss the screen.
- Record all Display Events? – Requires Evolve Server License – BETA – Please contact your local StayLinked Systems Engineer for more information.
Display Message Using Selected Icon and Text

- Choice of Message Icons for “Yes”, “No”, and “Information”.
- Text can be static value or variable.
- Up to 2 Buttons are optional (See Optional Parameters).
- If no buttons are configured, a “DISMISS” button will appear by default, allowing the worker to dismiss the screen.
- Record all Display Events? – Requires Evolve Server License – BETA – Please contact your local StayLinked Systems Engineer for more information.
Display Message Using Text Only
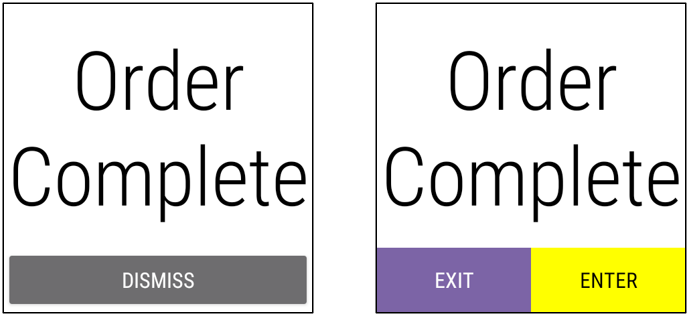
- 2 Buttons are optional (See Optional Parameters).
- If no buttons are configured, a “DISMISS” button will appear by default, allowing the worker to dismiss the screen.
- Record all Display Events? – Requires Evolve Server License – BETA – Please contact your local StayLinked Systems Engineer for more information.

- There are no limits on the number of characters for the Message Text. The fonts will automatically scale down and center justify as text is added (shown above). Mobile devices will differ on the number of characters supported based on their form factor and display resolution. You will need to test the different target devices for this feature to ensure all of the characters in Message will fit and are readable; and adjust as necessary.
Appendix D: Message Template Optional Parameters
Optional Parameters
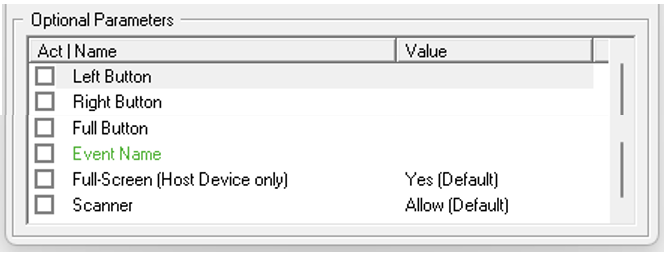
Left Button / Right Button

- Button Caption (static or variable).
- Button Script (SmartTE) (mnemonic or variable).
- Button Text Color is a HEX value (static or variable).
- Button Background Color is a HEX value (static or variable).
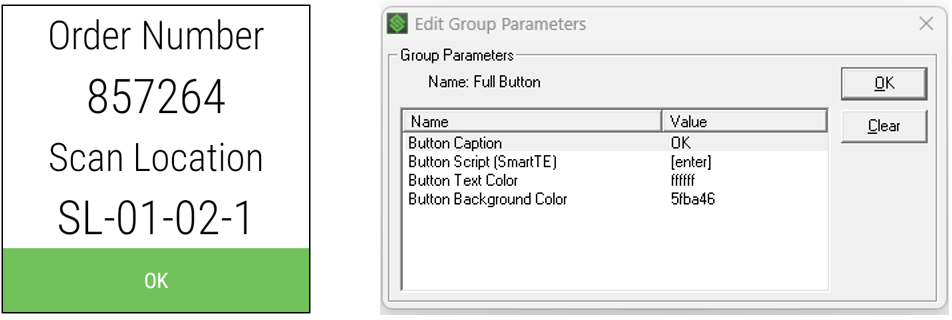
- If only Left Button or Right Button is enabled, the button will default to a Full Button along the bottom of the display.
Full Button
Event Name
- Requires Evolve Server License – BETA – Please contact your local StayLinked Systems Engineer for more information.
Full Screen
- By default, the display windows take up the full screen width and height.
- When Full Screen is set to “No”, it will appear as a floating window and the TE screen is visible behind the display window.
Scanner
- Controls whether scanned data can be accepted for the screen.
- Defaults to "Allow".
- Once a value is scanned, the worker may need to hit OK unless the scanner is configured to append an [enter] or [hex0D] to the scanned data.
- If set to "Don't Allow", the only way to progress from this screen is to use one of the configurable buttons.
Appendix E: Display Menu Template
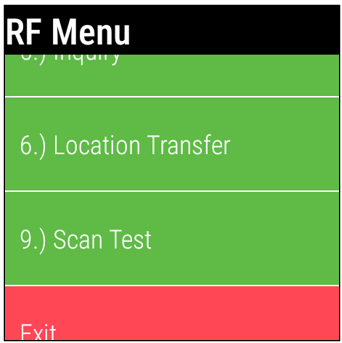
- The SmartMenu in SmartTE is a great way of presenting a scrollable menu of dynamic buttons. However, when Display Templates are used to present the workflow, we will see some screen flicker when the software switches from Evolve to SmartTE to display the SmartMenu. The solution to this is the Evolve Display Menu API. SmartTE will wrap up the SmartMenu contents for Evolve to display among the other Display Templates for a more fluid user experience.
- In order to use this feature, you must have a Dynamic Tap Spot collection defined and enabled for the target workflows in the WMS. More information on tap spots can be found here.
Optional Parameters
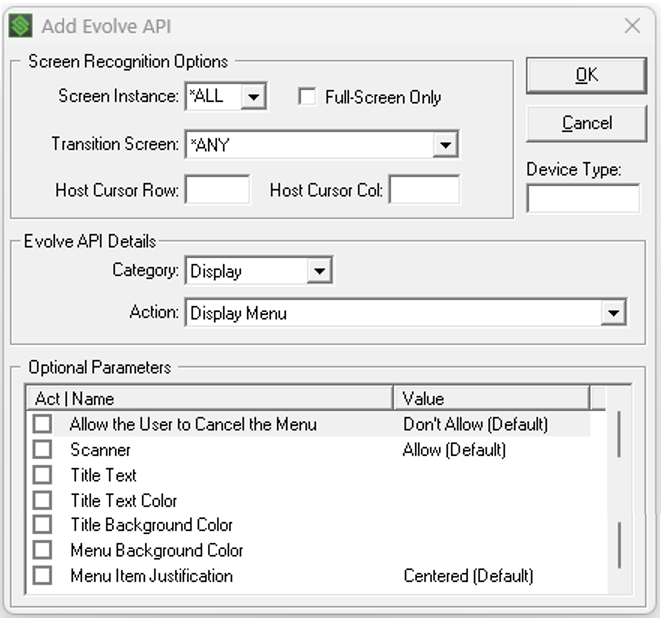
Allow the User to Cancel the Menu
- Useful when we want to force the user to make a menu choice.
- Defaults to “Allow”.
- Setting this to “Allow” will permit the worker to exit the Menu Display by hitting the Android back button on the device. This can be useful when testing / configuring a workflow using the Display Templates in providing an easy way return to the TE screen and access the TE menus (Host, Tools, etc.).
- Choose “Don’t Allow” or “Allow”.
- Check box to enable the parameter.
Scanner
- Controls whether scanned data can be accepted for the screen.
- Defaults to "Allow".
- Once a value is scanned, the worker may need to hit OK unless the scanner is configured to append an [enter] or [hex0D] to the scanned data.
- If set to "Don't Allow", the only way to progress from this screen is to make a choice from the menu. •Check box to enable the parameter.
Title Text
- Appears at the top of the scrollable menu •Can be static or variable. •Check box to enable the parameter.
Title Text Color
- Text Color is a HEX value (static or variable).
- Check box to enable the parameter.
Title Background Color
- Title Background Color is a HEX value (static or variable).
- Check box to enable the parameter.
Menu Background Color
- Menu Background Color is a HEX value (static or variable).
- Check box to enable the parameter.
Menu Item Justification
- Choose Left, Center, or Right justification for the menu item text.
- Defaults to Center.
- Check box to enable the parameter.
Appendix F: Display Barcode Template
Warehouses can increase worker productivity by leveraging multiple technologies in the same workflow. Wearable devices make perfect companions to forklift computers in adding a new level of freedom to the operator that they didn’t have before. By pairing these devices within the same workflow, workers can now perform all aspects of the WMS whether it be at the pallet level using the forklift computer or at the small item level, using a hands-free wearable like the Zebra WS50.
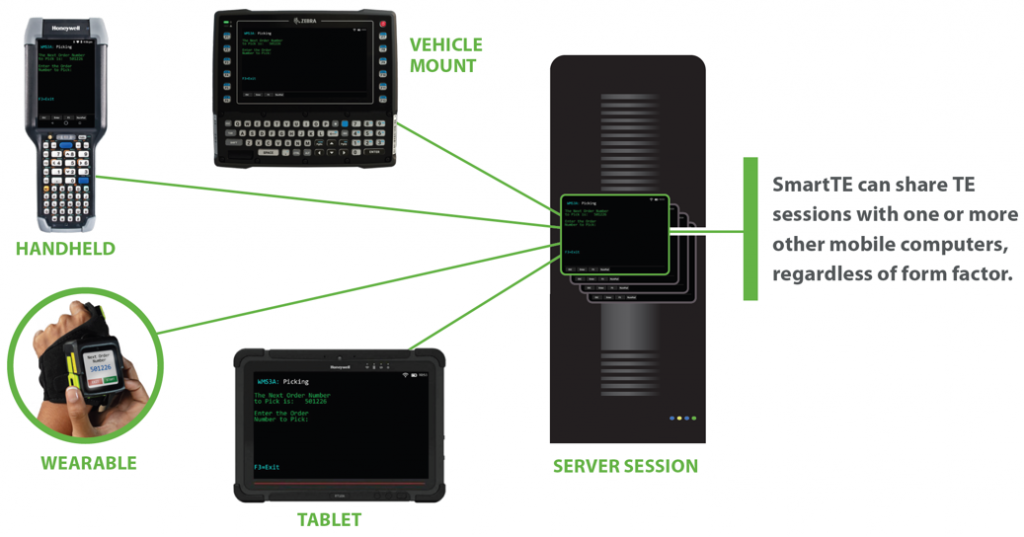
For operations utilizing dynamic data for pairing (DHCP acquired IP address, MAC address, Session ID) Evolve™ displays a device’s current IP address, MAC address, or Staylinked Session ID in the form of a barcode for another device to “Scan to Pair”.
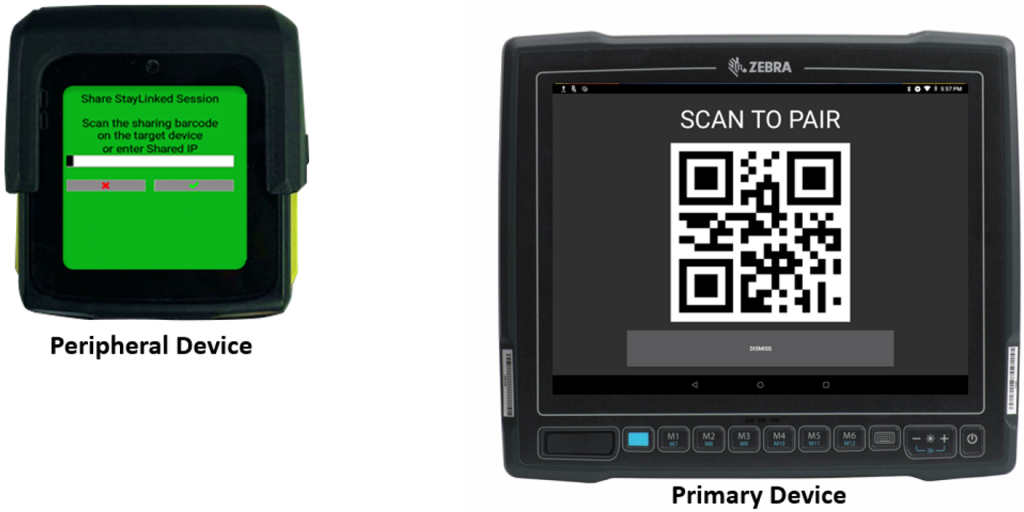
- For more information on displaying barcodes, please reference the tutorial for Session Pairing here.
Appendix G: Fine Tuning
Display UI Delay
When workflows are constructed using the Display APIs, there may be some flickering in the user experience as we will see the TE screens in the background briefly during the transition between Display API screens. This is often caused when there are slow repsonse times from the host app. This is illustrated below. Whenever the host sends a screen update to StayLinked, it's screen recognition will call an Evolve Display API. Evolve will present the Display Template. The worker will interact with it and will progress the workflow. As we're finished with the Display Template, we could dismiss it immediately but then we would see the TE screen in the background until the next Display API was called. This causes the flicker which is not a nice user experience.
By default, there is a 1 second delay built in to this sequence. When the workflow is progressed, Evolve will return the data to SmartTE but will wait for 1 second before it dismisses the display. This works well when the next Display Template call arrives in less than a second. However, if the response from the Host is slow and there will be more than 1 second until the next Display Template is presented, we will still see the flicker as we see the SmartTE screen for a period of time.
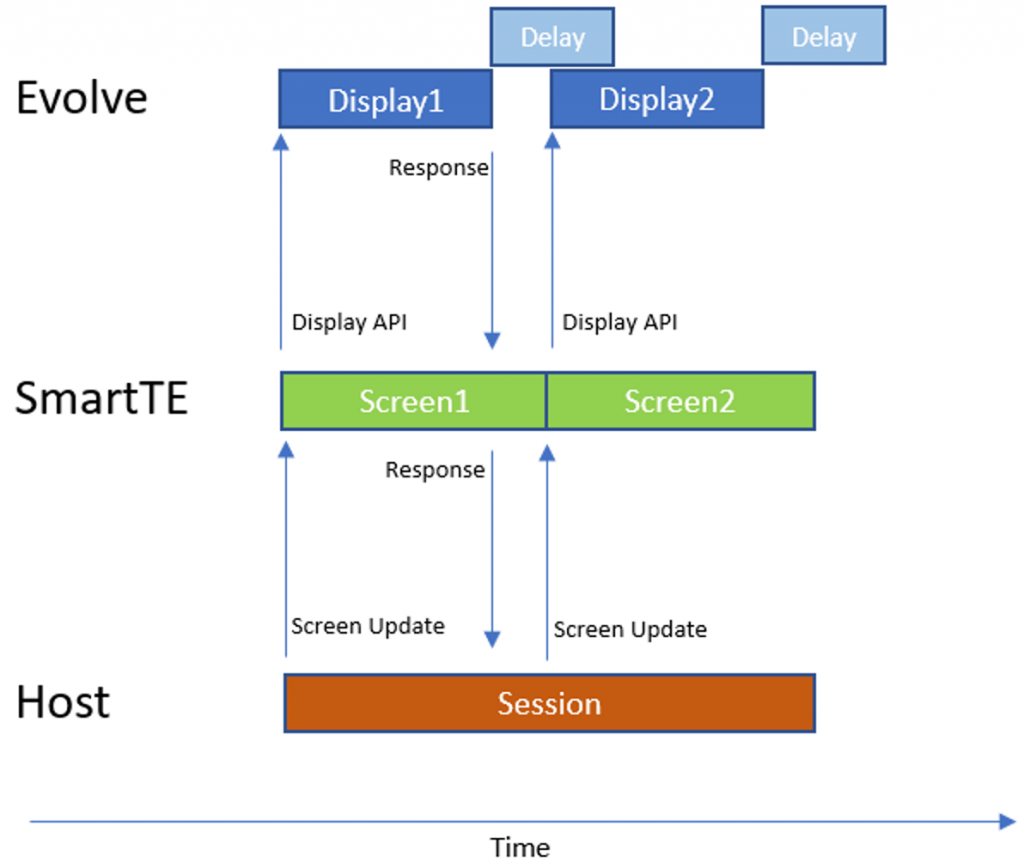
There is a configuration option in place to streamline the display transitions. The display_ui_delay settings in the defaults section of the evolve.ini allows us to specify a number of milliseconds before the display is dismissed. The worker is presented with an animated cursor during this time to show the user that something is happening. If the next Display API call is received by Evolve before the delay has expired, it will immediately dismiss the previous screen to ensure that the user experience is optimized.
Evolve.ini File Example:
[defaults]
display_ui_delay = 5000
Clear Display Message on Host Device
Display API screens will close once they are dismissed and the delay period has expired. However, there are times when we may want a Display API screen to be dismissed immediately:
- At the end a Telnet session.
- To revert back to a SmartTE screen.
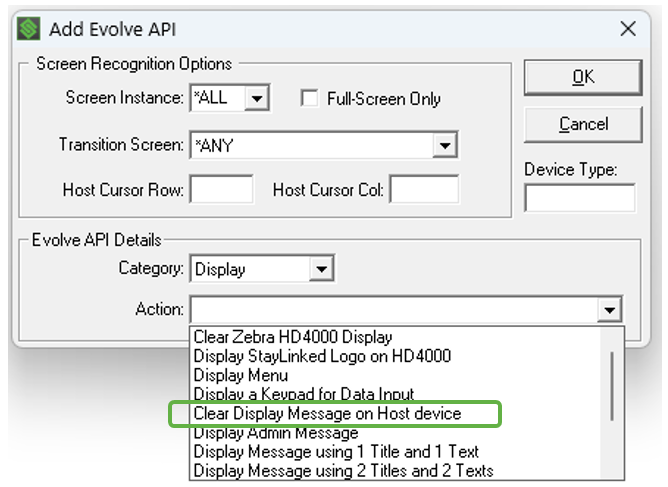
In this case, we can leverage a Session API or Host API to call the ”Clear Display Message on Host Device” API. This call takes no parameters.
Queuing Display Requests
As mentioned above, normal behaviour of the Display APIs will result in an existing display screen being dismissed as soon as a new Display API call is received. However, this behaviour can be overriden by setting the queue_display_requests configuration setting in evolve.ini to 1. This setting will not dismiss the existing display but will add the new display request to the end of the display queue and will only display it when the other display requests have been dismissed (by progressing the workflow).
Evolve.ini File Example:
[defaults]
queue_display_requests = 0
Display Administrative Message
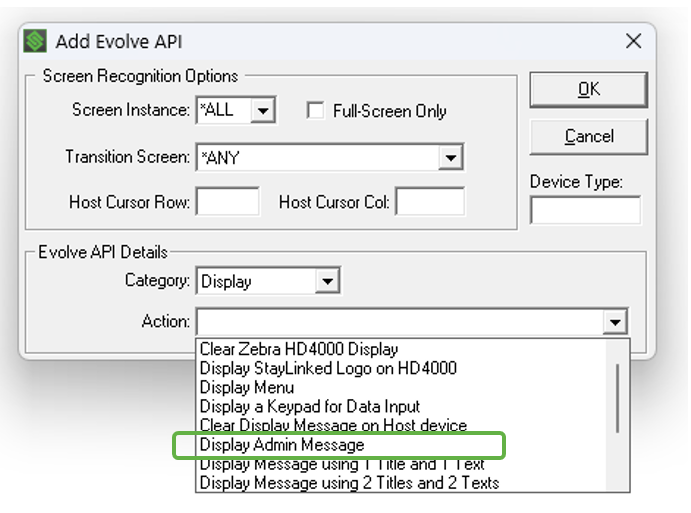
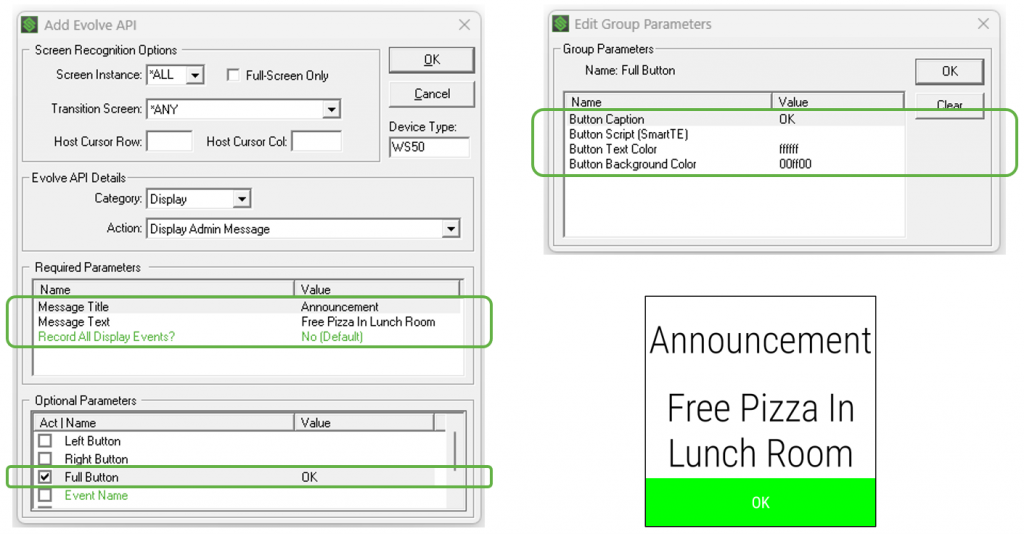
If there is a queue of Display APIs, you may need to jump the queue with an important administrative message. To do this, you should call the Display Admin Message API. This only applies to the host device so we do not need to ask for a target device. We can specify the Message Title and Message Text. This will immediately display on top of any existing display and will not affect any existing display queues. It will need to be dismissed by the worker and, when dismissed, we will revert back to the display that was being shown previously.
You can configure left/right/center buttons like the other display APIs. If the buttons do not have a script, clicking the buttons will not send anything to SmartTE but will just dismiss the display.
Share the post "Evolve Display Plugins"
