Overview
Most WMS applications do not have the ability to capture and store images within an existing workflow. Doing so would require significant resources, time, and high development costs. StayLinked Evolve allows warehouse workers to capture and store images within any workflow, without touching the back-end application. Image Capture is useful in many scenarios, including:
- Wrapped pallets before they leave the warehouse
- Returned items to record the state of the return
- Damaged items as soon as they are encountered in the warehouse
- Damaged items as they arrive on the receiving dock
- Messes in the warehouse requiring the cleanup crew
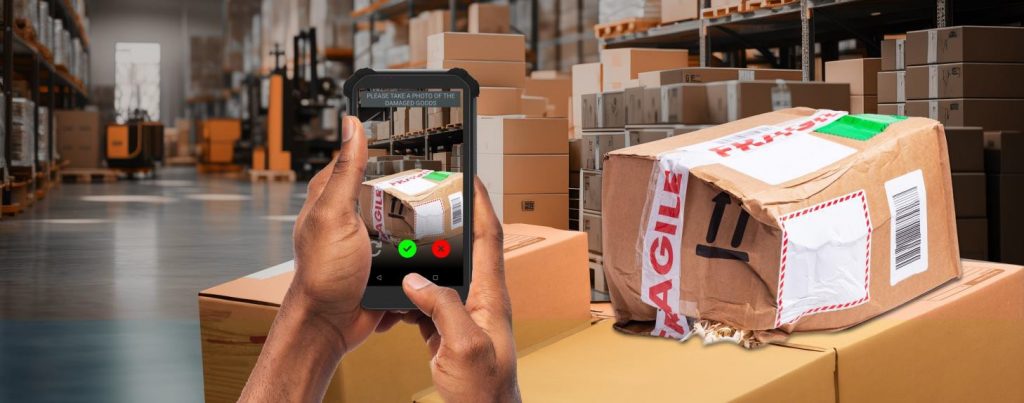
Today, many warehouses deploy clunky alternatives. Commonly, a single dedicated camera rests on a warehouse supervisor’s desk for workers to use when required. This is a cumbersome method, as workers run back and forth with the camera; with a manual effort required after the fact to match pictures with the damaged goods transaction within the WMS. With some simple configuration, images can be taken by the workers leveraging the mobile devices they are already carrying.
Some utilities exist but they are missing one or more of these capabilities:
- Capturing multiple images within a single workflow
- Making image capture mandatory before workers can continue their workflow
- Transporting the image files back to a server for storage and organization.
Advantages
- Leverage the worker’s mobile computer to capture images without requiring management of a separate camera.
- Eliminate manual effort to match images taken on the warehouse floor to transactions in the WMS.
- Increase worker productivity around the recording and tracking of damaged goods.
- Make the image capture mandatory before the worker can exit the workflow within the WMS.
- Unlock StayLinked Evolve’s full potential. StayLinked Evolve is an easy to use “no-code” technology integration platform, enabling rapid deployment of robotics, automation and other IIoT technologies without any changes required to your existing WMS.
Prerequisites:
- Participants must have a working FTP server in order to transfer the captured images. An example FTP server configuration is provided in Appendix C within this tutorial.
- Participants should have some experience with the screen recognition features of the StayLinked Administrator. Information on this can be found on the knowledge base here.
- Participants should have some experience capturing variables. Information on this can be found on the knowledge base here.
- The latest Evolve Agent release. Evolve device access licencing is required. Contact your local StayLinked representative for a demo license if required.
- The latest Server release.
- The latest Administrator release.
- The latest SmartTE Android client release.
SmartTip!: Image capture is supported only on Android devices.
Step 1: Create Evolve.ini File for Image Capture
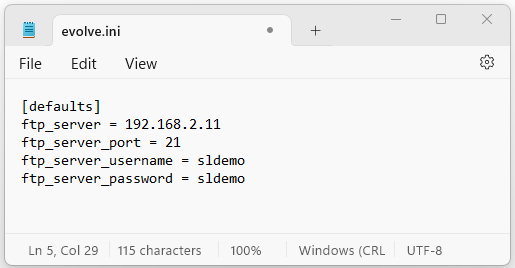
Using Notepad on your PC, create the text file shown below and save it as “evolve.ini”.
SmartTip! More options for the .ini file are covered in Appendix A of this tutorial.
SmartTip! More options for the .ini file are covered in Appendix A of this tutorial.
- Connect your mobile device to your PC using file explorer.
- Navigate to the “Downloads” directory on your mobile device.
- Delete the “evolve.ini”. from this directory.
- Copy/Paste the “evolve.ini” file you created into this directory.
Step 2: Trigger Image Capture Using Screen Recognition
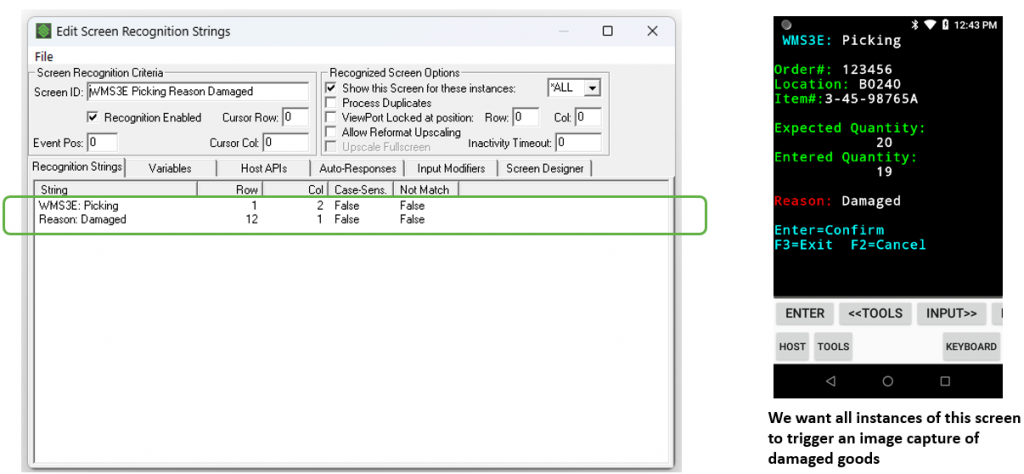
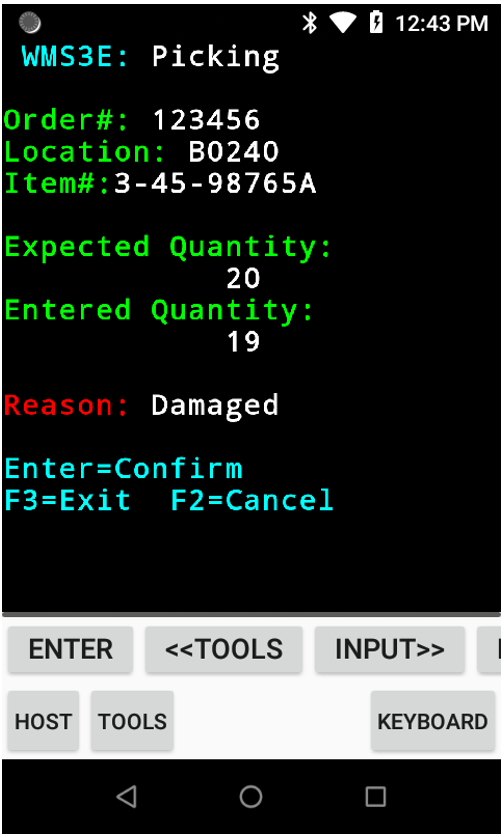
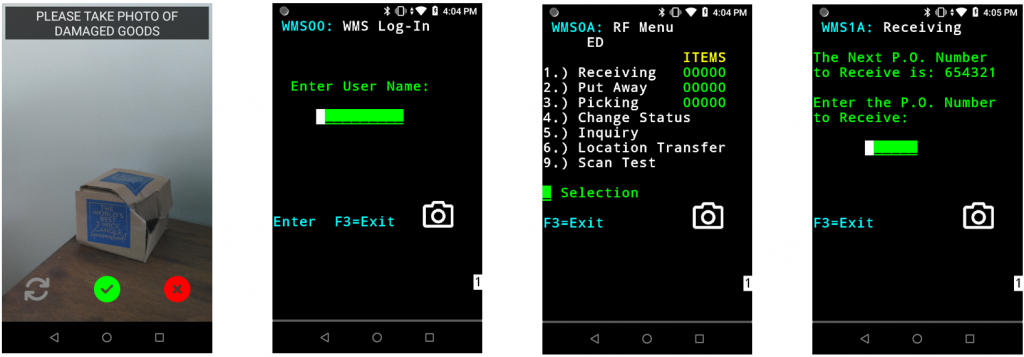
- Within the workflow of the StayLinked Demo WMS, when a worker defines the picking shortage reason as “Damaged”, this is echoed on a screen with the string “Reason: Damaged”. We want to trigger the Image Capture UI on ALL occurrences of this screen to force the worker to capture an image of damaged goods when they are identified. You will need to define which screen in your WMS you would like to trigger the Image Capture UI.
SmartTip! More information on these features can be found in the Knowledge Base here.
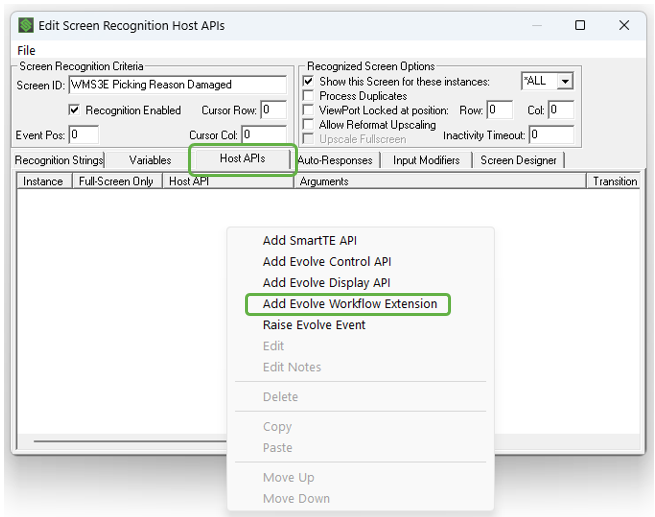
- Within the “Edit Screen Recognition Host APIs” window for the screen you have identified to trigger the Image Capture UI, click on the “Host APIs” tab.
- Right click in the white area and select “Add Evolve Workflow Extension” from the menu.
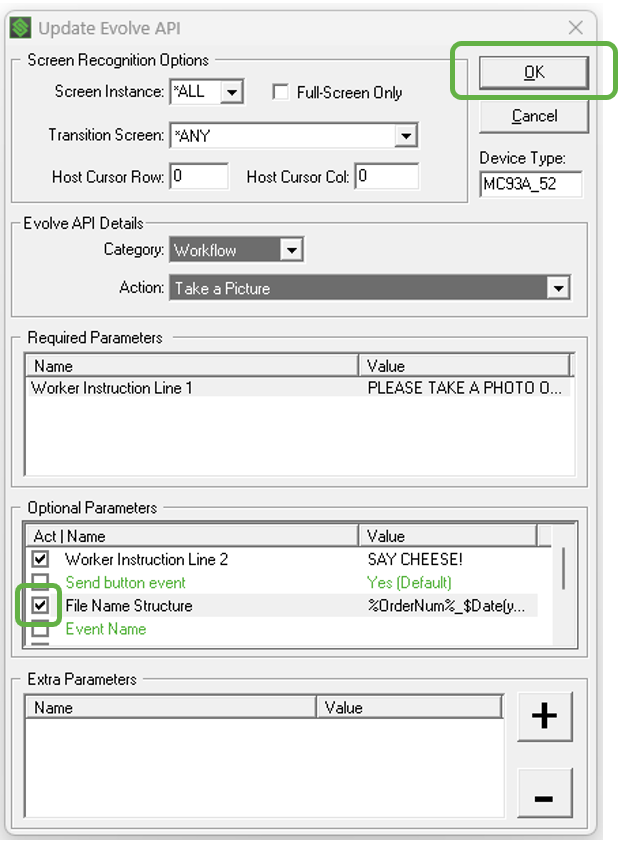
- Since we want to trigger the user to capture an image on all instances of the “Reason Damaged” screen, leave the Screen Instance set to “All”.
- If we wish to restrict taking pictures to specific mobile devices, we specify this in “Device Type”. To include all mobile device types, leave this blank. For this exercise we have used “MC93A_52”.
- From the “Action” menu, choose “Image Capture”.
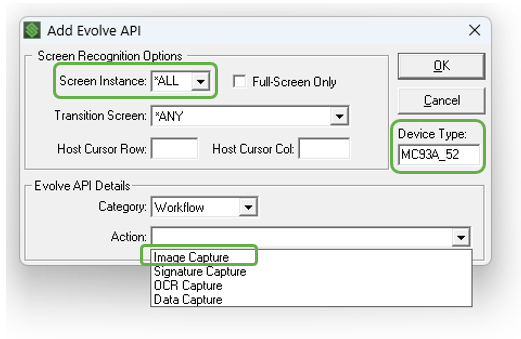
SmartTip! This API will be sent to all device types in the system by entering the wildcard “*ALL” into the “Device Type” field. If we want to target this API to two or more specific device types, we would then duplicate the API using the same API number, but with a different device defined in the “Device Type” field.
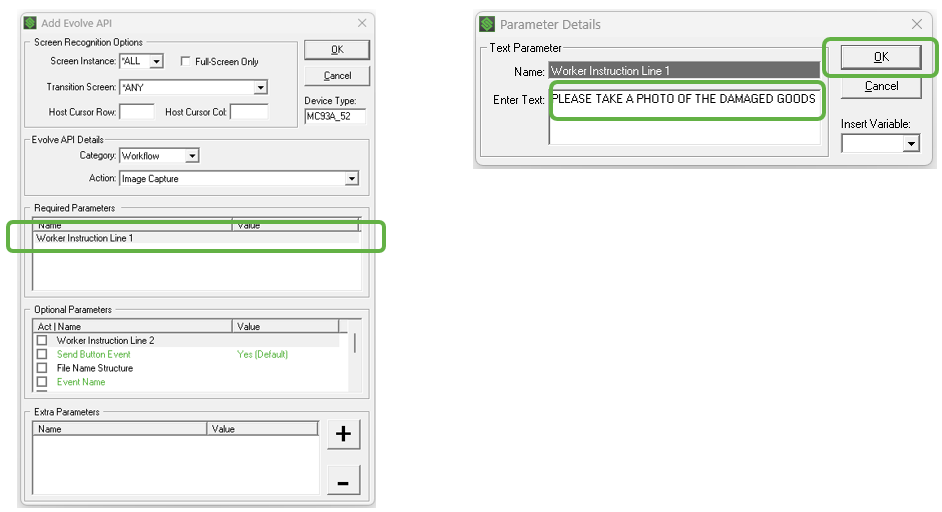
- In “Required Parameters” double click on “Worker Instruction Line 1”.
- Here we can enter an instruction for the user to capture one or more images of the damaged goods. For this example, we have entered “PLEASE TAKE A PHOTO OF THE DAMAGED GOODS”.
- Click on “OK”.
- For this exercise Optional Parameters are left at their default settings. Information on these can be found in Appendix B – Using Optional Parameters in the Image Capture API
SmartTip! There are no limits on the number of characters for the Worker Instructions in this API definition. Mobile devices will differ on the number of characters supported based on their form factor and display resolution. You will need to test the different target devices for this feature to ensure all of the characters in your worker instruction fit and are readable; and adjust as necessary.
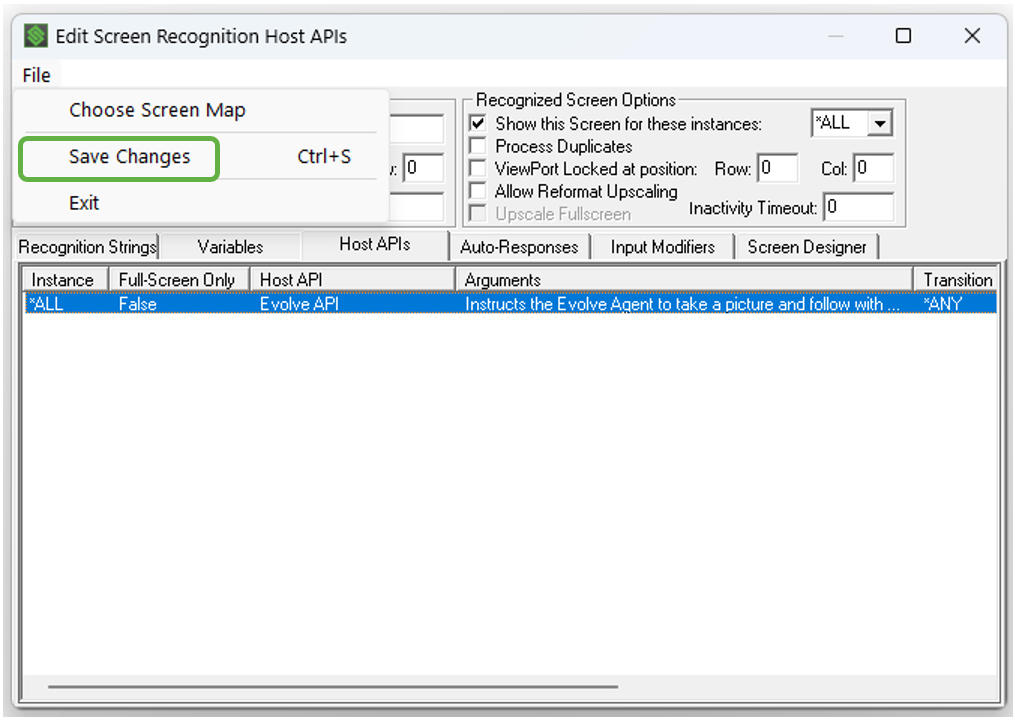
- Click “File” > “Save Changes”.
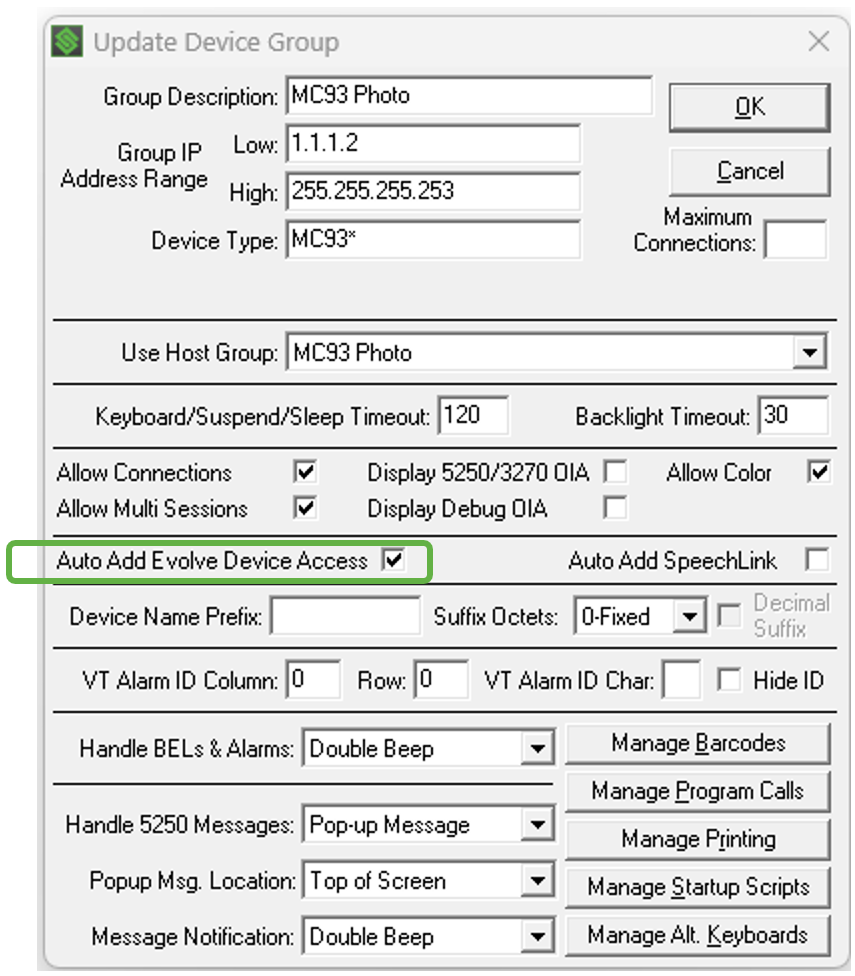
- In the Administrator under “Device Groups”, ensure the “Auto Add Evolve Device Access” is checked for each device group that will be capturing images.
Now we can test what we have configured for Image Capture within a live Telnet session.
- Cancel any live sessions on the mobile device you are using for image capture.
- Start a new session on the mobile device so it loads our new settings and navigate to the screen where the worker enters the quantity they picked.
- Navigate to the screen in your WMS application that is configured to trigger the Image Capture UI.
Step 3: Capture and Send Image(s) with the Image Capture UI
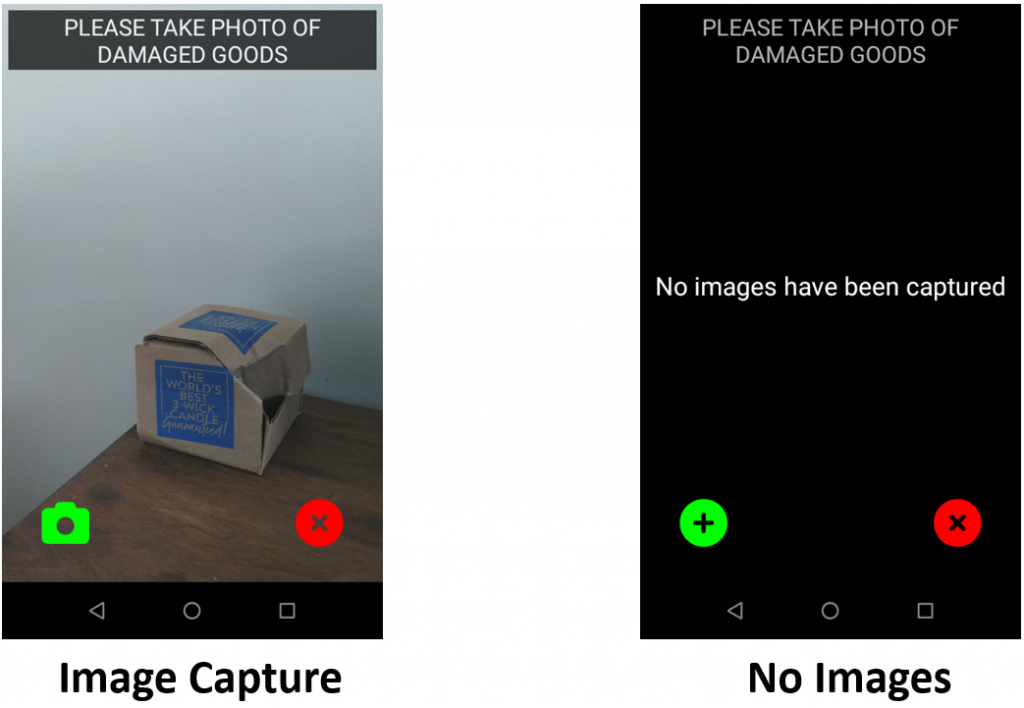
- The Image Capture user interface shown below should rapidly appear over top of the screen defined to trigger it.
- To take a photo, tap
- To cancel the Image Capture process and delete the cache on this screen, tap
- If no pictures have been saved in the cache, the "No Images" message appears; offering another opportunity for the worker to try again by tapping
- Once we take a photo we are brought to the Image Preview screen below.
- To retake the photo for better results tap
- When you are satisfied with the photo, tap
- To cancel the Image Preview and move to the Image Cache Screen, tap
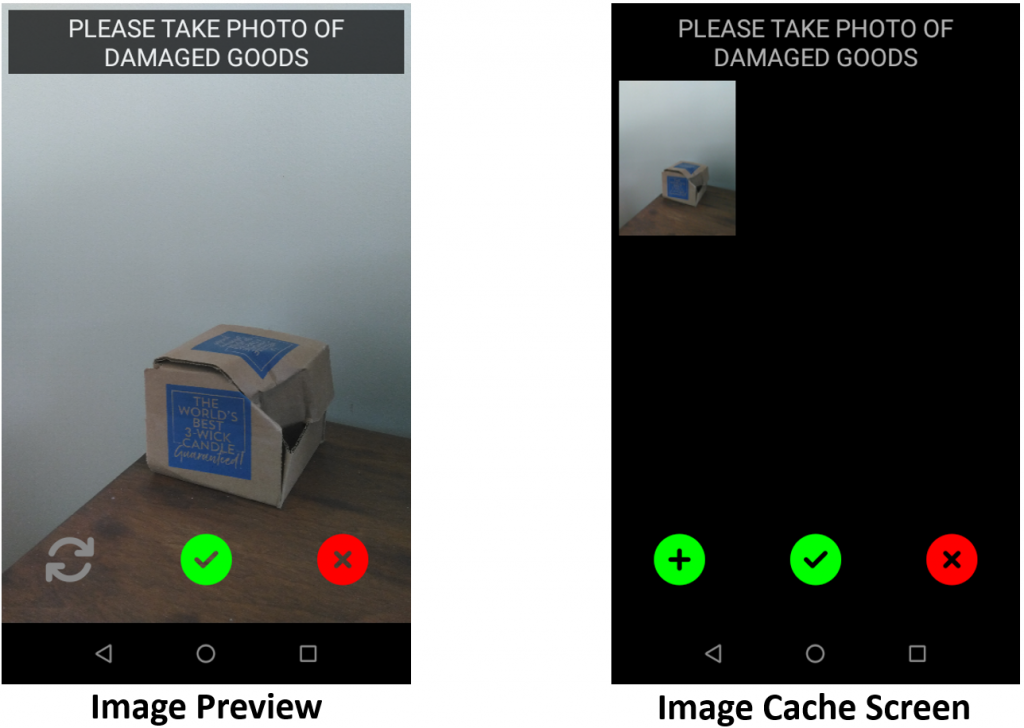
- The Image Capture user interface allows us to take multiple photos of damaged goods and collects them in an Image Cache Screen before sending them on to an FTP server.
- To add more photos to the Image Cache Screen, tap
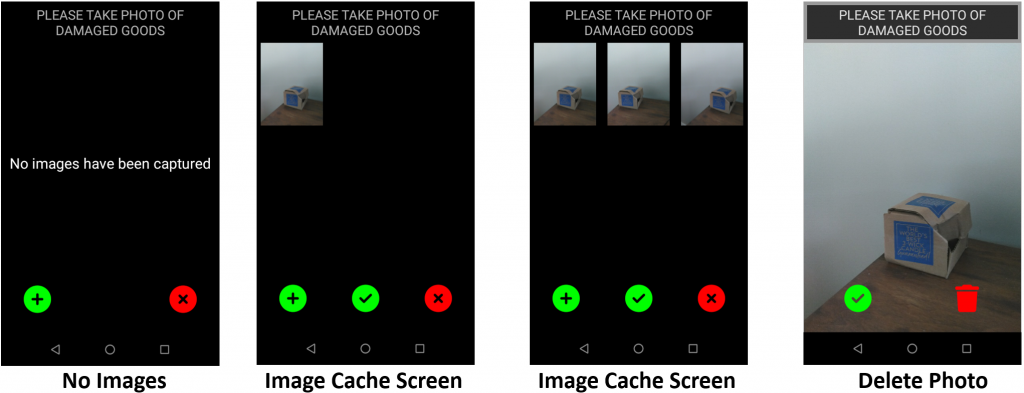
- Tapping on a photo will enlarge the image and allow us to delete it by tapping
- Once you have all the photos to send to the FTP server, Tap
- To dump all the images and exit the Image Capture UI, tap
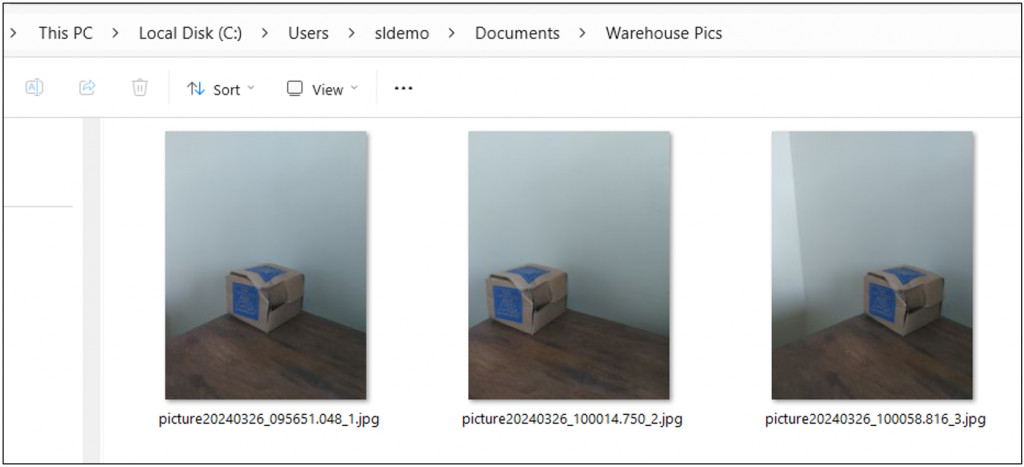
- On your PC using Windows Explorer, navigate to the folder you assigned the FTP server to send the “sldemo” user’s files to.
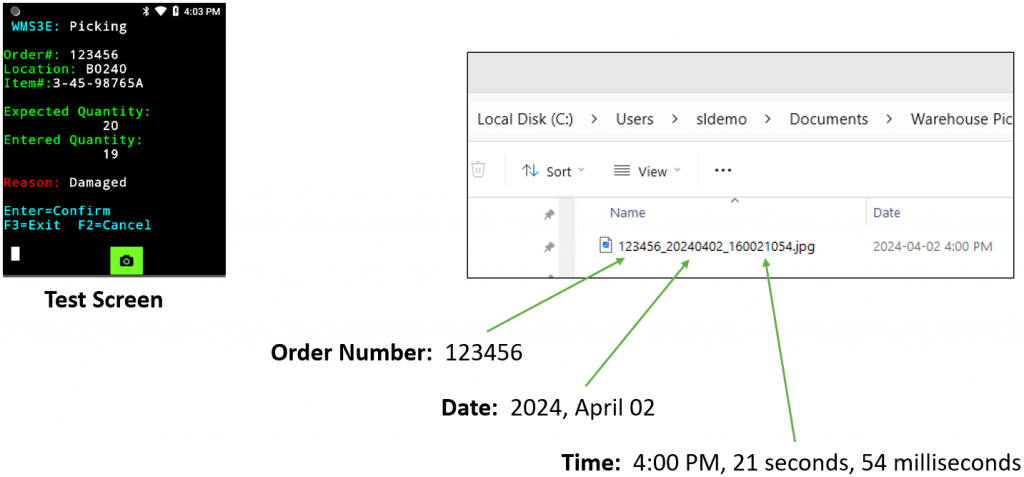
- We can see our files in the screen shot below.
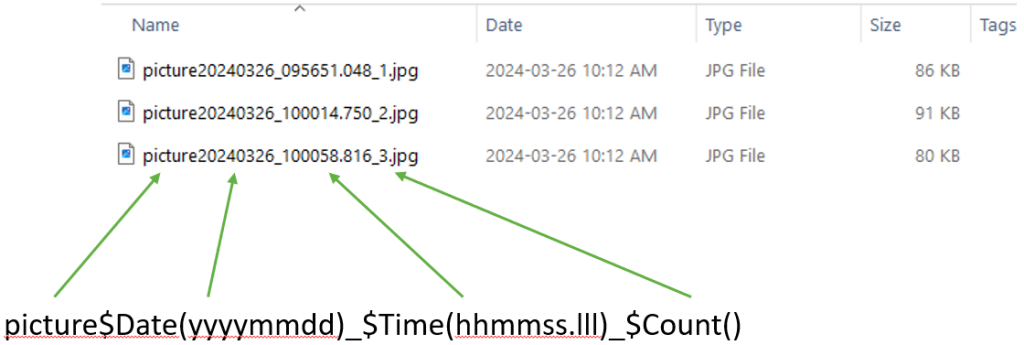
- The default filename structure for the images is shown in the diagram below.
- Typically, warehouse operations will include the Order Number, Time, Date, and perhaps the User within the filename.
- More examples of using the filename structure are covered in the Appendix B of this Tutorial.
Appendix A: .ini File Optional Settings
The FTP server details are configured in the evolve.ini file. The possible options are:
[defaults]
server = 0
- If an Evolve server (BETA) is in use, then the value should be set to “1”
- If 0 or not specified, this value defaults to no Evolve server in use
ftp_server = 85.215.188.38
- Value is the IP address of the FTP or SFTP server in use
- Required for successful functioning
ftp_server_port = 3456
- Value defines the port number used to communicate to the FTP server
- Required for successful functioning
sftp = 1
- Value defines type of server in use (FTP or SFTP)
- If 0 or not specified, this value defaults to FTP
ftp_server_username = sldemo
- Value represents the user name defined in the FTP/SFTP server
- Required for successful functioning
ftp_server_password = sldemo
- Value represents the user password defined in the FTP/SFTP server
- Required for successful functioning
ftp_server_pasv_mode = 1
- FTP can work in either active or passive mode.
- The administrator will specify which one is being used.
- Evolve defaults to Active mode. To configure for passive mode, set the value to 1.
picture_callback = 1
- Some devices (I.E. Honeywell CT40 running Enterprise Home Screen) will return the user to the SmartTE splash screen instead of their session after exiting the Image Capture UI. If this occurs please insert this setting into the .ini file.
ftp_queue_delete_response_codes = 226
- Sometimes disconnection with the FTP server will result in a non-graceful recovery and cause issues with queuing of new images. Different FTP servers may send different response codes in this situation. This line will reset the queue upon reconnecting to the FTP server after the specified response code is received.
Appendix B: Using Optional Parameters in the Image Capture API
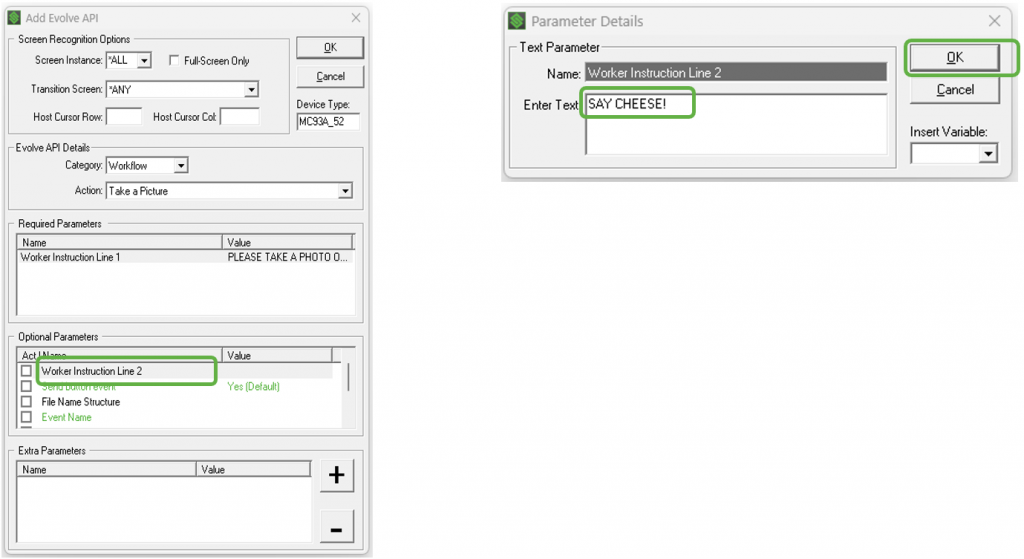
Worker Instruction Line 2
- The Image Capture API provides an option for a second worker instruction line.
- In “Optional Parameters” double click on “Worker Instruction Line 2”.
- For this example, we have entered “SAY CHEESE!”
- Tap “OK”.
- In order to enable any changed settings in “Optional Parameters” it is necessary to check the boxes next to them. Check the box next to “Worker Instruction Line 2”.
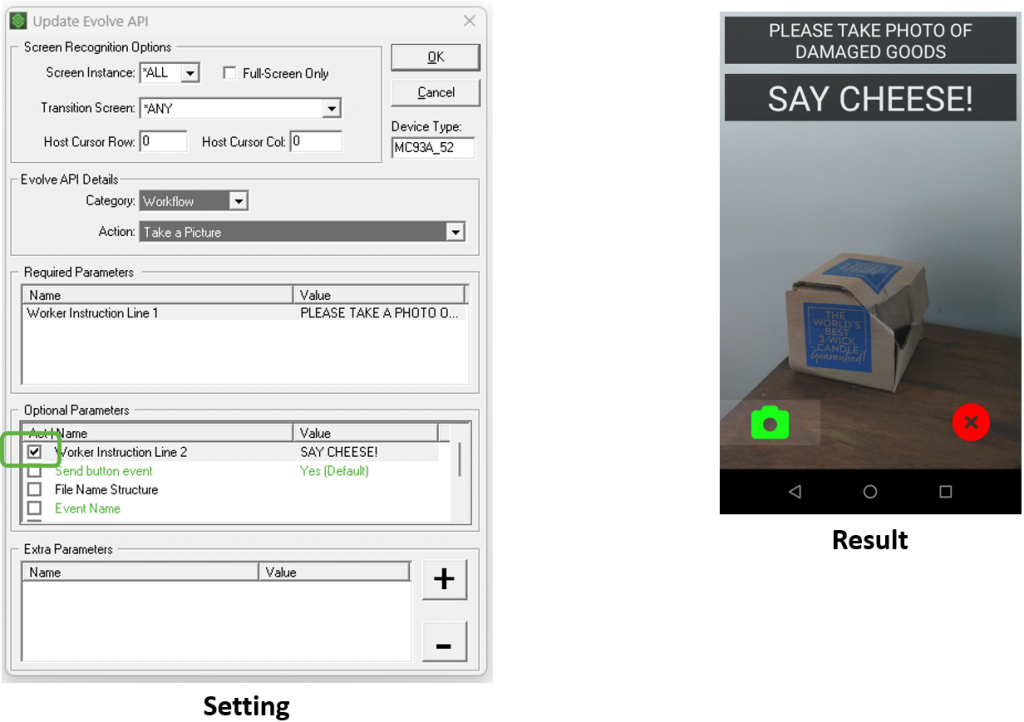
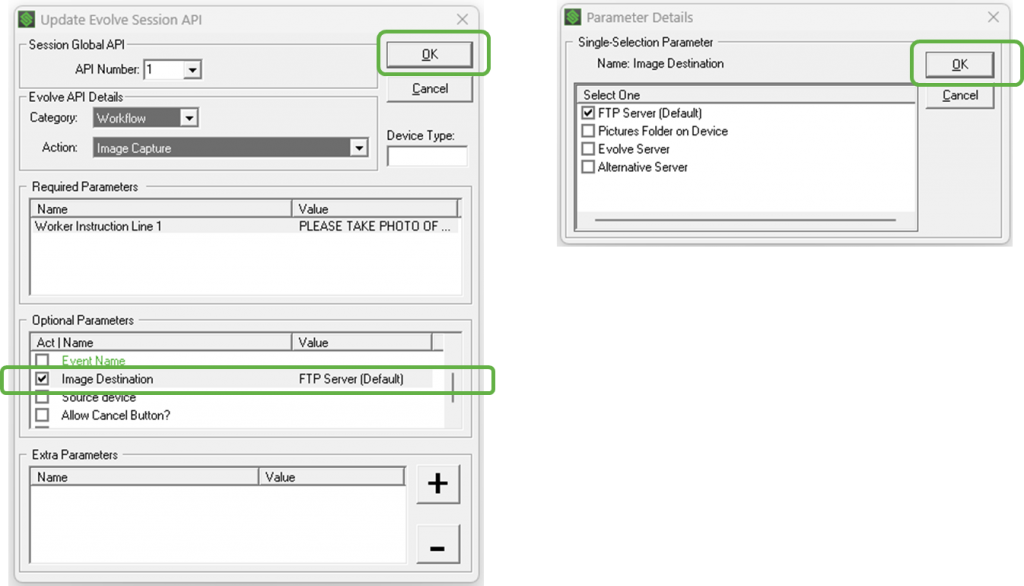
Image Destination
- In “Optional Parameters”, double click on “Image Destination”.
- A “Parameter Details” menu appears with choices on where to send or save the image.
- Only one box can be checked.
- Images are configured by default to be sent via FTP to a server for further processing.
- When the box is checked for “Pictures Folder on Device”, the images are saved to the "DCIM" directory on the mobile device in use.
- “Evolve Server” and “Alternative Server” are BETA features as this time.
- Press “OK” to save changes.
- Back in “Optional Parameters” if a non-default Image Destination was chosen, ensure the box is checked for “Image Destination” to enable the parameter.
- Press “OK” to save changes.
As shown in the screen shot below, images are saved in the mobile device's "DCIM" folder.
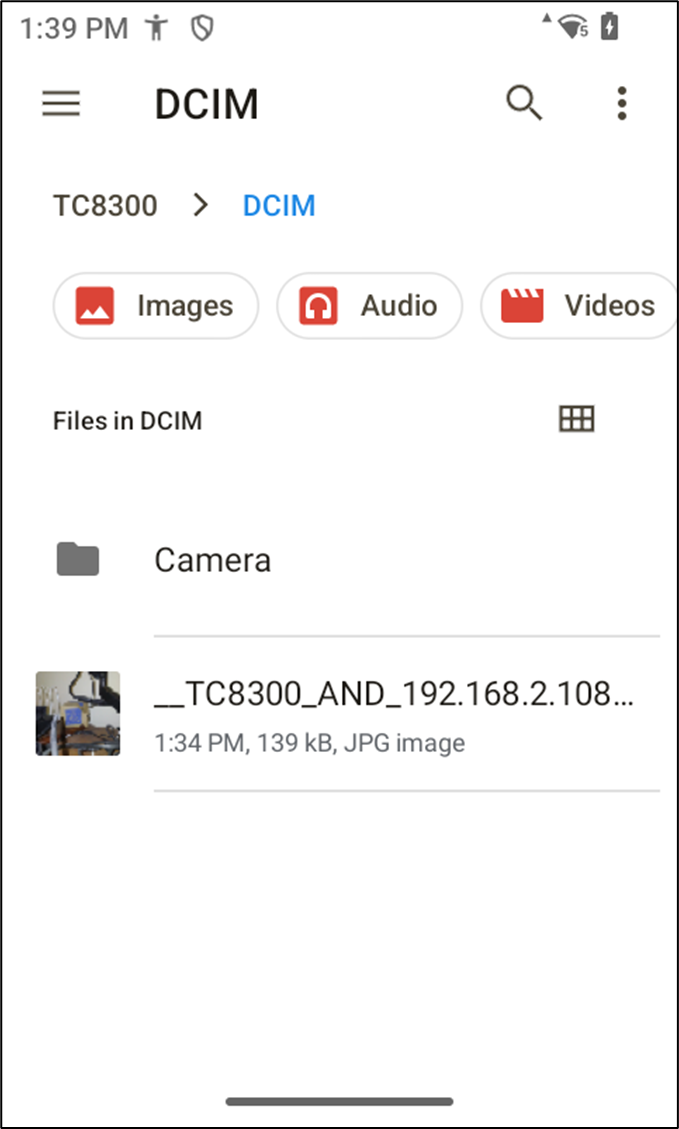
Image Capture Method
- In “Optional Parameters” double click “Select a way to capture the image”.
- A “Parameter Details” menu appears.
- Two modes are available, which are “Use Snapshot” and “Use Camera”.
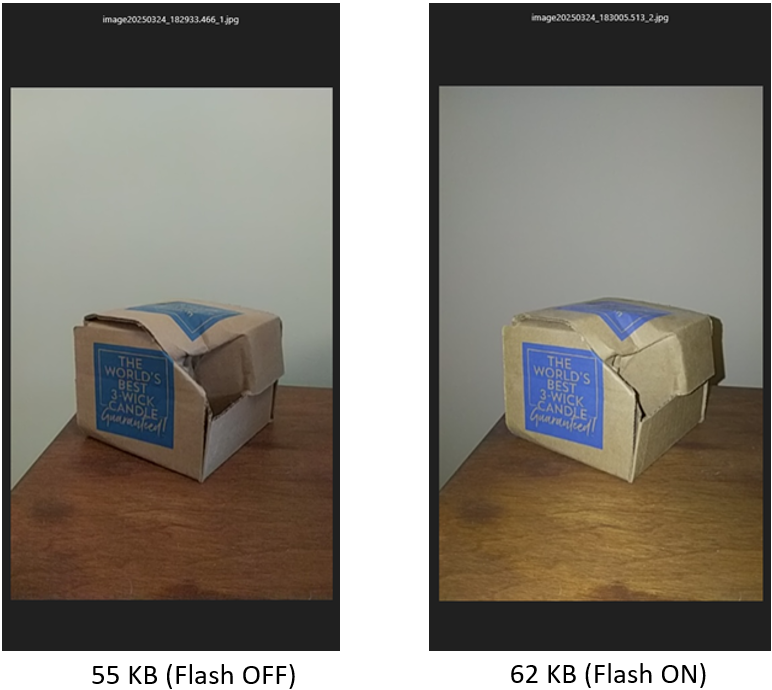
- "Use Snapshot" is the default mode. In this mode, the Evolve agent scrapes a screenshot of the Image Capture UI screen and creates a small file (10's of KB) which is typically sent via FTP to a remote server for further processing.
- The "Use Camera" mode employs the automatic flash control (if supported by the manufacturer) and leverages the onboard camera; outputting a higher resolution image (1,000's of KB).
- The default mode (Use Snapshot) is sufficient for most operations and transmits quickly over WiFi. The "Use Camera" mode option can be leveraged if a higher resolution image is required or the operation decides that AUTOMATIC flash control is a better fit for the users and environment.
- Press “OK” in the “Parameter Details” menu to save changes.
- In “Optional Parameters”, ensure the box is checked to enable the parameter.
- Press “OK” to save changes.

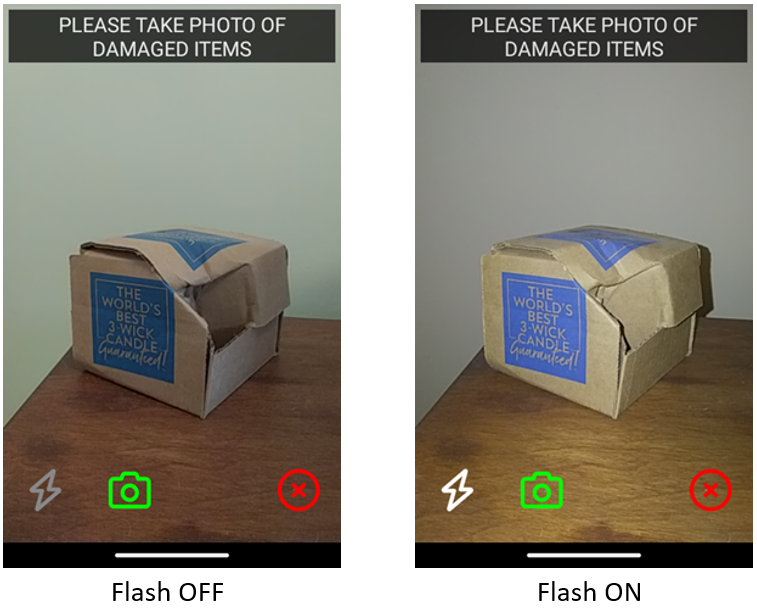
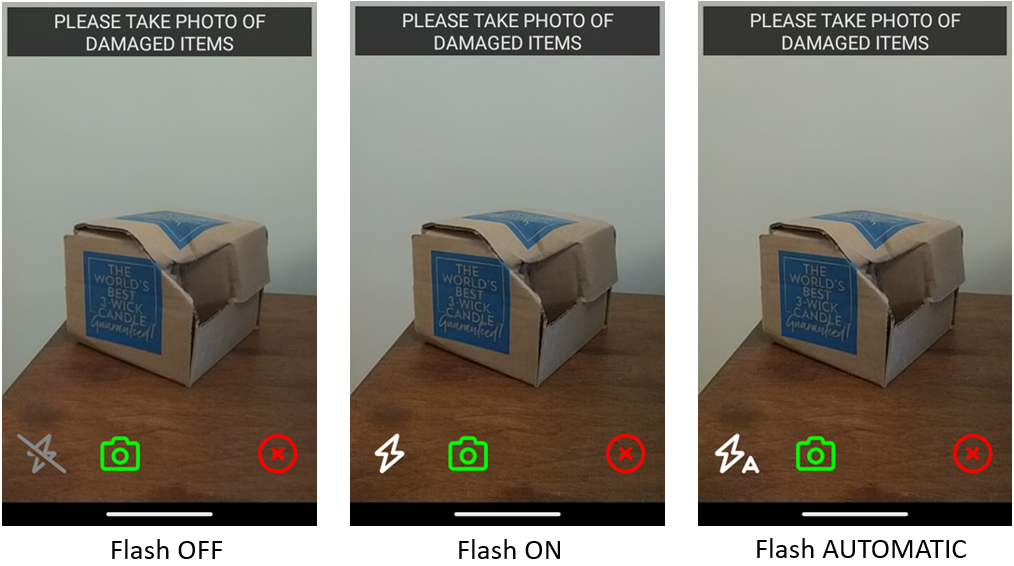
These screenshots below of the Image Capture UI in use are generated using the "Use Snapshot (Default)" option in the Image Capture API definition. Using this setting the worker can set the flash ON or OFF.
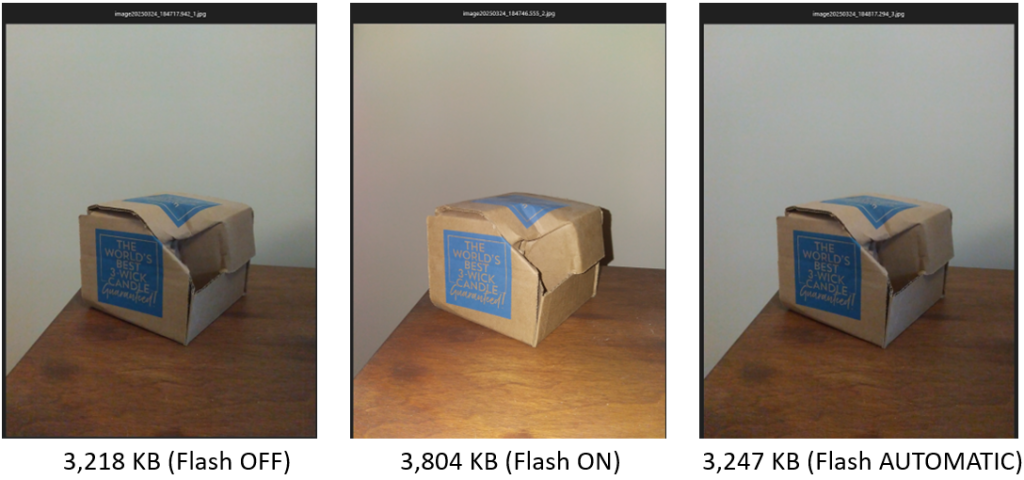
The resulting image files for the image capture examples above are shown below.
These screenshots below of the Image Capture UI in use are generated with the "Use Camera" option in the Image Capture API definition. Using this setting the worker can set the flash ON, OFF, or AUTOMATIC.
The resulting image files for the image capture examples above are shown below.
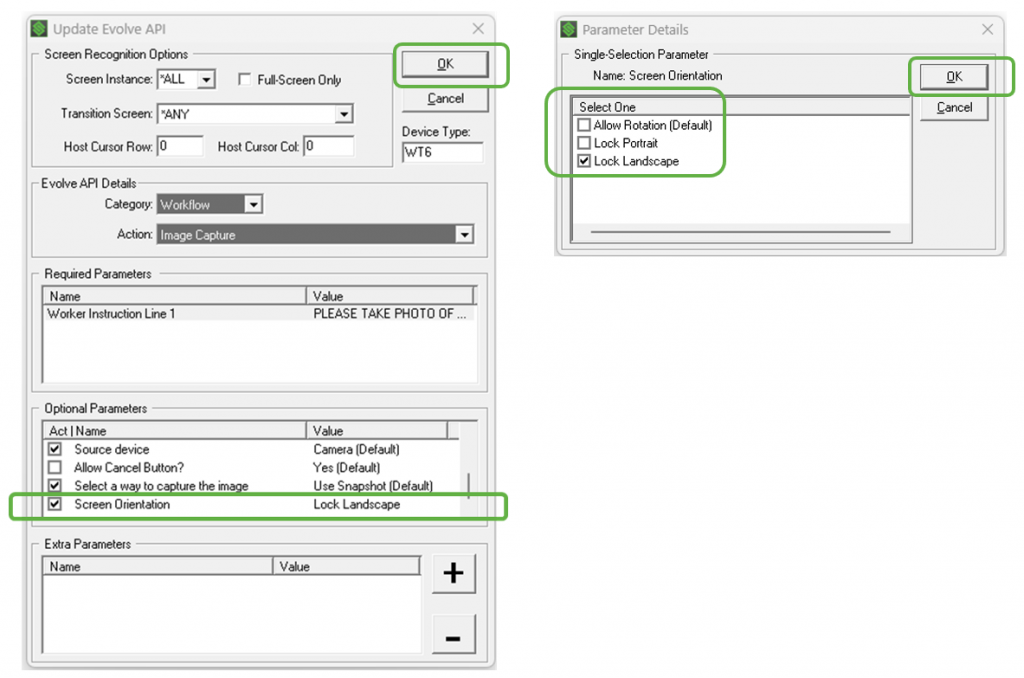
Screen Orientation
- When the Image Capture UI starts up in the Evolve agent, it defaults to auto screen rotation mode; even if the SmartTE client is locked in landscape or portrait mode. This can be useful with a hand-held device, as in some instances, a landscape image may be desired over a portrait image. However, when capturing an image using a landscape wearable, it can be difficult due to the form factor of the device and its constant switching of the screen orientation.
- For this situation, it is possible to set the Image Capture UI to lock in portrait mode or landscape mode.
- In “Optional Parameters” double click on “Screen Orientation”.
- A “Parameter Details” menu will appear. Check the box for the desired option.
- Press “OK”.
- In “Optional Parameters” ensure the box is checked for “Screen Orientation” to enable the parameter.
- Press “OK” to save changes.
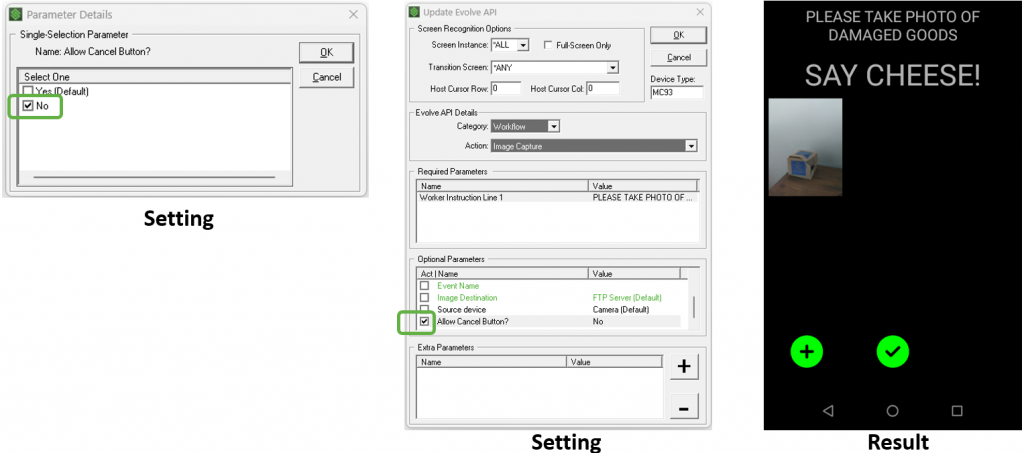
Allow Cancel Button
- By default, this parameter is set to "Yes". In order to override the image capture process, the worker is presented with a Cancel Button
- It is possible to ensure an image is captured by the worker before they can continue in the workflow. By setting this value to "No", the Cancel Button will not appear as an option to the worker on the Image Cache Screen.
- The Cancel Button will still appear on the Image Preview Screen, but tapping this will bring the worker to the Image Cache Screen which will not provide the Cancel Button
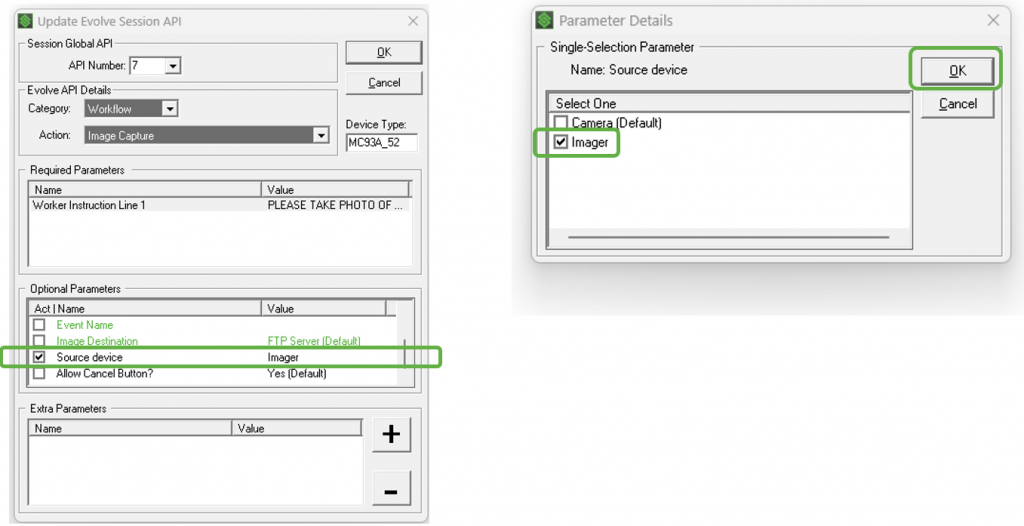
Source Device
- This setting specifies the hardware used to capture the image. The camera on the device is the default. However, some devices do not feature a camera, so the imager is used to take pictures.
SmartTip! Some devices support image capture using the onboard imager instead of a camera. You will need to test whether this functionality is available on your device of choice. Note that pictures taken with the imager will normally be of poorer quality and may be in monochrome.
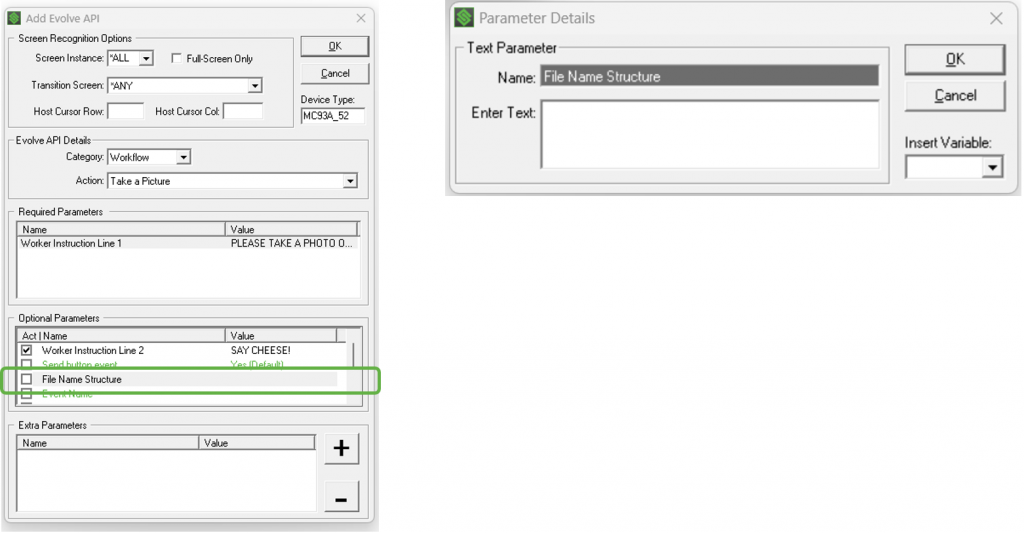
File Name Structure
- Scroll down in the list and double click on “File Name Structure”
- The following “Parameter Details” window should appear
- If no file name structure is specified, this structure is used by default:
picture$Date(yyyymmdd)_$Time(hhmmss.lll)_$Count()
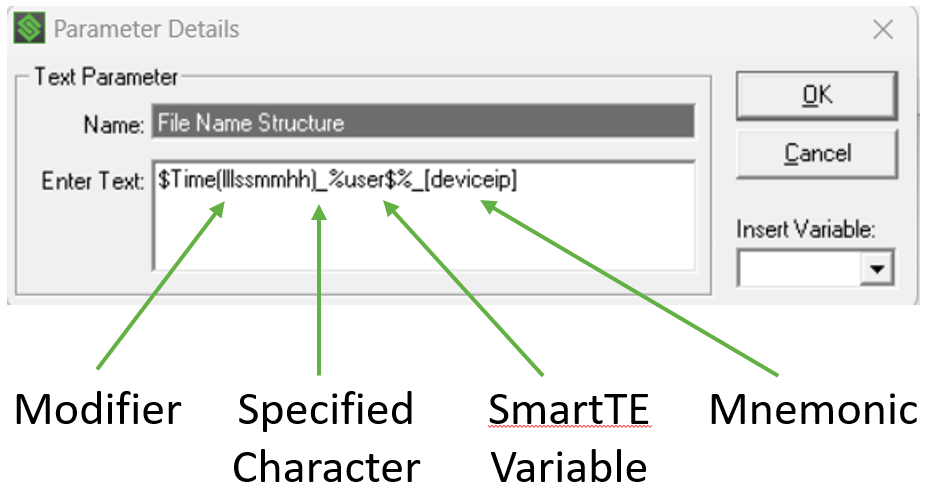
- The file name for the captured image can be structured using combinations of element types including modifiers, specified characters, SmartTE variables, and mnemonics as shown in the diagram below.
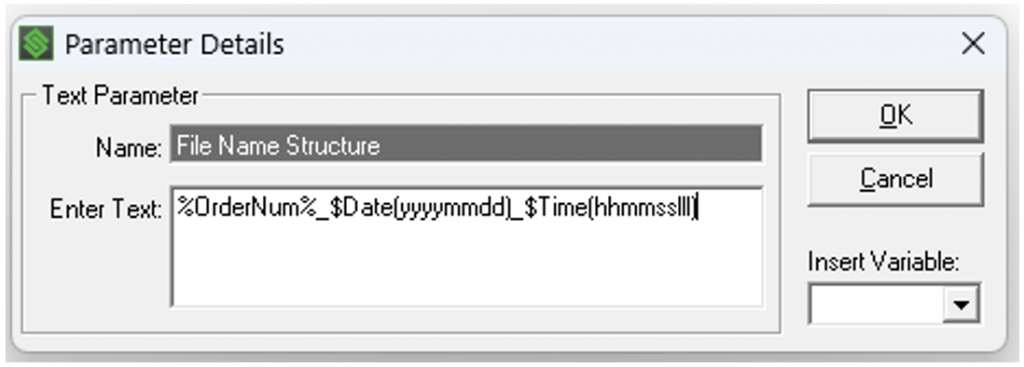
For this exercise, we will include the Order Number, Date and Time as our filename structure for the captured images.
- We have used the “Capture and Set Variables” feature of “Screen Recognition” in the Administrator to capture and define our variable for Order Number and called it “OrderNum”.
SmartTip! Information on Capturing and Setting Variables can be found on the Knowledge Base here.
- In the “Insert Variable” pull-down menu, click on “OrderNum”.
- “%OrderNum% appears in our filename structure wherever the cursor is inside the “Enter Text” window.

- In order to add Date and Time to the filename, we will use these modifiers:
$Date(yyymmdd)
$Time(hhmmsslll)
- We can separate the Order Number, Time and Date within the filename with a specified character as a delimiter. In this example, we are using underscore ("_").
- Once you add this to the file name structure as below, Tap “OK”.
SmartTip! Any specified characters / delimiters must be valid characters for file names.
- Check the box next to “File Name Structure” to enable the Parameter.
- Tap “OK” •Now take a picture to test the file name structure settings.
- Here are the results of our file name structure definition after our test:
Supported Modifiers
- The full list of modifiers supported in the file name structure are outlined below.
- Note that the structure of the modifiers themselves can be altered as well.
$Date(ddmmyyyy)
- Will be substituted by the current date. The user can customize the date format by changing the value between the brackets.
- Example: $Date(dd_mm_yyyy) will be substituted to 01_12_2024
- dd = day, mm = month, yyyy = year
$Time(hhmmsslll)
- Will be substituted by the current time. The user can customize the time format by changing the values between brackets
- Example: $Time(hh_mm_ss_lll) @ 10:00 am will be substituted to 10_00_00_000
- hh = hour, mm = minute, ss = second, lll = millisecond
$UTCDate(ddmmyyy)
- Same as $Date but in UTC time zone.
$UTCTime(hhmmsslll)
- Same as $Time but in UTC time zone.
$Count()
- A counter for the pictures in each message.
$Serial(n)
- Android prevents reporting the serial number. By default, it will report the StayLinked Unique ID instead; similar to behavior with Android 11+ MAC addresses.
- The value of n is the number of letters to take from the Unique ID. If n is not present, the entire Unique ID will be substituted.
- Example: If the Unique ID = BBBBBBBBBBBBB and we use $Serial(3) it will be reported as BBB. If $Serial() is used without a value entered it will be reported as BBBBBBBBBBBBB.
$IP(c)
- The IP Address if the device, c is the delimiter between the IP octets. If the device IP = 192.168.0.100 and the value $IP(_) will be substituted to 192_168_0_100. If no value is used $IP() it will be substituted to 192168000100.
$MAC(c)
- Android devices previous to Android 11 will report the MAC Address of the device.
- The value of c is the chosen delimiter between the MAC octets. If the device MAC = AA:BB:CC:DD:EE:FF and the value of c is “_” the MAC will be reported as AA_BB_CC_DD_EE_FF.
- If delimiters are defined, they must only include valid characters for file names. If invalid file name characters are defined, they will be replaced by “_”. If no value is defined for c in this example, the MAC will be reported as AABBCCDDEEFF.
- Android 11+ devices prevent reporting the MAC address. By default the StayLinked Unique ID will be reported instead.
Supported Mnemonics
Mnemonics supported within the file name structure are:
- [userid]
- [deviceid]
- [deviceip]
- [devicemac]
- [sessionid]
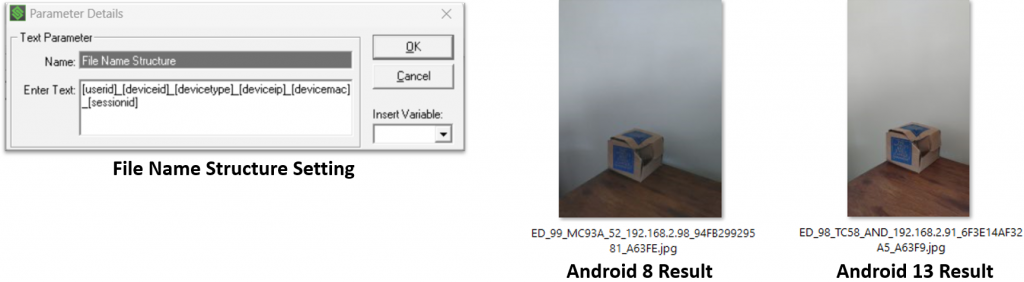
- The output when using these mnemonics is shown in this examples below.
- Pre-Android 11 devices report their MAC address.
- Android 11+ devices report the StayLinked Unique ID in place of MAC (illustrated below).
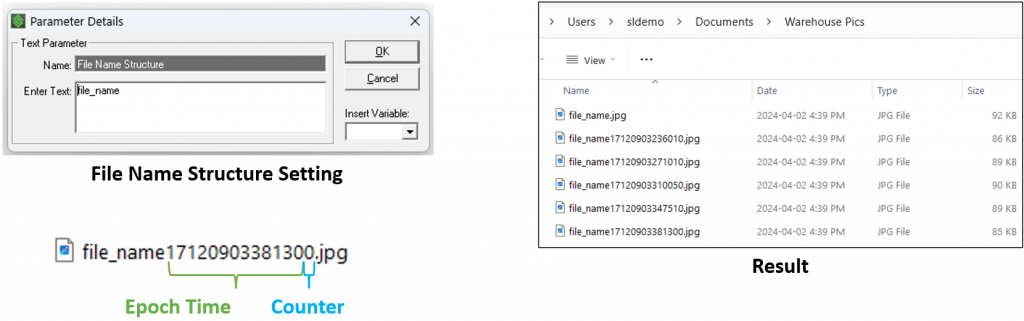
File Name Collision Handling
If no file name structure is specified, or the specified structure does not generate unique file names like in the example below set as “file_name”, the system will automatically generate unique names for subsequent pictures. When the user takes the first photo in this example, it will be named “file_name”. For subsequent photos, the application will find the collision and will automatically add time structure and a count to avoid the collision of naming so the second file will be called File_name1111111110 assuming that the current epoch time in milliseconds is 111111111.
Appendix C: Configuring FTP Server Example
For those who are unfamiliar with FTP servers, here are the steps we took to install one using a free version of Filezilla’s FTP Server.
- If not already done, create a windows local user called “sldemo” with password “sldemo”.
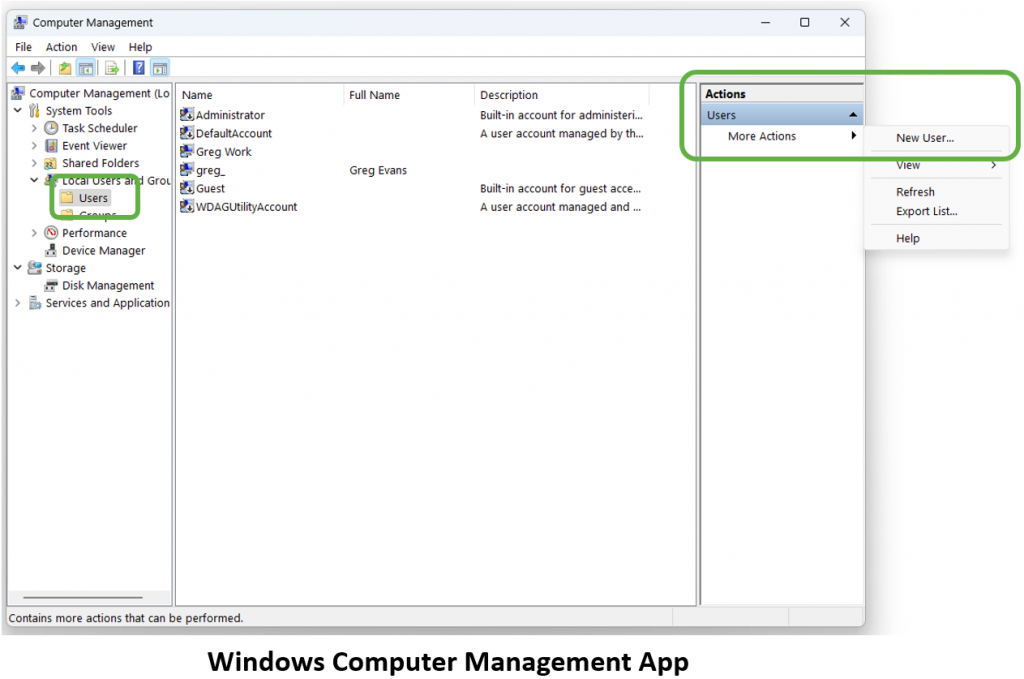
- Launch the “Computer Management” application from the Windows Search window.
- Click “Users” on the left panel.
- Click to expand “More Actions” menu within “Actions” in the right panel.
- Click “New user…”
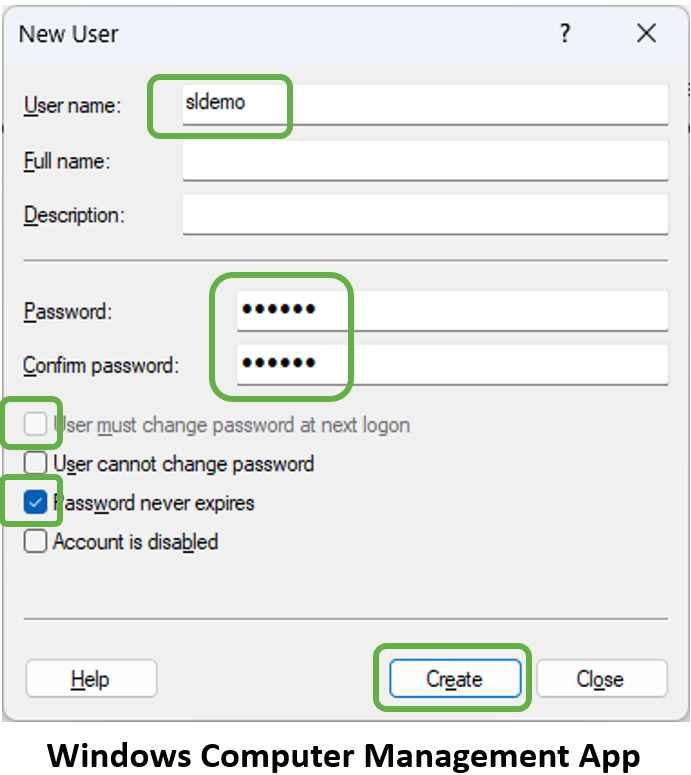
- Enter “sldemo” as User name. “sldemo” is commonly used in StayLinked training materials for the local user and password. If your company’s policy requires a more complex password, create it and substitute that in all relevant training materials.
- Since this is a demonstration environment, we recommend:
- Uncheck “User must change password at next login”.
- Check “Password never expires”.
- Click “Create” and close the “Computer Management” application.
- Using file explorer, create a folder where the photos will land. “C:\Users\sldemo\documents\Warehouse Pics”
- Download Filezilla Server from your favorite source.
- Run .exe file that you downloaded.
- Recommend accepting all installation wizard default settings.
- Use the Windows “Services” application to verify Filezilla is running.
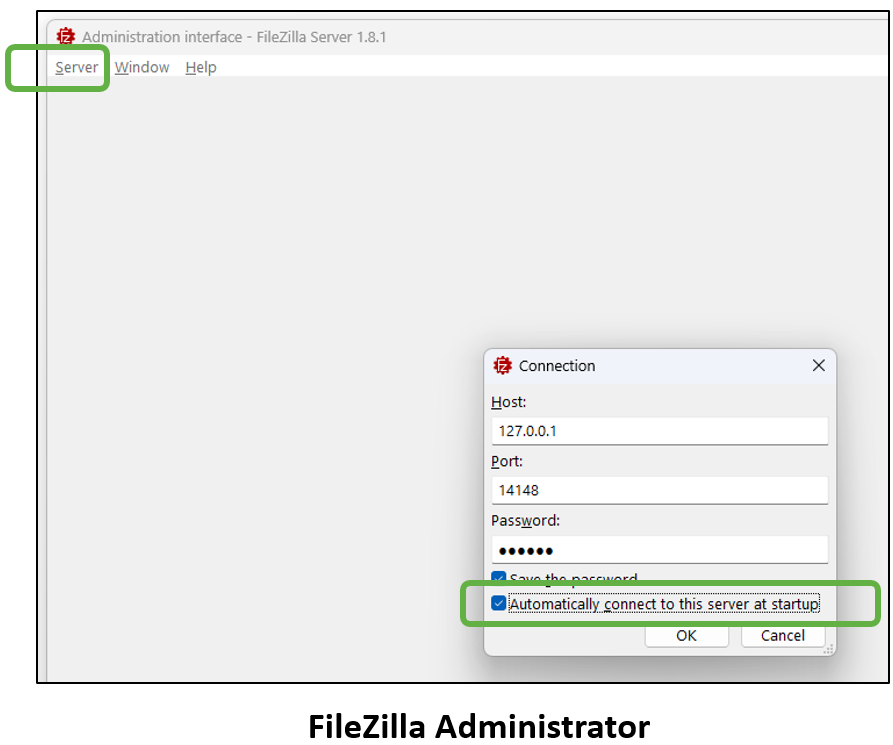
- Launch the Filezilla Administrator.
- From the “Server” pulldown menu, select “Connect”.
- Recommend checking “Automatically connect to this server at startup”.
SmartTip! If other utilities utilizing FTP are installed on the same computer then recommend changing the Filezilla startup type to “Manual” to avoid a conflict.
- Tap “OK”.
- Click “Server”.
- Click “Configure”.
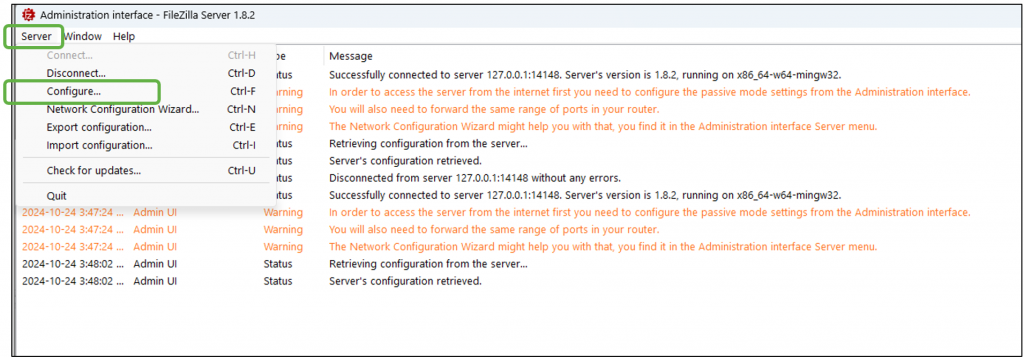
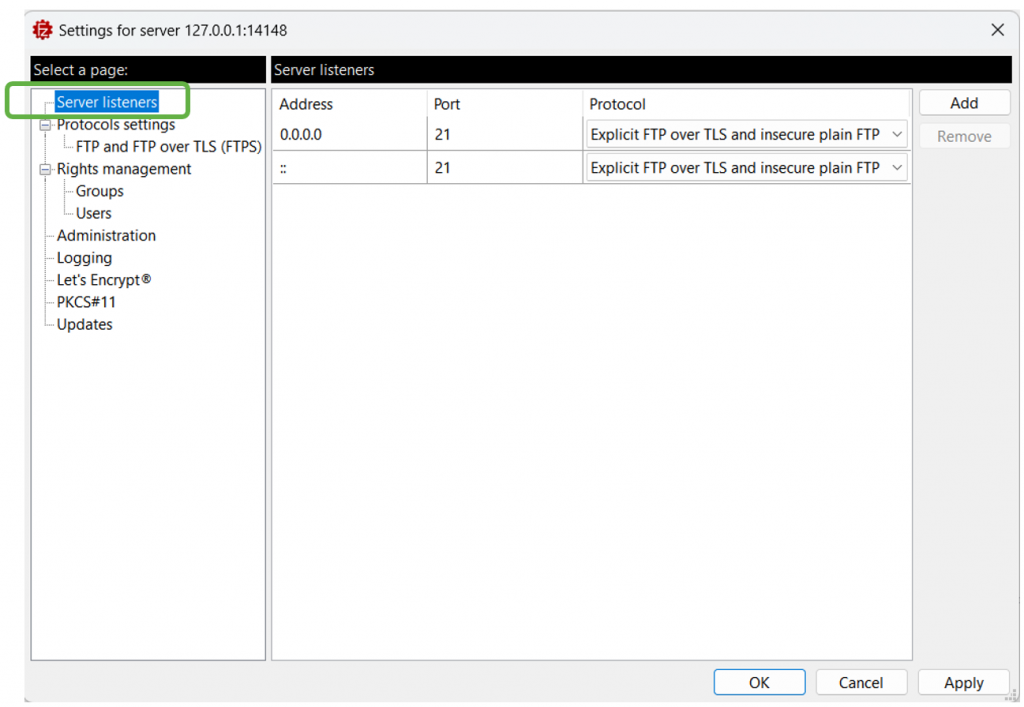
- Click "Server listeners" and validate that the settings match the example shown below and click "OK" once verified.
Next Step: Add a User
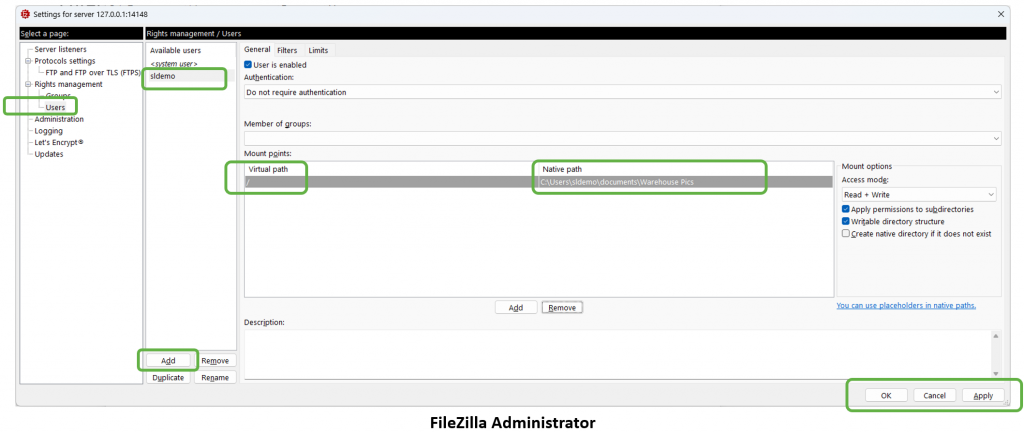
- Click “Users” in left panel.
- Click “Add” in the center panel.
- Enter “sldemo” for the username.
- Enter “/” in the “Virtual path.
- Enter “C:\Users\sldemo\documents\Warehouse Pics” in the “Native path”.
- Click “Apply”, “OK”.
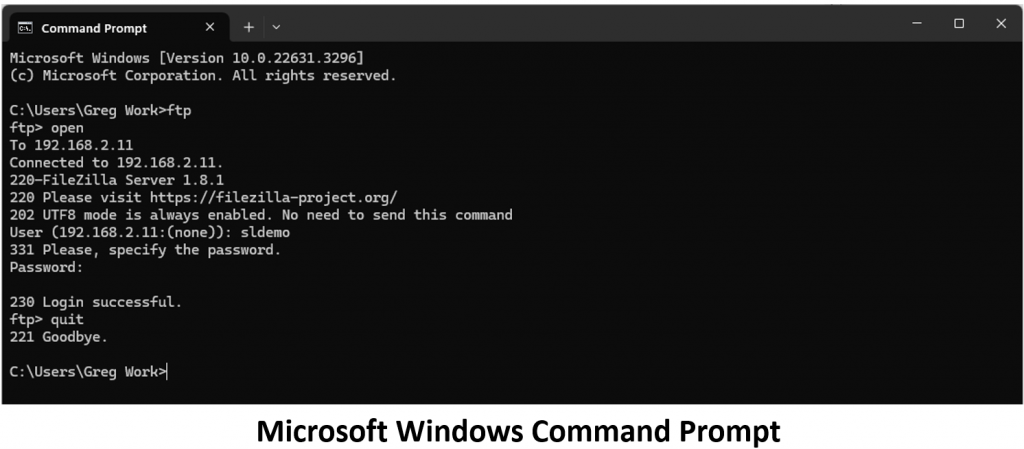
- To test and confirm that our FTP user is working, open a Command Prompt window.
- Type “ftp” <enter>. •Type “open” <enter>.
- Type <ipaddress> <enter>.
- At the user prompt type “sldemo” <enter>.
- At Password prompt type “sldemo” <enter>.
- Ensure Login is successful.
- Type “quit” <enter>.
- Close Command Prompt window or type “exit” <enter>.
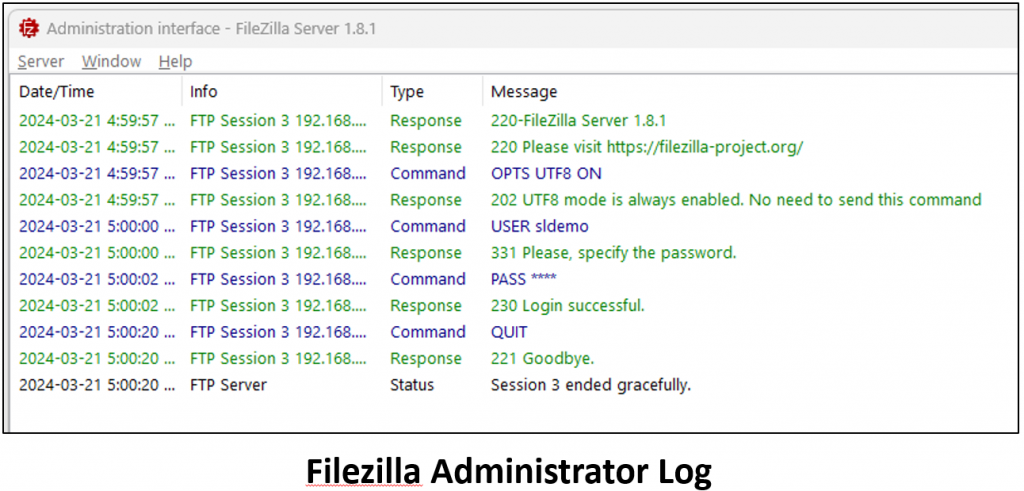
- If you refer to the Filezilla Administrator, the user test we just ran appears in the log.
- The Filezilla Administrator log can be a helpful visual when demonstrating the Image Capture feature.
Appendix D: Setting Up a Camera Button Using SmartTiles
Camera Button
We can enable workers to capture an image without automatically triggering the Image Capture UI within a workflow. In this exercise, we will create a “Camera” button using SmartTiles. This button can be made available on all screens or specific screens only when called. More information on using SmartTiles can be found in the Knowledge Base here.
Step 1 – Define the API that will enable the Camera UI
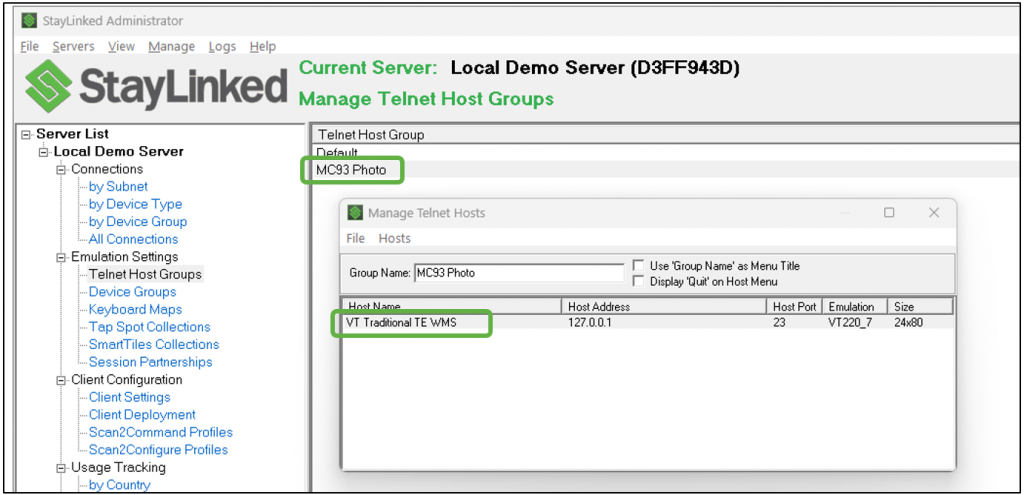
- In “Telnet Host Groups”, double click on the relevant host group, then double click on the relevant host. In this example, the host group is “MC93 Photo” and the host is “VT Traditional TE WMS”.
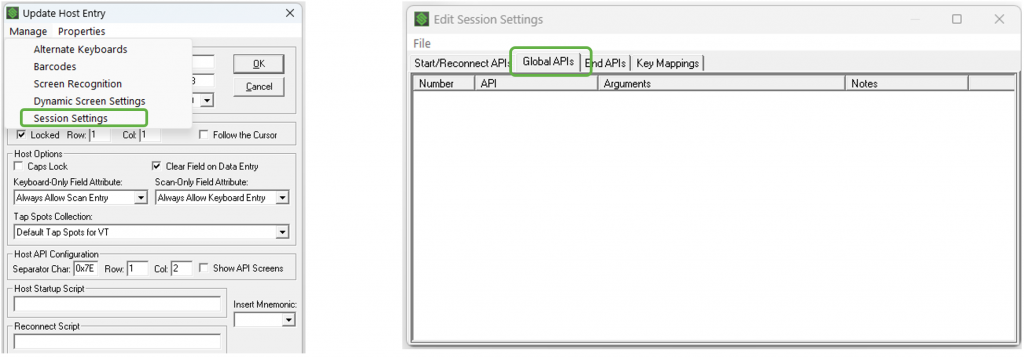
- Click “Manage” and choose “Session Settings” from the pulldown menu.
- In the “Edit Session Settings” window, choose the Global APIs tab. Any APIs that are already defined will appear in this window with their associated number. We will be assigning a number for the global API we will define for Image Capture, so it is important to avoid a duplicate number to another one in this list.
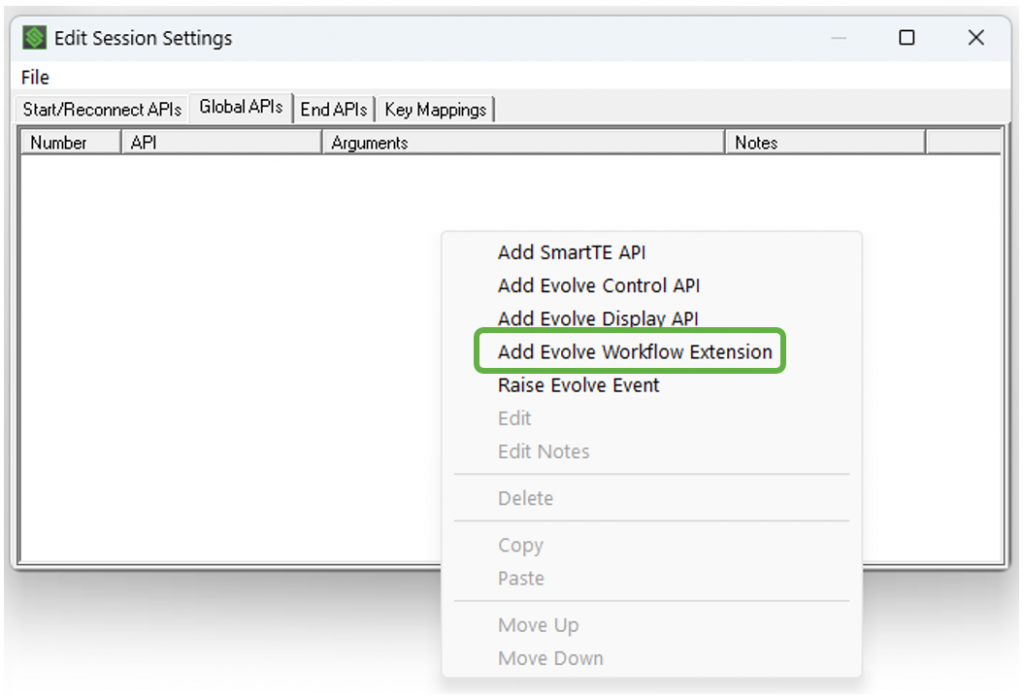
- Right click in the white area and select “Add Evolve Workflow Extension”.
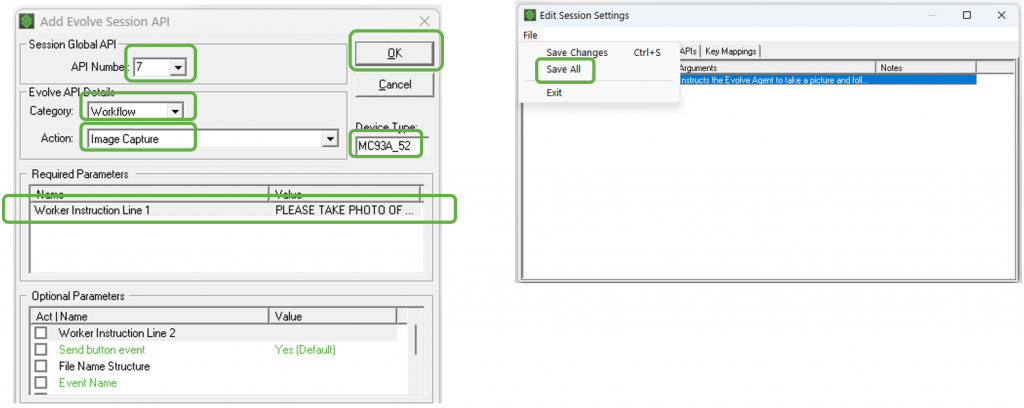
- Assign a number for this Global API. For this exercise, we have chosen “7”.
- Choose “Workflow” for the Category and “Image Capture” for the Action.
- In “Required Parameters”, Enter an instruction for the worker to take a photo.
- Ensure Device Type is configured. We have set to MC93A_52 for this exercise.
- Click “OK” and “Save all” and our Global API for Image Capture is defined.
Step 2 – Create SmartTile collection for the camera button
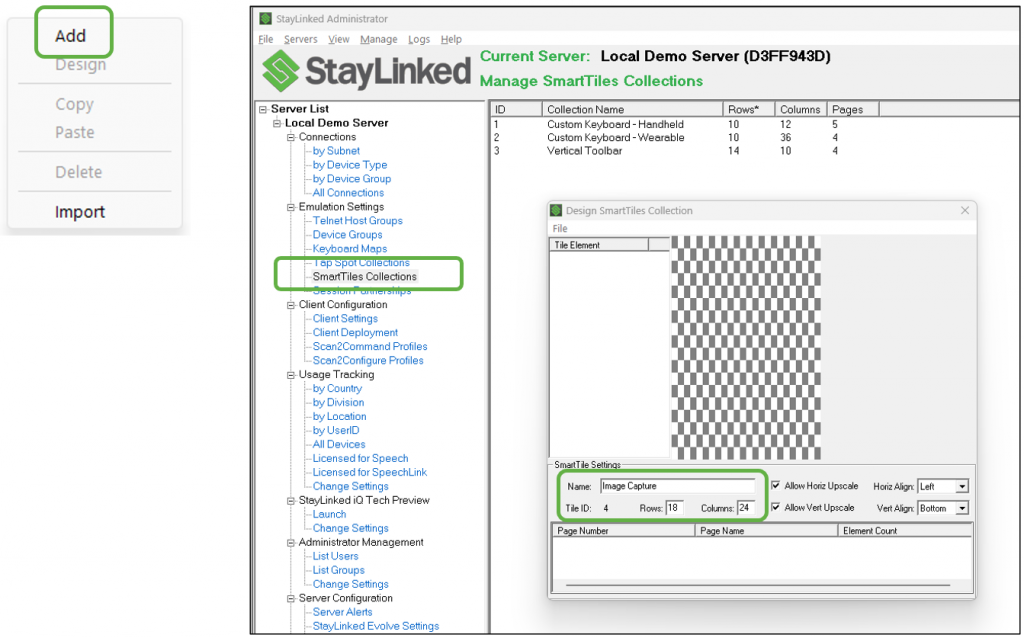
- In the Administrator in “SmartTiles Collections”, right click in the white area and select “Add”.
- Enter a name for the collection. For this exercise we have entered “Image Capture”.
- Set the Rows and Columns to match the target device.
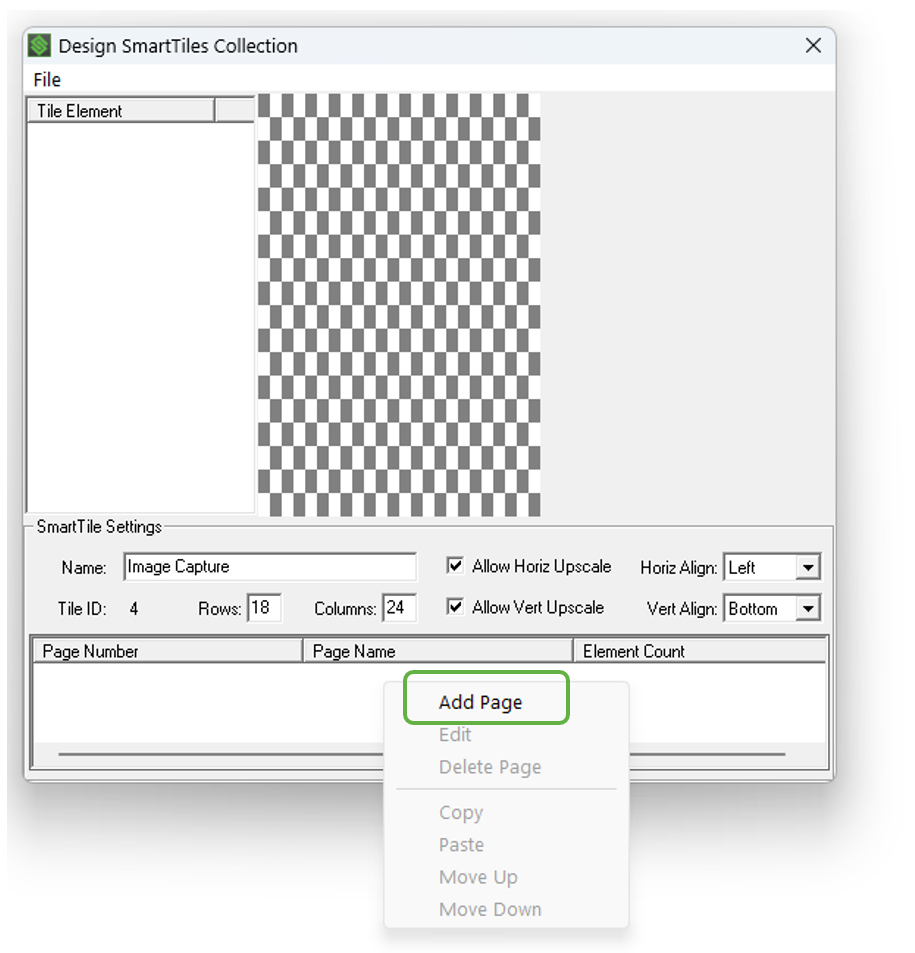
- Right click in the white area and select “add page”.
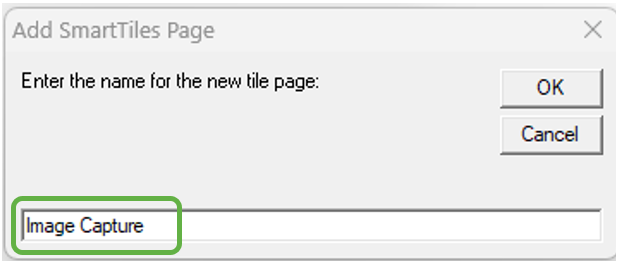
- Enter a name for the page. For this exercise we have entered “Image Capture”.
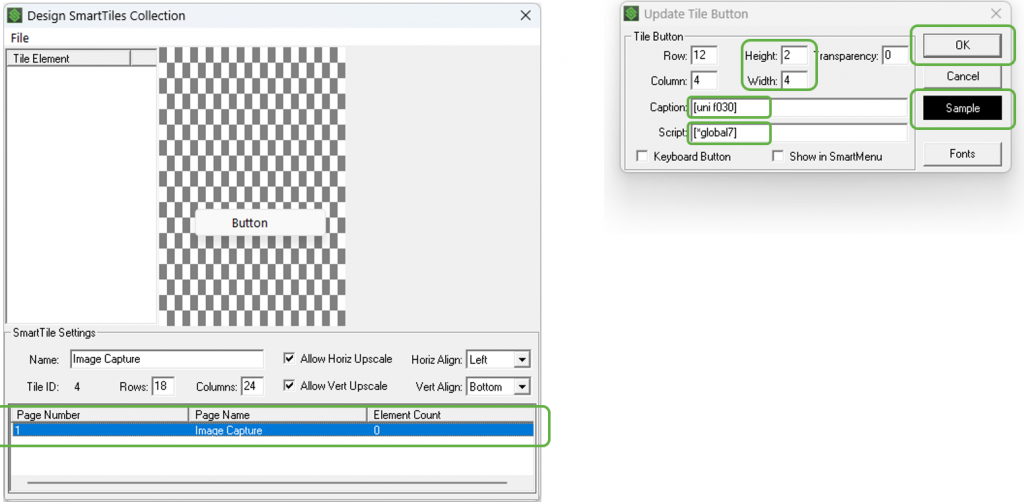
- Our page name now appears in the list as Page Number "1".
- Right click in the checkered area, then left click "Button".
- The "Add Tile Button" menu will appear.
- In the "Caption" field, add "[uni f030]" as shown below. This is the Unicode in Font Awesome for .
- For this exercise, we have set the size to Height: 3, Width: 6.
- Set the color to your preference.
- In the "Script" field, add [*global7]. Press "OK".
- Now when the worker taps the camera icon it will trigger Global API 7 which launches the Camera UI.
SmartTip! Once we test this we will likely need to come back and adjust settings for the button’s position and/or size.
- Once the button appears in the checkered area, click and drag it to reposition as necessary.
- For this exercise using the StayLinked inhouse WMS demo we have moved it to the far right, bottom corner.
- Click on “File” and select “Save Changes” from the drop-down menu.
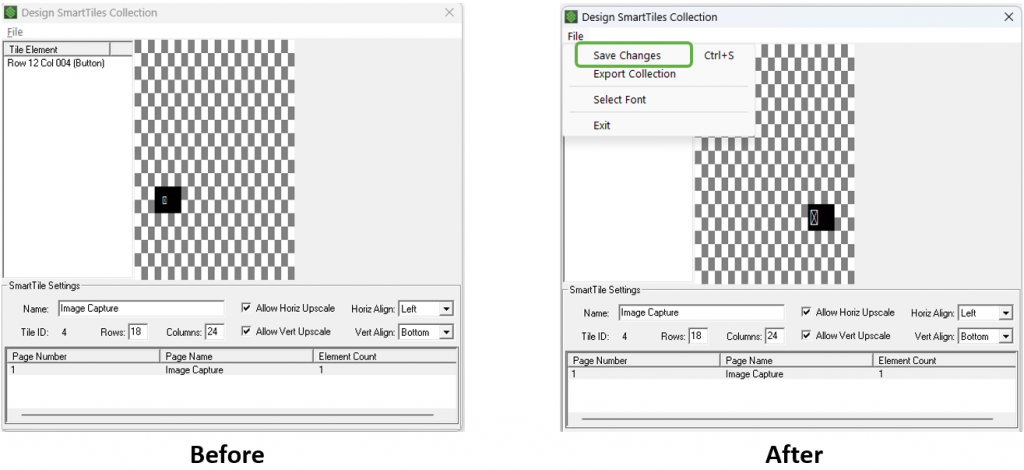
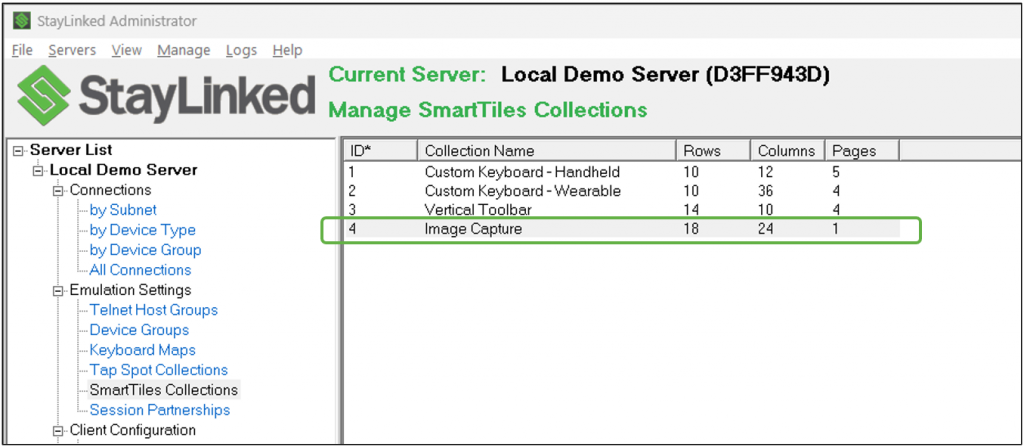
- The new SmartTile collection appears now in the list.
- Take note of its number. In this example it is Collection #4 with a single page.
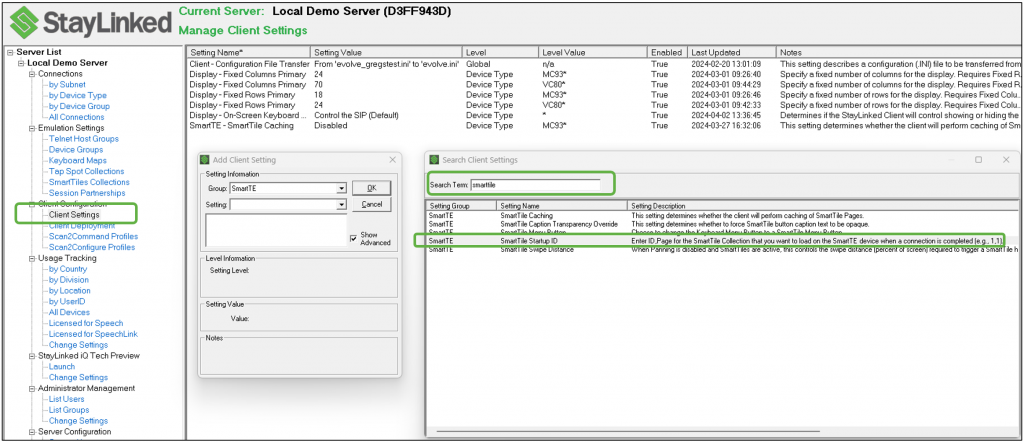
- In “Client Settings” right click in the white area and choose “Search” from the menu.
- Enter “smarttile” into the “Search Term” entry field and press Enter.
- Double click on “SmartTile Startup ID”.
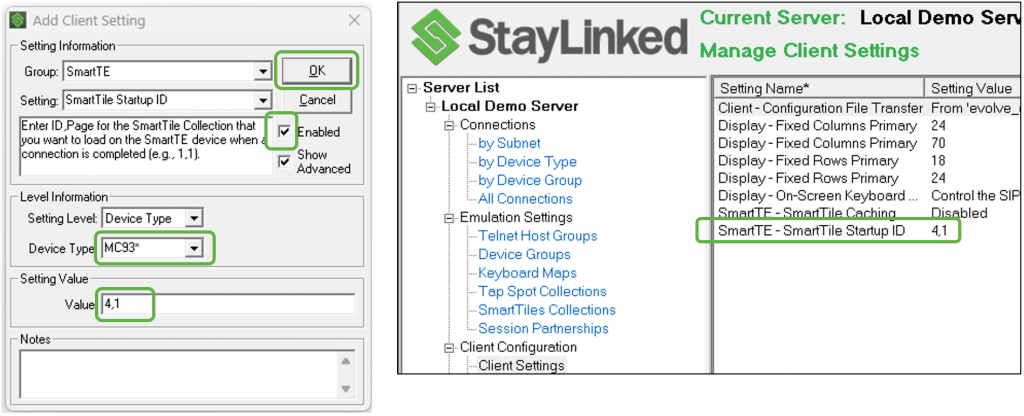
- Set the device type accordingly. In this example we have used the MC93 with wildcard.
- Enter the SmartTile collection number and the page number with the camera button on it separated by a comma. In this example, it is SmartTile collection #4, page #1.
- Check “Enabled” to enable the setting.
- Click “OK”.
- Our new SmartTile collection appears in the “Client Settings” list.
Step 3 – Test and Adjust
- Terminate any active sessions and log into a new session on the mobile device.
- The SmartTile Client Setting we defined displays the camera button once the session begins.
- Test the camera button to ensure it launches the Image Capture UI.
- Run through a variety of screens in the WMS to ensure the button isn’t interfering with other information and adjust as necessary in the SmartTile collection definition.
- Leverage Screen Recognition and add pages to the SmartTile collection if the button requires different locations on specific screens.
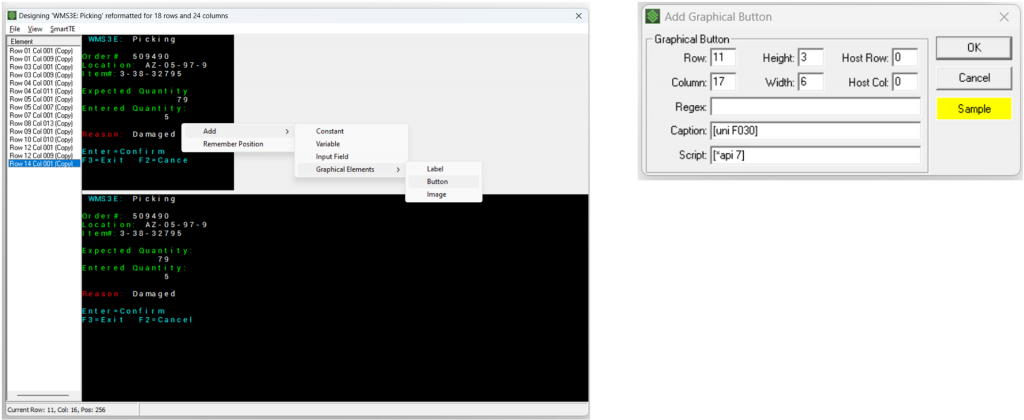
Alternate Method: Using a Reformatted Screen with a camera button
- Copy the original screen elements into a designer screen.
- Add a “Button” as a “Graphical Element”.
- Define the graphical element in the same manner as the smart tile button call the API.
- More information on using Designer Screens can be found on the knowledge base here.
Appendix E: Troubleshooting
General Troubleshooting Tips
- If you are capturing images and sending them from the Image Capture UI, but they are not ending up in the expected directory, check the settings in your FTP server’s administrator. See Appendix C of this tutorial.
- Trying a different device or resetting the device you are using can overcome issues. Sometimes a factory reset is required to ensure you are starting from a clean slate on the mobile device.
- The resolution for the captured images will match to the resolution of screenshots taken on the mobile device in use.
- If the Image Capture UI does not appear when it should, double check in the Administrator under “Device Groups” to ensure that “Auto Add Evolve Device Access” is checked for each device group that will be capturing images.

SmartTip! A variety of log files are available to assist with troubleshooting. Information on accessing the various log files can be found here.
- Leverage the Session Log to verify the screen we want the Camera UI to be triggered on is being recognized.
- As well, we can see the SmartTE client requesting the Evolve agent to launch the Image Capture UI including any instructions for the worker that we have defined in the Image Capture API.
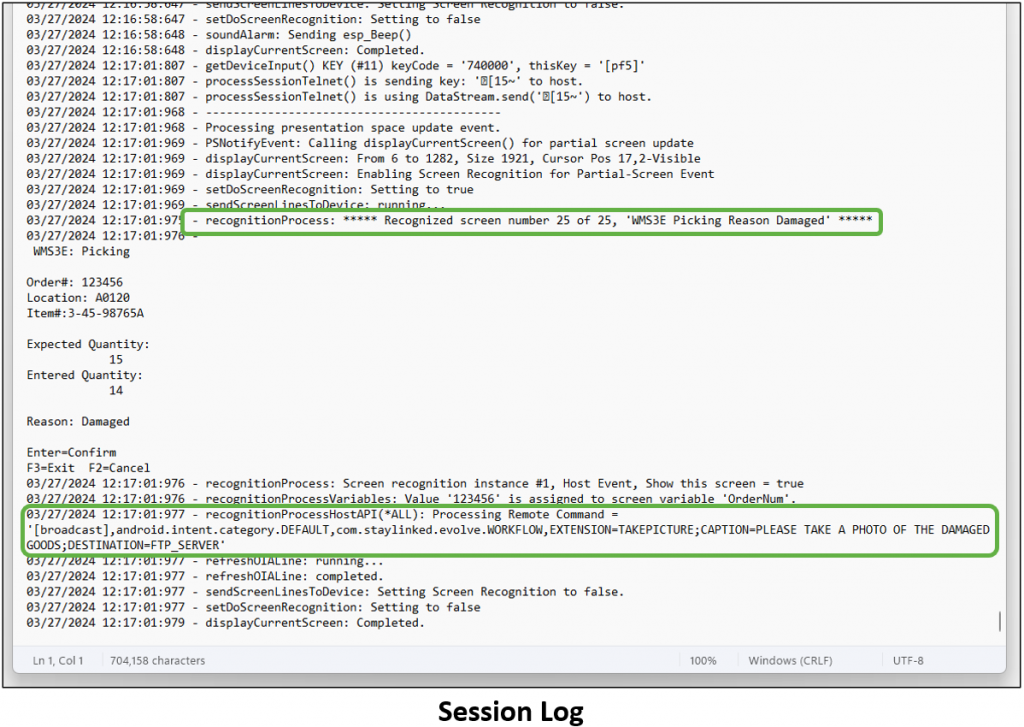
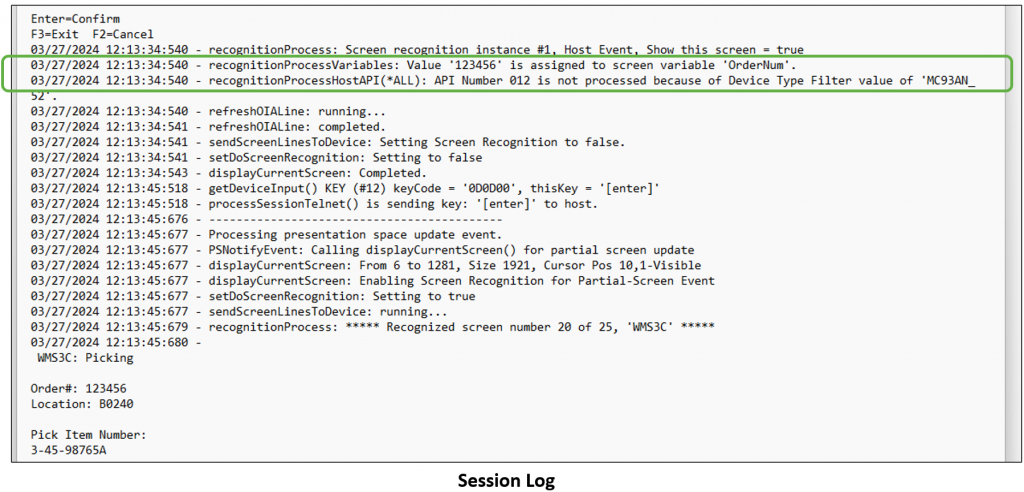
- The Session log is also useful to ensure any variables are being captured, the proper API number was defined and the device filter is set properly.
- In the example below, the device filter has an additional “N” in it. As a result, the Image Capture UI is not launched.
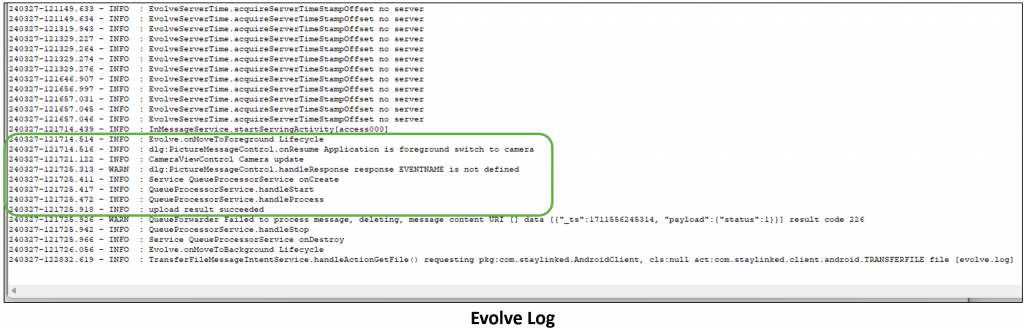
- Leverage the Evolve log to verify that the Evolve agent has launched the camera UI and uploaded the picture successfully to the FTP server.
- If the picture files are not making it into the expected directory, the FTP server settings and log files are your next thing to check.
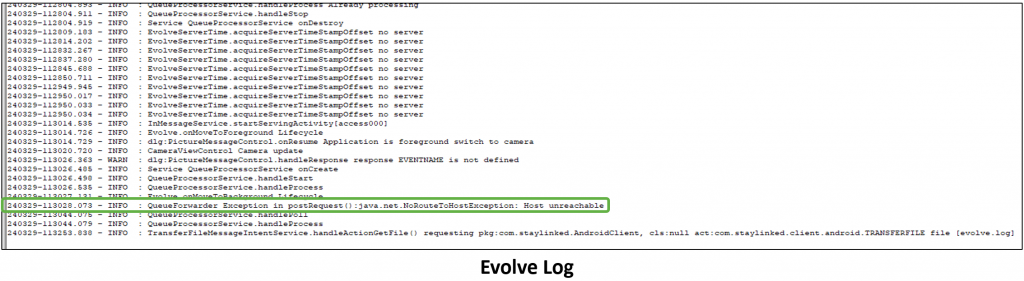
- A “Host unreachable” message in the Evolve log can indicate a missing or incorrect IP address for the FTP server.
- Check the evolve.ini file to ensure everything is there with the correct values (FTP IP address, Port, etc).
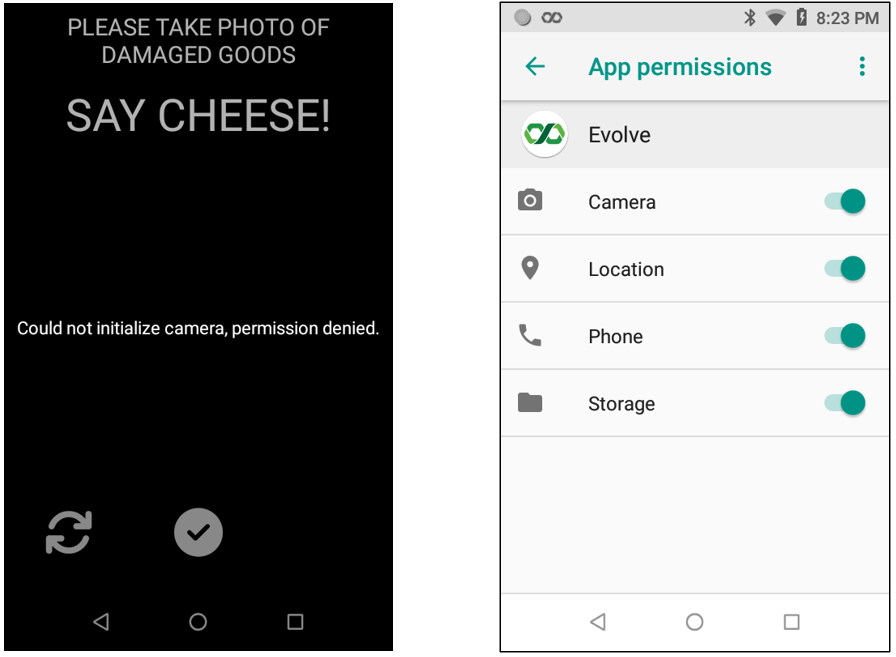
- We will see this screen when there is an issue with the permissions defined for the Evolve API.
- On the mobile device, check in Android Settings > Apps and Notifications to ensure the Evolve API has the necessary permissions defined.
Share the post "Image Capture"